QUILT PATTERN

Rag Quilt Pattern – The Ultimate Beginner-Friendly Quilting Project

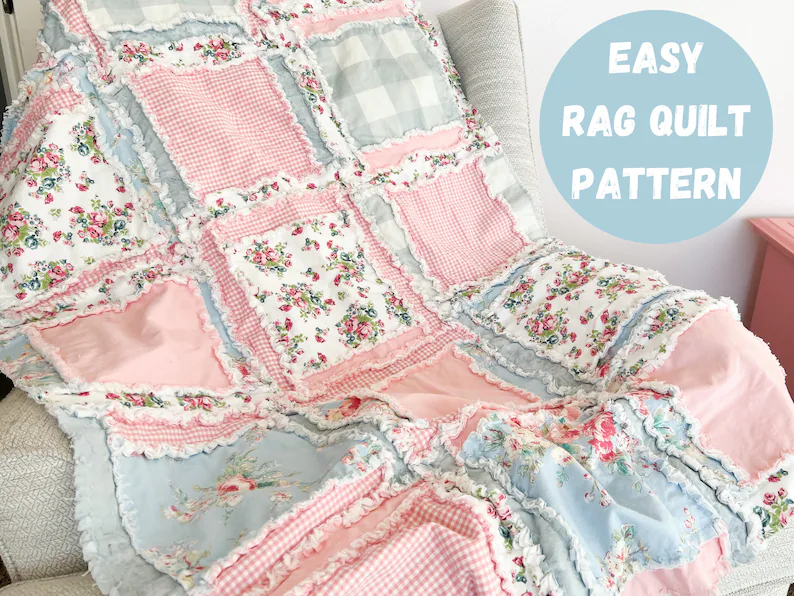
If you’re looking for a cozy, soft, and incredibly beginner-friendly quilting project, a Rag Quilt Pattern is the perfect place to start.

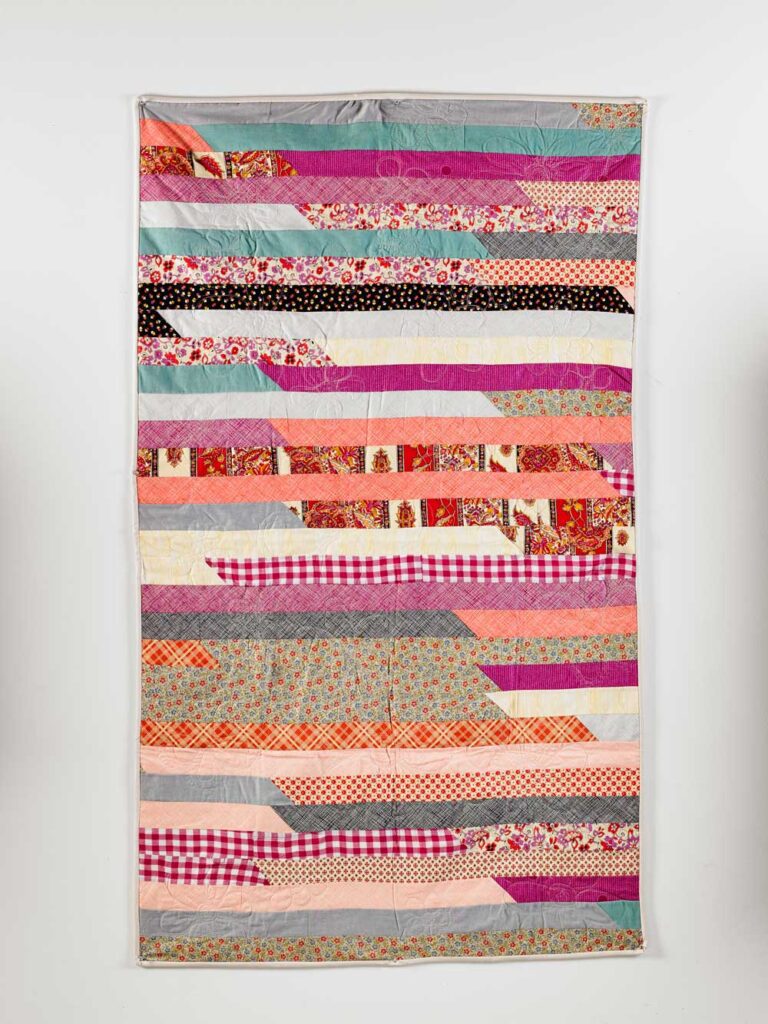
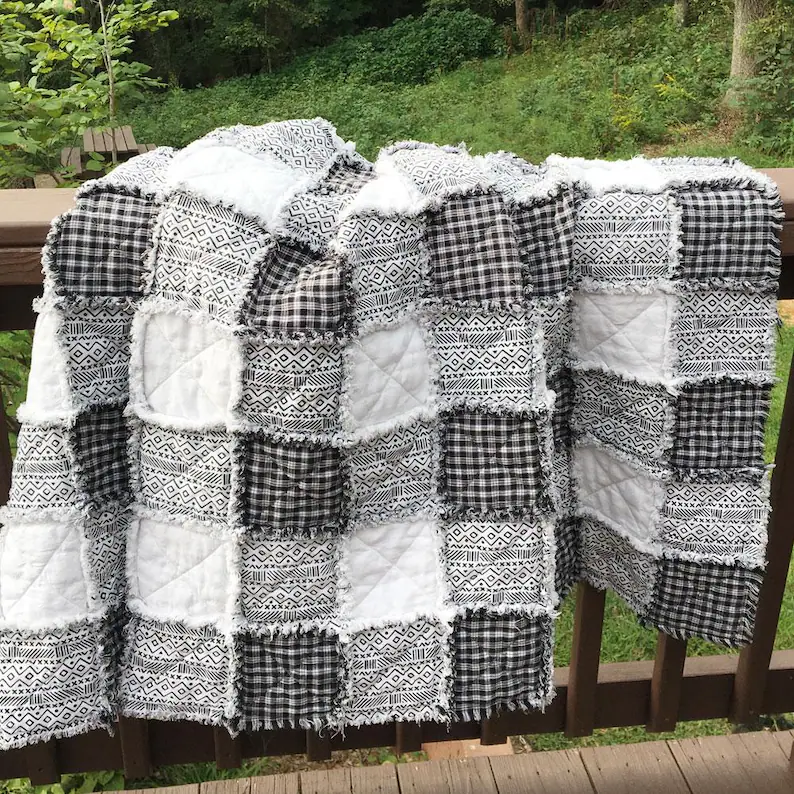
Unlike traditional quilts, a rag quilt is designed with exposed seams that fray beautifully after washing, creating a textured, rustic finish. It’s one of the easiest quilt styles to make — and one of the most satisfying.

In this complete guide, you’ll learn:

  • What makes a Rag Quilt Pattern unique
  • The history behind rag quilting
  • Step-by-step instructions
  • Pro quilting tips
  • Size and gift ideas
  • Care instructions
  • Troubleshooting
  • FAQs
  • And a full video tutorial

🎥 Full video tutorial here:


The History of the Rag Quilt Pattern

The Rag Quilt Pattern became popular in the late 20th century as a more relaxed and rustic alternative to traditional quilting.

While classic quilts hide seam allowances inside the quilt sandwich, rag quilts intentionally place seams outward. After washing, these seams fray and soften, creating the signature “ragged” look.

Rag quilts became popular because they:

  • Are beginner-friendly
  • Don’t require precise seam matching
  • Use simple square construction
  • Create a soft, cozy texture
  • Are perfect for flannel fabrics

Today, the Rag Quilt Pattern is trending again thanks to:

  • Cottagecore aesthetics
  • Farmhouse home decor
  • Cozy handmade gifts
  • Easy beginner sewing projects

About This Rag Quilt Pattern

This Rag Quilt Pattern is perfect for beginners and quick weekend projects.

Skill Level:

Beginner

Construction Style:

  • Quilt-as-you-go method
  • Exposed seam allowances
  • Square-based layout

Why You’ll Love This Pattern:

  • No binding required
  • Very forgiving seams
  • Quick assembly
  • Ideal for flannel or cotton
  • Beautiful textured finish after washing

Materials Needed (Affiliate Suggestions)

To achieve the best results for your Rag Quilt Pattern, here are recommended supplies:

🧵 Flannel Fabric Bundle
👉 https://amzn.to/3OxMOVe

✂️ Rotary Cutter & Mat Set
👉 https://amzn.to/4aOq9vb

📏 Quilting Ruler
👉 https://amzn.to/3ZU9dOY

🪡 Heavy Duty Sewing Needles (for flannel layers)
👉 https://amzn.to/4rAesiT

🧶 Cotton Batting (Low Loft)
👉 https://amzn.to/4aOqqyd

✂️ Rag Quilt Snips (Spring Loaded Scissors)
👉 https://amzn.to/3MsjkHF

(As an affiliate, we may earn from qualifying purchases.)


Step-by-Step Rag Quilt Pattern Tutorial

For a complete visual walkthrough, watch the full video here:
🎥 👉

Here’s the simplified breakdown:


Step 1: Cut Your Fabric Squares

Cut:

  • Top fabric squares
  • Batting squares (slightly smaller)
  • Backing squares

Standard beginner size: 6” or 8” squares.


Step 2: Create Quilt Sandwich Squares

Layer:

Top fabric (right side down)
Batting
Backing fabric (right side up)

Stitch an “X” across each square to secure layers.


Step 3: Sew Squares Together (Wrong Sides Together)

Unlike traditional quilts, sew squares with:

Wrong sides together
½” seam allowance (important for fraying)

Continue joining rows.


Step 4: Clip the Seams

Using rag quilt snips:

  • Clip seam allowances every ¼”
  • Do NOT cut into stitching line

This allows seams to fray evenly.


Step 5: Wash & Dry

This is where the magic happens.

Wash on gentle cycle and tumble dry.
The seams will fray and soften beautifully.

🖨 Prefer a Printable Rag Quilt Pattern PDF?

If you love having your projects organized and easy to follow, a printable Rag Quilt Pattern PDF might be exactly what you need.

While this free tutorial gives you everything to get started, many quilters prefer a clean, distraction-free version they can:

✔ Print and keep in their sewing space
✔ Highlight important steps
✔ Check off progress
✔ Take to classes or quilting groups
✔ Store in a binder for future projects

A downloadable Rag Quilt Pattern PDF makes sewing smoother — especially when working directly at your machine.


What’s Included in the Printable Rag Quilt Pattern PDF?

Our PDF version includes:

  • ✔ Step-by-step instructions (condensed & printer-friendly)
  • ✔ Fabric cutting charts
  • ✔ Square layout diagrams
  • ✔ Seam allowance reminders
  • ✔ Size calculation guide
  • ✔ Pro tips summary
  • ✔ Care instructions reference page

Everything is formatted clearly so you don’t need to scroll on your phone while sewing.


Why Quilters Love Having a PDF Version

Many quilters say that having a Rag Quilt Pattern PDF:

  • Reduces mistakes
  • Makes sewing faster
  • Keeps measurements visible
  • Helps avoid skipping clipping steps
  • Makes repeating the pattern easier

If you plan to make more than one rag quilt, a printable version is especially helpful.


Perfect for:

  • Beginner sewing classes
  • Quilting workshops
  • Gifting the pattern to a friend
  • Keeping as part of your quilt pattern library

A structured PDF version transforms this Rag Quilt Pattern into a reusable reference guide.


Want the Printable Version?

👉 Download the Rag Quilt Pattern PDF here.

Keep it saved, print it, or store it digitally for your next cozy quilting project.


🧵 Pro Tips for a Perfect Rag Quilt Pattern

If you want your Rag Quilt Pattern to look professional and last for years, these advanced tips will make a huge difference.


1. Choose the Right Fabric for Maximum Fraying

Not all fabrics behave the same in a Rag Quilt Pattern.

Flannel → softest result, most popular choice
Quilting cotton → cleaner fray, more structure
✔ Avoid polyester blends → they don’t fray properly

If you want dramatic texture, flannel on both sides works beautifully.


2. Pre-Wash Strategically

Pre-washing prevents uneven shrinking. However:

  • If using flannel, pre-wash to reduce heavy lint shedding.
  • If mixing fabric brands, pre-wash everything.
  • If you want extra fray effect, skip pre-wash — but expect more lint.

Consistency is key for a balanced Rag Quilt Pattern.


3. Use a Walking Foot

Because a Rag Quilt Pattern includes multiple fabric layers, shifting can occur.

A walking foot:

  • Feeds layers evenly
  • Prevents puckering
  • Improves seam alignment

This is especially helpful for larger quilts.


4. Double Stitch for Durability

Since seams are exposed, they experience more stress.

Professional tip:

  • Sew a second stitch line ⅛” from the first.
  • This reinforces the structure.
  • Ideal for baby Rag Quilt Patterns that will be washed frequently.

5. Clip Thoroughly (But Carefully)

The fray effect depends on clipping.

✔ Clip every ¼ inch
✔ Stop just before stitching line
✔ Use spring-loaded rag quilt snips

The more consistent the clipping, the more even the fray.


6. Wash & Dry More Than Once

After completing your Rag Quilt Pattern:

  • Wash once → softens seams
  • Wash twice → enhances fray texture
  • Clean lint trap each time

The transformation after washing is what makes a rag quilt magical.


📏 Size Ideas for a Rag Quilt Pattern

One of the best things about a Rag Quilt Pattern is how easily you can customize the size.

Below are common size ideas based on square size and layout.


Baby Rag Quilt Pattern

  • Size: 30” x 40”
  • Squares: 5×6 grid (8” squares)
  • Perfect for newborn gifts

Crib Rag Quilt Pattern

  • Size: 36” x 50”
  • Ideal nursery blanket
  • Works beautifully in soft pastel flannel

Lap Rag Quilt Pattern

  • Size: 50” x 60”
  • Great for couch use
  • Beginner-friendly project size

Throw Rag Quilt Pattern

  • Size: 60” x 70”
  • Popular farmhouse decor option
  • Looks stunning with neutral tones

Twin Bed Rag Quilt Pattern

  • Size: 66” x 90”
  • Larger square size speeds up assembly
  • Use reinforced stitching for durability

Square Size Matters

6” squares → more seams, more texture
8” squares → faster project
10” squares → bold, chunky aesthetic

The size of your Rag Quilt Pattern directly affects texture and overall look.


🎁 Gift Ideas Using a Rag Quilt

A handmade Rag Quilt Pattern is one of the most meaningful gifts you can give.


👶 Baby Shower Gift

Soft flannel Rag Quilt Patterns are incredibly popular for:

  • Newborn blankets
  • Nursery decor
  • First birthday keepsakes

Choose gender-neutral prints for versatility.


🎄 Holiday Gift

A winter-themed Rag Quilt Pattern with:

  • Plaid flannel
  • Rustic colors
  • Cozy textures

Makes a perfect Christmas present.


🏡 Housewarming Gift

Neutral farmhouse Rag Quilt Patterns are trending in modern interiors.

Think:

  • Beige
  • Sage green
  • Warm gray
  • Cream tones

🎓 Graduation Quilt

Create a memory Rag Quilt Pattern using:

  • Old t-shirts
  • Sports uniforms
  • School colors

These quilts become lifelong keepsakes.


🧡 Comfort Gift

Rag quilts are soft, warm, and comforting — ideal for:

  • Hospital stays
  • Get-well gifts
  • Emotional support gifts

Few handmade projects feel as cozy as a Rag Quilt Pattern.


💬 What the Community Says About Rag Quilt

The quilting community consistently ranks the Rag Quilt as:

✔ One of the easiest beginner quilts
✔ The most forgiving quilt construction
✔ Perfect first sewing machine project
✔ Fast compared to traditional quilting

Many beginners say:

“My first Rag Quilt Pattern gave me the confidence to try more complex quilts.”

On social platforms:

  • Rag quilt transformation videos perform extremely well.
  • The fraying effect is visually satisfying.
  • Cottagecore and farmhouse aesthetics boost popularity.

Experienced quilters appreciate that a Rag Quilt Pattern:

  • Doesn’t require binding
  • Doesn’t require perfect points
  • Allows creative freedom

It’s both beginner-friendly and creatively flexible.


🧼 Care Instructions for Your Rag Quilt

Proper care ensures your Rag Quilt Pattern stays soft and beautiful for years.


First Wash is Important

The first wash activates the signature fray effect.

  • Wash in cold water
  • Gentle cycle
  • Mild detergent
  • Avoid overloading washer

Expect lint — this is normal.


Drying Tips

  • Tumble dry low
  • Remove promptly
  • Clean lint trap mid-cycle if necessary

After drying, shake the quilt outdoors to remove loose fibers.


Long-Term Care

  • Wash separately during first 2–3 cycles
  • Avoid harsh detergents
  • Avoid bleach
  • Store in breathable cotton bag

Over time, your Rag Quilt Pattern becomes softer and more textured.


How Often Should You Wash It?

Because seams are exposed:

  • Wash only when needed
  • Avoid excessive washing
  • Gentle cycles are best

Rag quilts are durable but benefit from mindful care.


🔧 Troubleshooting Your Rag Quilt

Even a beginner-friendly Rag Quilt Pattern can present small challenges.


Seams Not Fraying Enough

Cause:

  • Insufficient clipping

Solution:
Clip closer together and wash again.


Too Much Fraying

Cause:

  • Fabric loosely woven

Solution:
Choose higher-quality quilting cotton or flannel next time.


Quilt Feels Stiff

Cause:

  • Has not been washed yet

Solution:
Wash and tumble dry to soften.


Batting Bunching Inside Squares

Cause:

  • Inadequate stitching across square

Solution:
Stitch an “X” securely in each block before assembly.


Uneven Square Alignment

Cause:

  • Fabric shifting

Solution:
Use clips and sew slowly with walking foot.

easy peasy rag quilt pattern

❓ FAQs – Rag Quilt Pattern

Is a Rag Quilt really beginner-friendly?

Yes. It is widely considered the easiest quilt pattern for beginners because it does not require perfect seam matching or binding.


How much seam allowance do I need for a Rag Quilt ?

A ½ inch seam allowance is standard. This allows enough fabric to create the frayed edge.


Can I make a Rag Quilt without batting?

Yes. You can omit batting for a lighter summer version. Flannel backing alone can add softness.


What fabric works best for a Rag Quilt?

Flannel is the most popular choice due to softness and fraying effect. Quilting cotton also works well.


How many squares do I need?

It depends on quilt size. A baby Rag Quilt may use 30–42 squares, while larger quilts may use 100+ squares.


How many times should I wash a rag quilt?

Usually 1–2 washes fully activate the fraying effect.


Is a Rag Quilt durable?

Yes. When double-stitched and properly clipped, rag quilts are very durable and long-lasting.


Why is my Rag Quilt shedding lint?

Shedding during first washes is normal. It reduces significantly after 2–3 cycles.


See Also

You may also love:


Follow for More Quilting Patterns

If you love cozy quilting projects like this Rag Quilt Pattern:

📌 Follow us on Pinterest for daily inspiration
📘 Follow us on Facebook for new quilt tutorials

We share beginner guides, trending quilt patterns, and video tutorials weekly.


Final Thoughts

The Rag Quilt Pattern is one of the most rewarding and beginner-friendly quilting projects you can make.

It’s cozy.
It’s forgiving.
It’s beautiful.
And it gets softer with time.

Ready to start sewing your own Rag Quilt Pattern?

✨ Grab your fabric and create something warm and meaningful today.

15 Jelly Roll Quilt Patterns You Can Sew This Weekend (Free & Modern Ideas)

Jelly roll quilts are one of the fastest, easiest, and most satisfying ways to create a quilt top. Whether you’re a beginner just starting your quilting journey or a seasoned quilter looking for a quick weekend project, these jelly roll quilt patterns will spark your creativity and help you finish a quilt you’ll be proud of.


🧵 What Is a Jelly Roll Quilt?

This is a quilt made with jelly rolls — pre-cut fabric strips that are 2.5 inches wide and usually the width of the fabric (about 42″). A standard roll contains about 40 strips in coordinated fabrics, meaning you can dive right into sewing without spending hours cutting.

✨ Benefits of Using Jelly Rolls

  • Save time: No need to cut dozens of strips — the work is already done.
  • Coordinated fabrics: Each roll comes from a single collection, so your quilt looks harmonious without second-guessing colors.
  • Less waste: Pre-cuts mean you only buy what you need.
  • Perfect for beginners: Strip-pieced projects are straightforward and forgiving.
  • Speed: Many quilters can complete a jelly roll quilt top in a weekend!

🖤 15 Free & Inspiring Jelly Roll Quilt Patterns

Here’s a curated list of free patterns and tutorials you can start today. If you already have on hand, you can choose one of these and get sewing right away!

Jelly Roll Quilt Patterns  – fast strip quilt made with 2.5 inch fabric strips
Rail Fence Jelly Roll Quilt Pattern – easy beginner-friendly quilt using pre-cut strips
Log Cabin Jelly Roll Quilt Pattern – modern log cabin blocks made from jelly roll strips
  • Strip & Flip Quilt – Sew strips together, then cut and rearrange for a bold visual effect.
Strip and Flip Jelly Roll Quilt Pattern – creative strip quilt with flipped panels
Diagonal Strip Jelly Roll Quilt Pattern – on-point design with bold diagonal layout
Modern Ombre Jelly Roll Quilt Pattern – gradient color quilt using jelly rolls
Scrappy Trip Around the World Jelly Roll Quilt Pattern – colorful travel-inspired quilt
Bargello Jelly Roll Quilt Pattern – wavy quilt design with dramatic movement
Stair Step Jelly Roll Quilt Pattern – geometric step design made from strip sets
Jelly Roll Twist Quilt Pattern – half square triangles and twist design using strips
Rainbow Jelly Roll Quilt Pattern – colorful ROYGBIV quilt using fabric strips
alt="Baby Jelly Roll Quilt Pattern – small lap size quilt perfect for gifts and nurseries"
Striped Table Runner Jelly Roll Quilt Pattern – quick and easy jelly roll project
Holiday Jelly Roll Quilt Pattern – Christmas-themed strip quilt with seasonal fabrics
Two-Color Jelly Roll Quilt Pattern – minimalist and modern strip quilt design

💡 Tip: For each of these patterns, add your own twist — alternate strip order, insert solids, or add sashing for variety.


🛒 Beginner Quilter Starter Kit (Affiliate Section)

If you’re ready to start your first project, here are our recommended tools and materials:

Tool / MaterialWhy You Need ItOur Recommendation
Rotary Cutter + MatClean, accurate cuts make piecing easier.Olfa 45mm Rotary Cutter + Mat
Acrylic Ruler SetKeep strips square & even.Creative Grids Quilting Ruler Set
Quality ThreadSmooth seams, fewer breaks.Aurifil 50wt Cotton Thread
Quilt BattingThe “fluff” that gives your quilt body.Warm & Natural Cotton Batting
Pins or ClipsHold layers together when assembling.Clover Wonder Clips
Beginner Sewing MachineStraight, even stitches every time.Brother CS7000X Quilting Machine

As an Amazon Associate, we may earn from qualifying purchases — at no extra cost to you.


🪡 How to Start Your First Project

Even if you’re new to quilting, you can tackle a project with confidence. Here’s the basic process:

  1. Choose a Pattern: Select one of the patterns above that matches your skill level.
  2. Prep Your Strips: Some quilters like to press the strips first for smoother seams.
  3. Join Strips: Sew them along the short ends with a 1/4″ seam, alternating direction to avoid bowing.
  4. Press and Subcut: Press seams carefully and cut according to your pattern instructions.
  5. Assemble Top: Lay out your blocks or strips, sew rows together.
  6. Baste and Quilt: Layer backing, batting, and top; baste with pins or spray; quilt as desired.
  7. Bind: Finish with binding strips (you can make binding from leftover jelly roll strips!).

🧼 Care & Preparation Tips

  • Pre-wash? Most quilters don’t pre-wash jelly rolls (they can fray). Instead, use color catchers during the first wash.
  • Starch strips before cutting or sewing for crisper piecing and reduced stretch.
  • Label rows: If working on a large quilt, use sticky notes or painter’s tape to keep order.
  • Chain piece: Speed up sewing by sewing strip pairs in continuous chains.
  • Stay organized: Use a design wall or floor layout to keep track of strip placement.

🔗 More Models Resources (External)

These are excellent places to find new patterns, fabric inspiration, and color ideas.


❓ FAQs about this model

1. How many jelly rolls do I need for a quilt?
Most throw-size quilts use 1–2 jelly rolls. Queen-size may need 2–3 rolls, depending on pattern.

2. Can I wash my project fabric before sewing?
It’s not recommended — pre-washing can cause fraying and distortion. Use as-is and wash after finishing.

3. What size quilt can I make with one jelly roll?
Usually about 50″ x 60″ (lap size) when using all strips.

4. Do jelly rolls shrink after washing?
Yes — like any cotton fabric. Account for about 3–5% shrinkage.

5. Can I mix jelly rolls from different collections?
Absolutely! Mixing can create a scrappy, one-of-a-kind look.


🧵 You May Also Like:


📣 Join Our Quilting Community

Love these jelly roll quilt patterns? Don’t miss future tutorials and ideas:

  • Follow us on Facebook: Facebook Page
  • Pin this post on Pinterest: Create a board just for jelly roll inspiration.
  • Subscribe to our Newsletter: Get weekly roundups, tips, and exclusive free patterns delivered to your inbox.

🧡 Sharing is caring — send this post to a quilting friend who needs a quick weekend project!

Quilt Patterns – Free Ideas, Tutorials & Modern Designs

Quilting blends creativity, color, and craft into heirloom pieces you’ll love forever—and quilt patterns are where every great project begins. This guide pulls together the best free patterns, modern designs, starter tutorials, and buying tips so you can plan, cut, and stitch with confidence. Whether you’re choosing your first baby quilt or exploring advanced quilt block patterns, you’ll find inspiration, links, and tools here to start (and finish!) your next quilt.


Why quilt patterns matter (and how to pick good ones)

Not all patterns are created equal. Great patterns share three traits:

  1. Clear cutting charts: yardage, block size, and a visual layout so you avoid fabric waste.
  2. Step-by-step assembly: diagrammed blocks and pressing directions to keep points crisp.
  3. Size options: baby, throw, twin, queen—so your favorite design scales to any bed.

Whenever you evaluate new quilt patterns, scan for those elements first. You’ll sew faster and make fewer mistakes.


Featured patterns from Patterns Here

Start with these reader favorites from your own library (interlinking boosts topical authority and keeps readers on-site):

Chandelier Quilt Pattern – free quilt pattern with step-by-step tutorial
Colorbrick Quilt Pattern – modern quilt design for beginners
Shimmer Quilt Pattern – colorful quilt pattern with easy instructions
Starburst Quilt Pattern – bold star quilt blocks with free tutorial
Spiral Bargello Quilt Pattern – dramatic quilt design with wave effect
Minecraft Quilt Pattern Free – pixel style quilt perfect for kids
Deep Blue Sea Baby Quilt Pattern – beginner-friendly baby quilt design
Adorable Baby Quilt Patterns – collection of free minimalist quilt ideas
Fab Farm Quilt Pattern
Poinsettia Quilt Pattern – Christmas quilt idea with free pattern

Bookmark this hub and jump to any tutorial—each post includes photos, materials, and actionable steps.


Browse quilt patterns by goal

Baby quilts: Soft, fast, and perfect for gifting. Start with the Deep Blue Sea design or choose simple nine-patch quilt patterns to practice accurate seams.

Modern quilt patterns: Love negative space and bold color blocking? Explore your Free Modern Quilt Patterns roundup for minimalist designs that quilt up beautifully with straight-line quilting.

Quilt block patterns: Learn skills one block at a time—flying geese, half-square triangles, log cabin. Then assemble a sampler quilt from the Ten Incredible Quilt Block Patterns post.

Theme & novelty: Your Minecraft quilt pattern is ideal for birthdays or game rooms. Holiday sewists can’t miss the Poinsettia project.

Show-stoppers: When you want drama, the Spiral Bargello or Starburst quilts deliver movement and color that read beautifully on a bed or sofa.

Each path above links deeper into quilt patterns that match your skill level and timeline—so you always know what to sew next.


Fabric, batting & color: quick guide for better results

Choosing fabric is half the fun. For most quilt patterns, 100% quilting cotton is the sweet spot: stable weave, predictable shrink, and crisp pressing.

  • Color plan: Pick one hero print, two supporting prints, and solids that contrast. Squint at your palette—if values blur together, increase contrast so blocks read clearly.
  • Pre-wash? Optional for quilting cotton, recommended for flannel and dark solids prone to bleeding.
  • Batting basics:
    • Cotton or 80/20 blend → classic drape, machine washable.
    • Poly → puffs higher, great for tied quilts.
    • Wool → lightweight warmth, quilts like a dream.
  • Thread & needles: 50wt cotton or poly/cotton blends; use a fresh 80/12 or 90/14 needle for clean stitches.

Apply these notes to any of your quilt patterns and your piecing will look instantly more polished.


🧰 Beginner Quilter Starter Kit (Recommended Tools & Materials)

Getting started with quilting is easier when you have the right tools. Here’s our recommended kit — everything you need to make your first quilt from start to finish.
(Affiliate links — we may earn a commission at no extra cost to you.)

Tool / MaterialWhy You Need ItOur Recommendation
Rotary Cutter + MatClean, accurate fabric cuts save time and frustration.Olfa 45mm Rotary Cutter + Self-Healing Mat
Acrylic Ruler SetPerfect 90° angles and consistent strips for any quilt pattern.Creative Grids 6.5” & 24” Quilting Rulers
Quality ThreadSmooth seams prevent skipped stitches.Aurifil 50wt Cotton Thread
Quilt BattingGives your quilt loft, warmth, and structure.Warm & Natural Cotton Batting
Pins or ClipsHold layers together before sewing or quilting.Clover Wonder Clips
Beginner-Friendly Sewing MachineStraight, even stitches make assembly stress-free.Brother CS7000X Quilting Machine

💡 Pro tip: Add a pair of sharp fabric scissors and a seam ripper to complete your kit — they’ll save you on those inevitable “oops” moments.


Step-by-step: from pattern to finished quilt

Follow this simple workflow for any of the quilt patterns linked above:

  1. Choose the pattern & size (baby, throw, twin, queen).
  2. Print or save cutting charts and label each stack as you cut—sticky notes are your friend.
  3. Chain piece whenever possible to keep seams consistent and speed up assembly.
  4. Press with intent (to the dark side or open) so points match and blocks lay flat.
  5. Assemble rows, then join the top. Measure across the center for borders to prevent wavy edges.
  6. Make your quilt sandwich (backing → batting → top). Baste with pins or spray.
  7. Quilt it. Straight-line grids, gentle waves, or stitch-in-the-ditch flatter most quilt patterns.
  8. Bind & label. A simple machine binding is durable for everyday use.

This rhythm keeps you moving and reduces decision fatigue so you actually finish more quilts.


External quilt pattern resources (trusted & free)

Linking to reputable sites strengthens this hub and helps readers discover even more quilt patterns:

Use these alongside your own tutorials to plan colorways, blocks, and quilting motifs.

FAQs about quilt patterns

What are the easiest quilt patterns for beginners?
Nine-patch, rail fence, and simple strip quilts top the list. These quilt patterns rely on straight cuts and basic seams, so you can focus on accuracy.

How much fabric do I need for a throw quilt?
Most throw-size quilt patterns call for 3–5 yards total depending on borders and backing. Check each pattern’s yardage chart before shopping.

Do I have to pre-wash fabric?
Not required for most quilting cottons. If your quilt patterns use reds, navies, or flannel, pre-wash or use color catchers the first time you launder.

What batting is best for everyday quilts?
80/20 cotton-poly blends are popular: soft drape, minimal shrink, and easy sewing—great with straight-line quilting on modern quilt patterns.

Can I sell quilts made from free quilt patterns?
Usually yes for small-scale selling, but always read the designer’s usage policy in the pattern.

How do I resize quilt patterns?
Multiply block measurements by the desired scale (e.g., 125% for larger blocks) and add borders to fine-tune final dimensions. Many quilt patterns include multiple sizes—use those when available.


Join the Patterns Here community

Love these quilt patterns? Don’t miss what’s next.

  • Follow us on Facebook: Click here – new patterns & polls weekly.
  • Pin with us on Pinterest: share and save your favorite quilt patterns for later.
  • Subscribe to the newsletter: get free pattern roundups, fabric tips, and seasonal projects straight to your inbox.

If you found this hub helpful, share it in your favorite quilting group—thank you for helping more makers discover inspiring quilt patterns!

Fab Farm Quilt Pattern by Elizabeth Hartman – Complete Guide + Kit Options

Quilts are more than just fabric and thread – they tell stories, bring warmth, and add personality to our homes. If you love playful, modern, and farm-inspired designs, the Fab Farm Quilt Pattern by Elizabeth Hartman is one you’ll definitely want to add to your quilting list. Featuring adorable farm animals like cows, pigs, horses, goats, chickens, and even a little barnyard vibe, this quilt is as charming as it is creative.

In this guide, we’ll dive into everything you need to know about the Fab Farm Quilt: what’s included in the pattern, the available kit options, fabric requirements, tools you’ll need, tips for sewing, and why quilters around the world are obsessed with it. Whether you’re looking for a cozy baby quilt or a full-size statement quilt, this pattern will bring joy to your sewing room.

👉 Check the Fab Farm Quilt Pattern on Etsy here
👉 See kit options with fabric included here


About the Fab Farm Quilt Pattern

The Fab Farm Quilt is designed by Elizabeth Hartman, a well-known modern quilt designer famous for her creative animal-themed patterns. If you’ve seen her Fancy Forest, Penguin Party, or Dogs in Sweaters quilts, you’ll already know her unique style.

This particular quilt is a sampler quilt, which means it is made up of different block designs – each one featuring a different animal. You’ll piece together a barnyard full of friends: pigs, sheep, cows, horses, goats, roosters, and more.

  • Sizes included: Baby Quilt (38″ x 39″) and Large Quilt (75″ x 77″).
  • Skill level: Confident beginner to intermediate. If you’re comfortable sewing straight seams and organizing small pieces, you’ll be ready to go.
  • Techniques used: Traditional piecing, no paper piecing required.
  • Pattern type: Printed pattern booklet or kit options available.

👉 Order the Fab Farm Quilt Pattern here

Fab Farm Quilt Pattern

Fab Farm Quilt Kit Options

One of the best things about this design is that you can purchase it as a pattern only or as a complete quilt kit.

  • Pattern only: Includes detailed step-by-step instructions, diagrams, and block layouts for both quilt sizes.
  • Quilt Kit: Comes with pre-selected fabrics curated to bring your farm animals to life in the same color palette shown in the samples. Some kits also include binding fabric.
  • What’s not included: Backing fabric and batting are usually not part of the kit, so you’ll need to purchase those separately.

👉 Shop Fab Farm Quilt Kits here


Materials and Tools You’ll Need

If you choose the pattern only, you’ll need to gather your own fabrics. The quilt is fat-quarter friendly, which makes it perfect for using your stash or mixing fun colors.

Fabric requirements (for Baby Quilt):

  • Background: ~2 ½ yards
  • Assorted fat quarters for animals: 10–12
  • Binding: ½ yard
  • Backing: 2 ½ yards

Fabric requirements (for Large Quilt):

  • Background: ~6 ¼ yards
  • Assorted fat quarters for animals: 20–25
  • Binding: ¾ yard
  • Backing: 4 ¾ yards

Essential tools (affiliate-ready links):

These are standard quilting tools, but if you’re just getting started, investing in good equipment makes the process smoother and more enjoyable.


Tips for Sewing the Fab Farm Quilt

  1. Organize your fabrics before starting. Label each fabric according to the animal it will belong to. This saves time and confusion.
  2. Work block by block. Focus on finishing one animal at a time – it makes the project less overwhelming.
  3. Use small containers or zip bags. Keep pieces for each block together, especially since there are many small parts.
  4. Chain piecing helps. Sew similar units together in a continuous chain to save time and thread.
  5. Press carefully. Accurate pressing is key to getting seams to match perfectly.
  6. Have fun with colors. The pattern looks amazing in bright modern fabrics, but you could also go for a muted farmhouse palette for a rustic vibe.
  7. Quilting ideas. Straight-line quilting works beautifully, but you can also try free-motion designs like swirls, loops, or even animal-themed motifs.

Why Quilters Love the Fab Farm Quilt

  • Perfect for kids and babies. The playful animal blocks make it an ideal baby shower gift or nursery quilt.
  • Farmhouse charm. If you love country décor, this quilt brings the cozy barnyard feel straight to your home.
  • Great scrap buster. Since it’s fat-quarter friendly, you can use fabric you already have.
  • Elizabeth Hartman quality. Known for clear instructions and fun designs, her patterns are always a hit.

Frequently Asked Questions (FAQ)

Is the Fab Farm Quilt beginner-friendly?
Yes! It’s designed for confident beginners. If you’ve sewn a few quilts before, you’ll be able to handle it.

Do I need templates or paper piecing?
No special templates are required. The entire quilt uses traditional piecing methods.

What sizes does the pattern include?
The pattern provides instructions for both a Baby Quilt (38″ x 39″) and a Large Quilt (75″ x 77″).

Does the kit include everything?
Kits usually include fabrics for the quilt top and binding, plus the printed pattern. Backing fabric and batting are sold separately.

Where can I buy it?
You can find the Fab Farm Quilt Pattern and kits on Etsy, Amazon, and at many quilt shops.


See Also

If you loved the Fab Farm Quilt, check out these other popular quilt patterns:


Final Thoughts

The Fab Farm Quilt Pattern by Elizabeth Hartman is the perfect mix of playful and practical. With adorable animals, multiple size options, and fat-quarter-friendly construction, it’s a quilt you’ll enjoy making and gifting. Whether you’re quilting for a child, decorating a farmhouse-style home, or simply want a cheerful project, this pattern is a winner.

👉 Grab the Fab Farm Quilt Pattern today
👉 Shop Fab Farm Quilt Kits with fabric included

Bring your very own barnyard to life – one quilt block at a time! 🐷🐮🐴🐑

How to Make a Puff Quilt Blanket – Free Pattern and Easy Tutorial

If you’re looking for a cozy, textured, and visually stunning quilting project, the Puff Quilt Blanket—also known as a biscuit quilt—is the perfect choice! This unique quilt style features small fabric “puffs” or “biscuits” that are sewn together to create a plush, comfortable blanket. Whether you’re a beginner or an experienced quilter, this project is both fun and rewarding.

In this article, you’ll find everything you need to know about making your own Puff Quilt Blanket, including tips, materials, and where to find the best free patterns and tutorials online.

What is a Puff Quilt Blanket? 🤷‍♀️

A Puff Quilt Blanket, sometimes called a Biscuit Quilt, is made up of individual fabric squares filled with a small amount of stuffing. These puffy squares are then sewn together to form a quilt that’s both decorative and practical. Unlike traditional flat quilts, puff quilts are more dimensional and have a soft, cushion-like feel.

This style of quilting became popular in the United States during the 1970s but has recently seen a resurgence thanks to modern fabric designs and DIY culture. Puff quilts are perfect for baby blankets, lap throws, or even full-size bedspreads.

Why You’ll Love Making a Puff Quilt Blanket ❤️

Here are some reasons why the Puff Quilt Blanket is a great quilting project:

  •  Beginner-friendly – no complicated piecing techniques required.
  •  A great way to use fabric scraps from previous projects.
  •  Perfect for making cozy baby blankets and gifts.
  •  Fun to customize with different fabrics and colors.
  •  No need for traditional batting—just a bit of fiberfill!

Materials You’ll Need 🧵

To make your own Puff Quilt Blanket, you’ll need the following supplies:

  • Fabric for the puff squares (cotton works great).
  • Fabric for the backing.
  • Fiberfill or polyfill stuffing.
  • Sewing machine and basic sewing tools.
  • Scissors or rotary cutter.
  • Pins or clips.
  • Ruler or quilting square.

Optional: Binding fabric if you want to finish the edges with a clean, professional look.

How to Make a Puff Quilt Blanket – Step-by-Step ▶️

Here’s a simple overview of how to create a Puff Quilt Blanket:

  • Cut Your Fabric Squares

Decide on the size of each puff square. A common choice is 5-inch squares for the top fabric and 4-inch squares for the bottom fabric. This size difference helps create the puff effect when assembled.

  • Sew and Stuff the Puffs

Take a top square and a bottom square, place them with the wrong sides together, and sew around three edges, leaving one side open. Lightly stuff with fiberfill to create the puff, then sew the last side closed. Repeat this for all your squares.

  • Arrange and Join the Puffs

Lay out all your stuffed squares in the desired arrangement. Once you’re happy with the layout, begin sewing the squares together in rows, then sew the rows together to form the quilt top.

  • Add the Backing

Place the quilt top right side up on the backing fabric and pin or clip in place. Sew around the edges, leaving a small gap for turning.

  • Finish the Quilt

Turn the quilt right side out, then stitch the opening closed. Optionally, you can add quilting stitches between the puffs for extra durability.

Free Puff Quilt Blanket Patterns and Tutorials 🎁

If you’re new to puff quilting or just want some extra guidance, there are many free patterns and video tutorials available online. Here are some of the best resources:

👉 Free Puff Quilt Pattern PDF

Helpful Tips for Making a Puff Quilt 💡

  •  Use consistent stuffing amounts to keep all puffs uniform.
  •  Experiment with color gradients or patterned fabrics for a unique look.
  •  Pre-wash your fabrics to avoid shrinkage after sewing.
  •  A walking foot attachment can help when sewing multiple layers.

Is a Puff Quilt Blanket Right for You? 🤯

If you love tactile textures, cozy blankets, and creative sewing projects, the Puff Quilt Blanket is definitely worth trying. It’s an excellent project for using up fabric scraps and makes a thoughtful handmade gift.

Whether you’re making a small baby quilt or a large bedspread, the puff quilt offers endless customization options and is sure to be a cherished item in your home.

Final Thoughts ✨📌

The Puff Quilt Blanket is more than just a cozy layer for chilly nights; it’s also a beautiful piece of handmade art. With the right materials and a bit of patience, anyone can create this plush, textured blanket.

Be sure to check out the free patterns and tutorials linked above, and if you make your own Puff Quilt, share your creation online—there’s a whole community of quilters who’d love to see your work!

If you liked this pattern, be sure to explore more quilting tutorials and inspirations on our site. Happy quilting! 🧵🪡

Related Posts:
• The Funky Chicken Quilt – Free Pattern
• French Rose Quilt – Free Pattern

Card Trick Quilt BlockCard Trick Quilt Block Tutorial – Master This Stunning Optical Illusion DesignCard Trick Quilt Block

Hello, sweethearts! Together, let’s study the Card Trick Quilt Block, a more recent pattern. This design is really lovely. Along with being vibrant and alive, the overlapping of the squares appears to be an optical illusion. Don’t worry if you haven’t sewn before; it’s not difficult. Since quilt blocks are simpler designs than full quilts, they are highly advised for beginners.

The Card Trick Quilt Block is a timeless pattern loved for its optical illusion effect. Its interlocking shapes create a visually striking design that adds depth and sophistication to any quilt. In this tutorial, we will walk you through the steps to sew this block with precision and ease.

What Is the Card Trick Quilt Block?

The Card Trick Quilt Block is a classic patchwork design featuring overlapping shapes that create a three-dimensional effect. It’s often made using contrasting fabric colors to highlight the illusion.

You can do it faster, and every time we complete a job, we are filled with a strong sense of pride. The uses for quilt blocks are countless; they are incredibly adaptable. Use it as a pillow case, centerpiece, or decorative item. You may make a lovely tablerunner to adorn the table by sewing few blocks together. Whatever the case, there is no lack of ideas, and human ingenuity is capable of amazing feats.

Image / Pattern / Tutorial – Card Trick Quilt Block Pattern

Materials Needed

Practice is necessary to produce a seam that is more flawless. Every day, you can stitch a little bit. Utilize fabric scraps that were cut from prior projects. There are many combinations of the colors you are already familiar with. Equally stunning are squares with the same hue but various tints. Utilize prints to enhance the quilt block’s beauty.

You may also use this new template if you have leftover fabric pieces. Assemble the quilt block to see how it will appear before you begin stitching. It’s ready to start sewing if the combination, size, and all the components fit. The greatest method to visualize the item before it is finished is in this way. It’s advisable to make any modifications before sewing so that you can simply relocate the cuttings rather than having to reverse your work.

The Generations Quilt Patterns book includes a pattern for the card trick quilt block. You may produce this lovely design with the assistance of the full set of instructions and measurements. We constantly use the step-by-step pictures to make sure we are doing everything correctly, and we hope they are helpful to you as well. Don’t forget to share your thoughts with us. Please share any fresh suggestions for using this block quilt in the comments section. As a result, we artists share our experiences with one another.

Crafting is a creative and rewarding activity that can bring people together and create unique objects. An interesting way to use this skill is to create a card block quilt. This technique combines elements of sewing and card games, resulting in an original piece that can be used as a quilt, a rug, or wall decoration. In this article, we will explore the basic steps to create your own card block quilt, from selecting the cards to final assembly.

Step-by-Step Assembly Guide

  1. Cutting the fabric: Use your rotary cutter and ruler to cut fabric pieces as per the pattern dimensions. Precision here is key for a perfect illusion.
  2. Sewing the shapes: Piece together the fabric triangles and squares carefully, maintaining a 1/4-inch seam allowance.
  3. Pressing: Press seams open or to the side as preferred for neat block assembly.
  4. Final block assembly: Join the smaller units to complete the Card Trick Block, checking alignment carefully.

Tips for Perfect Points

  • Use pins or clips to hold pieces securely before sewing.
  • Chain piecing can speed up your work.
  • Take your time pressing to keep seams flat.

Best Fabrics for Illusion Effect

Choose fabrics with a clear contrast between light, medium, and dark tones. This contrast brings out the “trick” in the Card Trick Block, making the pattern pop visually.


FAQ

Q: Is the Card Trick Quilt Block suitable for beginners?
A: It’s ideal for confident beginners and intermediate quilters due to its need for precise cutting and sewing.

Q: Can I use scraps for this block?
A: Yes! Scraps work well if you have good contrast in colors.

Q: How many blocks do I need for a full quilt?
A: That depends on your desired quilt size. Common sizes use anywhere from 25 to 100 blocks.

Download Pattern

You can found and access the pattern here: Card Trick Quilt Block Pattern.

If you enjoyed learning the Card Trick Quilt Block, be sure to check out other exciting quilt patterns and tutorials on Patterns Here:


Stay connected and get inspired daily!

Follow us on Pinterest and Instagram for fresh quilting and crochet ideas, behind-the-scenes videos, and exclusive patterns:

Don’t miss out on new tutorials, tips, and special giveaways — join our creative community today!

The Funky Chicken Quilt Pattern – Free Tutorial, Size Guide & Creative Ideas

If you love playful, farmhouse-inspired patchwork, The Funky Chicken Quilt Pattern is going to steal your heart. This cheerful quilt features quirky chicken blocks that are perfect for nursery décor, farmhouse kitchens, kids’ rooms, or anyone who collects chicken-themed items. In this complete guide, you’ll find an overview of the block construction, fabric recommendations, layout ideas, quilting suggestions, a printable-style size guide, a handy affiliate shopping list, FAQs, and smart tips to finish like a pro. Whether you’re a confident beginner or a seasoned quilter, The Funky Chicken Quilt Pattern offers a fun way to practice precise piecing while making something that makes everyone smile.


What makes The Funky Chicken Quilt Pattern so popular?

The Funky Chicken Quilt Pattern is block-based, so you build one chicken at a time. Each block typically uses squares, rectangles, and half-square triangles (HSTs) to form the beak, comb, body, and tail. That means it’s easy to batch-sew units and keep your project organized. Makers love it because:

  • It’s scrap-friendly — you can raid your stash for colorful bodies, beaks, and combs.
  • It’s beginner-friendly — once you sew one block, the rest fly by.
  • It’s modular — turn a few blocks into a mini wall hanging or pillow, or make a full throw or bed quilt.
  • It’s high-contrast and photogenic — perfect for sharing progress pics and finished quilts.

Pro tip: If you’re brand-new to novelty blocks, sew one “test chicken” first to dial in your cutting accuracy and seam allowance before chain-piecing the full flock.


Materials & fabric planning

Fabrics

  • Chicken bodies: bright scraps or fat quarters in prints/solids
  • Background: 3–4 yards (white, cream, linen, or light gray to make shapes pop)
  • Beak & feet: small orange/yellow scraps
  • Comb/wattle: small red scraps
  • Binding: ½ yard (check Size Guide for bigger sizes)
  • Backing: 3–4 yards for a throw; more for bed sizes
  • Batting: throw-size cotton or 80/20 blend

Notions

  • 50wt cotton thread, fresh 80/12 or 90/14 needle, pins or clips, seam ripper, fabric marker/chalk.

Color strategy

  • Choose high contrast between chicken bodies and background so the silhouette reads clearly.
  • Consider a cohesive palette (all blues, farm neutrals, or rainbow flock).
  • Low-volume backgrounds (tiny prints on white/cream) add texture without stealing focus.

Tools we recommend (Affiliate picks)

These tools make crisp chickens and a smoother quilting experience:

Tool / MaterialWhy it helpsOur pick (affiliate)
Rotary cutter + self-healing matAccurate, fast cutting for small unitsOlfa 45mm + Mat
6.5″ square rulerTrimming HSTs perfectly to sizeCreative Grids 6.5” Ruler
24″ x 6″ rulerLong straight cuts for sashing & bordersCreative Grids 24×6
Wonder ClipsKeep rows aligned while joiningClover Wonder Clips
Cotton battingSoft drape and easy quiltingWarm & Natural Batting

Disclosure: As an Amazon Associate, Patterns Here may earn from qualifying purchases at no cost to you.


Cutting & assembly workflow (step-by-step)

  1. Cut in batches: Pre-cut all squares, rectangles, and HST pairs for your target number of chickens. Label zip bags “Body,” “Beak,” “Comb,” “Tail,” and “Background.”
  2. Make HSTs first: Use the two-at-a-time method (draw diagonal on the back, sew ¼” on both sides, cut, press, trim). Accurate HSTs = crisp chicken shapes.
  3. Piece sub-units: Assemble beak + head section; body + wing section; tail units; feet if your block includes them.
  4. Join sub-units into a block: Square up each finished block. Most layouts are rectangle-oriented blocks; check your chosen block dimensions.
  5. Add sashing (optional): 1.5″–2.5″ sashing strips between blocks give the flock breathing room and help small inaccuracies disappear.
  6. Join rows, then add borders: A narrow inner border in red or yellow can echo the comb/beak and tie the palette together.

This flow is repeatable and fast — ideal for chain piecing several chickens in an afternoon.

Access the Complete PDF Pattern here!


Layout ideas for The Funky Chicken Quilt Pattern

  • Rainbow Flock: Each chicken in a different color; arrange in ROYGBIV order across rows.
  • Farmhouse Neutrals: Bodies in cream/tan/gray with a textured linen background.
  • Spotlight Chickens: Use sashing plus cornerstone squares (tiny red/yellow squares) to echo combs and beaks.
  • Kitchen set: Make 3–4 blocks for a wall hanging, plus matching pillow covers and table runner using leftover units.
  • Story quilt: Alternate chicken blocks with simple patch blocks (e.g., nine-patch or churn dash) for a playful mix.
The Funky Chicken Quilt pattern
Pattern Image/Tutorial – The Funky Chicken Quilt

Quilting ideas (make the flock strut!)

  • Crosshatch quilting (1″–1.5″ spacing) creates a sturdy, classic farmhouse texture.
  • Echo quilting around chicken silhouettes makes each bird “pop.”
  • Diagonal straight lines keep it modern and quick on a domestic machine.
  • Free-motion “chicken tracks” (little V-shaped footsteps) add whimsy to borders or sashing.

Size guide (blocks, yardage & binding estimates)

Use this table as a starting point; adjust to your chosen block size and whether you include sashing/borders.

Quilt SizeApprox. Finished SizeChicken BlocksBackground YardageBinding
Wall Hanging~24″ x 36″4–6~1.5 yds¼ yd
Baby~40″ x 50″9–12~2.5 yds⅓ yd
Throw~60″ x 70″16–20~3.5–4 yds½ yd
Twin~70″ x 90″25–30~5 yds⅝ yd
Queen~80″ x 90″30–36~6 yds¾ yd

Tip: If you’re short on background yardage, add scrappy sashing or a piano-key border from leftover chicken fabrics.


Pressing, accuracy & finishing tips

  • Press seams consistently (to the dark or open). Open seams often help small pieces lay flatter.
  • Trim blocks after assembly so every chicken measures identically.
  • Starch lightly before piecing for sharper points and stable bias edges.
  • Use a design wall (or a sheet on the wall) to preview color placement across the flock.
  • Baste well (pins or spray) so quilting lines stay straight across sashing seams.

These small details turn The Funky Chicken Quilt Pattern into a crisp, professional finish.


Care & washing

  • Pre-wash dark reds used for comb/wattle if you’re pairing with white backgrounds.
  • Wash finished quilt cold, gentle; add color catchers the first 1–2 washes.
  • Tumble low or air dry flat; press lightly after drying to reset seams.

Another Ideas

Interlinking spreads topical authority and helps Google understand how The Funky Chicken Quilt Pattern connects to your broader quilting content.


Trusted external resources (learn & explore)

Adding a few authoritative external links signals quality and helps readers go even deeper.


FAQs – Everything about The Funky Chicken Quilt Pattern

1) Is The Funky Chicken Quilt Pattern beginner-friendly?
Yes. If you can sew an accurate ¼” seam and make simple HSTs, you can complete this quilt. Start with a small wall hanging to practice, then move to a throw.

2) What block size should I use?
Common chicken blocks range from 8″ to 12″ finished. Larger blocks are more forgiving and faster; smaller blocks look extra cute but require more precision.

3) Do I need sashing?
No, but sashing gives each chicken space and keeps the top visually tidy. If your blocks vary slightly in size, sashing helps mask small differences.

4) Can I make The Funky Chicken Quilt Pattern with precuts?
Absolutely. Fat quarters and charm packs are perfect for bodies, beaks, and combs. Add background yardage and you’re set.

5) What quilting design is fastest for a throw?
Straight-line or crosshatch quilting is quick, sturdy, and farmhouse-friendly. Echo quilting around chicken shapes is a fun extra if you have time.

6) How many times should the keyword appear for SEO?
Use The Funky Chicken Quilt Pattern naturally throughout your post — in the H1, intro, a few headings, and several paragraphs. Avoid stuffing; keep it reader-first.


Join the Patterns Here community

If this guide to The Funky Chicken Quilt Pattern inspired you, don’t miss future tutorials and free patterns:

  • Follow us on Facebook: https://facebook.com/patternshere
  • Pin this quilt on Pinterest so you can find it later and share with quilting friends.
  • Subscribe to our newsletter: get weekly free quilt patterns, fabric tips, and seasonal projects.

We’d love to feature your makes! Post your finish and tag @patternshere so we can cheer you on.

French Roses Quilt – Free Floral Quilt Pattern & Tutorial

Floral quilts have a timeless elegance, especially when designed with simplified rose motifs that balance artistry with ease. The French Roses Quilt Pattern offers that balance – floral grace, minimal cuts, and a quilt that looks sophisticated without spending all day piecing tiny shapes. In this guide, you’ll find all the details you need to make this floral quilt your own: project materials, layout and color tips, step-by-step method, affiliate-recommended tools, plus FAQs and styling suggestions to make your finished quilt look beautiful in any room.


🌹 What is the French Roses Quilt Pattern?

The French Roses Quilt Pattern is a type of patchwork quilt that features rose-inspired floral motifs in a minimalist design. Rather than many small, intricate petals typical of some flower quilts, the roses here have large rounded shapes that simplify cutting and piecing. The design gives you the visual appeal of florals while being more forgiving in pattern alignment and fabric usage.

This pattern works well for:

  • Intermediate quilters who want floral elegance with less precision stress.
  • Anyone looking for a statement quilt that still reads clearly from a distance.
  • Those who enjoy playing with color in floral contrast (roses, leaves, neutrals, dark outlines, etc.).
french roses quilt pattern
Pattern/Image/Tutorial – French Roses Quilt

🧶 Fabrics, Yardage & Tools

Here’s what you need to get started with the French Roses Quilt Pattern:

Fabric Requirements:

  • Rose shapes: 3-5 colors (fabrics for the petals)
  • Background / petals contrast: neutral or darker fabric
  • Leaves or accents (optional): green or any contrasting color
  • Binding: ½ yard
  • Backing and batting: yardage depends on quilt size (throw, twin, queen, etc.)

Approximate Yardage (for throw size ~55×70 in):

  • Roses & accent fabrics: ~4-5 yards total
  • Background fabric: ~5-6 yards
  • Backing + batting: ~6-7 yards

Tools & Notions (Affiliate Recs):

Tool / MaterialWhy It HelpsAffiliate Link Suggestion
Rotary cutter + matClean, quick cuts especially for curved or large shape edgesClick Here
Large square ruler (12-inch)Helps size rose blocks uniformlyClick Here
Fabric scissors / appliqué scissorsFor trimming blossoms and rose petals smoothlyClick Here
Thread in rose & neutral shadesSeam contrast & invisible seamsClick Here
Batting (cotton or cotton blend)Drape, warmth, and stable quiltingClick Here

✂️ Step-by-Step Construction Guide

Here is a suggested workflow for constructing your French Roses Quilt:

  1. Design layout first: On a design wall or graph paper, plan rose colors, spacing, leaves and background color distribution.
  2. Cut rose motifs: Large rounded petals are easier to cut and join than very small ones. Use templates where needed.
  3. Piece rose blocks: Combine petals with background to make rose blocks. Sew with consistent seam allowance.
  4. Add accent blocks or leaves: If design includes leaves or smaller accent blocks, piece separately and insert in layout.
  5. Join blocks: Arrange rows, join neatly. Squares might not be perfect—pin or clip carefully to reduce distortion.
  6. Borders (optional): A simple border frames roses well—dark or neutral depending on your preference.
  7. Quilt layering: Backing + batting + top. Baste well.
  8. Quilting: Use quilting lines that echo petals or follow flower outlines – echo quilting often accentuates the rose motif beautifully.
  9. Binding & Finish: Use binding fabric that complements roses. Press final quilt, block edges.

Watch the complete pattern bellow:


🎨 Color & Design Tips

  • Choose fabric with moderate contrast between roses and background, so the rose shapes show clearly without harshness.
  • Use tone-on-tone prints for petals if you don’t want strong contrast—this gives subtle elegance.
  • Mix prints and solids for visual interest.
  • Try a dual rose palette (two petal colors) with a strong neutral background for balanced look.
  • If you like florals, consider adding small appliqué or embroidered roses/leaves for texture.

🔗 Related Quilt Patterns (Internal Links)


🌍 External Resources


❓ FAQs – French Roses Quilt Pattern

1) Is the French Roses Quilt Pattern beginner-friendly?
Yes — although it involves floral shape cutting, the large rounded petals are more forgiving than complex petal quilts. Beginners comfortable with basic patchwork can manage this well.

2) How much fabric do I need for different sizes?
Throw size (≈55×70 in) needs about 4-5 yards for rose fabrics and ~5-6 yards background. For twin or queen sizes, increase yardage accordingly (add about 20-30%).

3) Can I substitute fabrics?
Definitely! Use cotton or cotton blend. If using darker petal fabrics, pre-wash to avoid bleeding.

4) What quilting design suits this pattern best?
Echo quilting around the rose petals or outline quilting highlights the design beautifully. Straight-line quilting works too for a modern twist.

5) How do I finish the edges cleanly?
A simple binding, maybe in a matching rose color, helps frame the quilt. Press well and block at the end for even edges.


📣 Join the Patterns Here Community

Loved this French Roses Quilt Pattern? Stay inspired and keep creating:

  • Follow us on Facebook: Facebook Page
  • Pin this pattern on Pinterest so you can revisit or share with other quilters.
  • Subscribe to our Newsletter: free quilt patterns, fabric tips, and design inspiration weekly.

Three Most Wanted Patterns 2022

A Bonnie Hunter Mystery Quilt Pattern is a great way to get into quilting and to learn about the different techniques that are used in making a quilt. There are many different mystery quilt patterns available online and in quilting magazines. You can also find a variety of books that contain mystery quilt patterns. The first thing that you need to do when you are looking for a Bonnie Hunter Mystery Quilt Pattern is to decide what type of quilt you would like to make. You can choose from a variety of different mystery quilt patterns. You can find a pattern for a baby quilt, a wedding quilt, a family quilt, a holiday quilt, or even a pattern for a wall hanging.

Once you have decided on the type of quilt that you would like to make, you can start looking for a Bonnie Hunter Mystery Quilt Pattern. There are a number of different websites that offer a variety of different mystery quilt patterns. You can also find a variety of books that contain mystery quilt patterns. You can even find a variety of magazines that contain mystery quilt patterns. The next thing that you need to do when you are looking for a Bonnie Hunter Mystery Quilt Pattern is to decide on the size of the quilt that you would like to make.

Bonnie Hunter Mystery Quilt Pattern

You can make a quilt that is as small as a baby quilt or as large as a family quilt. You can also make a quilt that is as big as you want it to be. You can even make a quilt that is as big as you want it to be and then add a border to it. The last thing that you need to do when you are looking for a Bonnie Hunter Mystery Quilt Pattern is to decide on the fabric that you would like to use for your quilt. You can use a variety of different fabrics for your quilt. You can use cotton, wool, or even flannel.

You can also use a variety of different colors for your quilt. You can even use a variety of different patterns for your quilt. Once you have decided on the type of quilt that you would like to make and the size of the quilt that you would like to make, you can start looking for a Bonnie Hunter Mystery Quilt Pattern. There are a number of different websites that offer a variety of different mystery quilt patterns. You can also find a variety of books that contain mystery quilt patterns. You can even find a variety of magazines that contain mystery quilt patterns.

Pattern/Image/Tutorial – Bonnie Hunter Mystery Quilt Pattern

Flying Geese Quilt Pattern

This pattern is very easy to make and practice, because the only work you will have is cutting out the triangles, and for those who don’t have much facility with manual cutting out, the pattern lets you make bigger triangles, creating your own version, why not?

The quilt is composed only of triangular shapes, so for those who are just starting in the world of quilting, you will do very well with this pattern. In one of the versions you can see how the rainbow effect in this pattern fits very well, a tip when it comes to choosing fabrics.

We always recommend that you use fabrics and scraps that are lying around in the back of your closet, so that there is no waste, after all, fabrics are also very expensive. And this would be a perfect pattern to do this reuse!

Pattern/Image/Tutorial – Flying Geese Quilt Pattern

Ohio Star Quilt Pattern

This pattern is special, I remember when my grandmother had the cosstume of putting this pattern into practice in her donation quilts. And yes, my grandmother donated her quilts every year. Incredible this attitude, isn’t it? I need to do it too! Here you can also put your imagination and creativity into practice, use printed and colored fabrics, I’m sure it will be amazing!

Pattern/Image/Tutorial – Ohio Star Quilt Pattern

SEE TOO – Five Modern Quilts Patterns

Five Easy Quilt Designs

Hello everybody! How nice it is to be back and writing to you! I haven’t brought you anything new for a few days, but I was actually preparing my Halloween decorations! Have you done your own? I confess that this year my house became more charming, with a more discreet decoration, I made some table toppers to put on my tables with a pumpkin pattern, they were beautiful! In case you’ve also done some decoration using our pattern, share it with us, we love to see your creativity!

Today I came to share some patterns that I selected that are incredible and very easy to learn and make to put into practice from now on! So for beginners, enjoy this article, because I’m sure you’ll love it! Besides, the patterns have a very modern style of cutouts and designs, they are quilts that you can make to update your home or even prepare a gift for someone. So, get your list ready and check out these incredible patterns that we have separated for you!

Exploding Heart Quilt Pattern

This pattern is for romantics! But also for those who love modern design. Inspired by something more abstract, this deconstructed heart pattern is very beautiful and is being used and researched a lot lately. You can bet on this pattern, because the moment you make it, everyone will be wide open! And as hard as looking at it may seem to be a difficult pattern to make, it really isn’t! Of course you will have a little more work to cut out the smaller triangles, but they are not many. But remember! Every detail matters, we have to be patient when making the quilt so that the result is amazing!

Pattern/Image/Tutorial – Exploding Heart Quilt Pattern

Autumn Harvest Quilt Pattern

This pattern is beautiful! With its geometric shape, we can imagine references to small crosses. Unfortunately we could not find a free pattern of this pattern, but I had to share it with you, because it is a quilt that has been very successful and is really easy to make. In its original version we can see solid colors in autumn tones, I find it wonderful and it is something that never goes out of fashion. This is a quilt that is really worth the investment!

Pattern/Image/Tutorial – Autumn Harvest Quilt Pattern

Simple Heart Quilt Pattern

Another heart design pattern, but this one is a bit more simple and minimalist. Easier also to make, it has charmed everyone, because it is a romantic and elegant pattern, perfect also for girls’ rooms. The quilt can be made in 7″ blocks, which is why it is so easy to make. It became most famous last Valentine’s Day, but the truth is that it is still a success today and I don’t think it will ever go out of style. The nice thing about this quilt is that it is totally adaptable to the way you want to make it, for example making borders on each block or changing the size of the hearts, my advice is: FOLLOW YOUR HEART!

Pattern/Image/Tutorial – Simple Heart Quilt Pattern

Antique Lace Quilt Pattern

An impeccable design created simply by jenny Doan! If you don’t know her, it’s worth a look! This pattern actually came from a recreation of a block she once purchased online. Inspired by small weathervanes, this pattern is also something that looks complex to make but is very simple once you get the hang of it. In the video we can see her teaching it in a very didactic way. I always try to share video tutorials, that’s how I learned faster, but whenever I find a written pattern that is easy to understand, I post it for you!

Pattern/Image/Tutorial – Antique Lace Quilt Pattern

Stargazers Quilt Pattern

Last but not least, this pattern is also taught by Jenny Doan. Basically it has a design of geometric star shapes with a square cutout in the middle, making it even simpler to do. I found this pattern super modern and easy to combine with plain solid fabrics and printed fabrics, a great option to make a quilt for boys’ rooms, they usually like this kind of design without getting sick. But of course, it is totally combinable with any room in your house, so get creative!

Pattern/Image/Tutorial – Stargazers Quilt Pattern

So that’s it folks, I loved sharing these patterns with you, and I hope you liked them too. Any questions or comments write to us, we’re always keeping an eye on what you send us! A kiss and see you next time!

SEE TOO – Elephant Abstractions