
Sophie Hood Crochet Pattern – Easy & Cozy Hoodie Tutorial for All Skill Levels
✨ Updated for 2026:
This guide has been fully updated with new tips and free step-by-step instructions to help you create the perfect Sophie Hood.
🧶 What Is the Sophie Hood Crochet Pattern? (Free + Easy Guide)
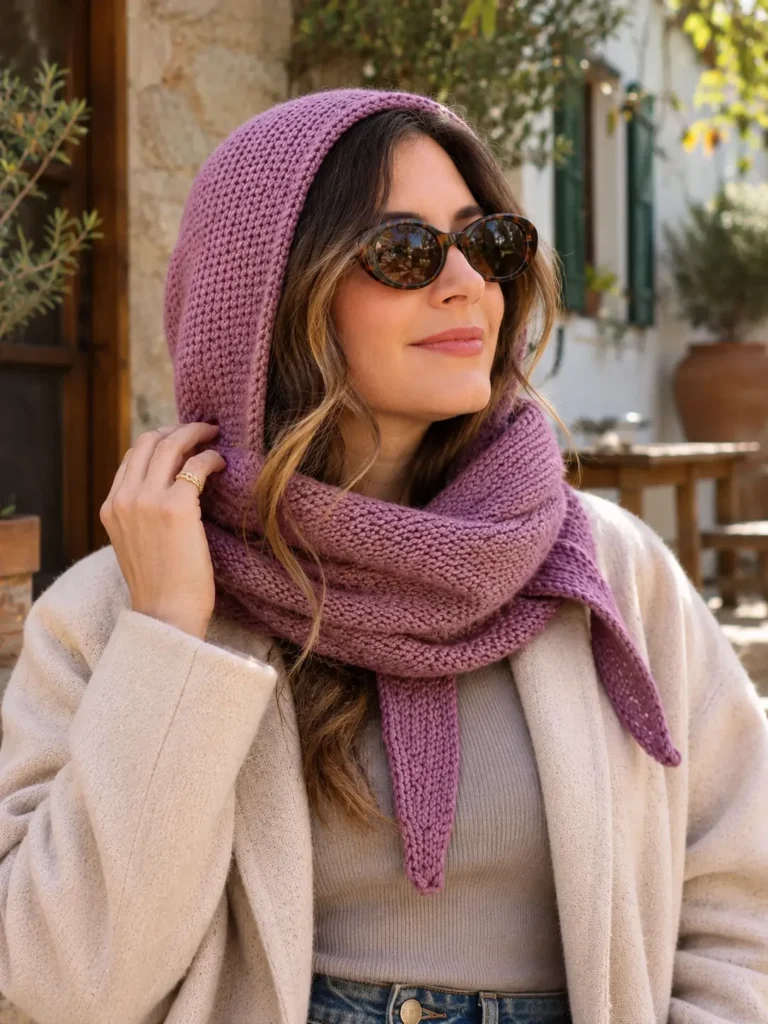
The Sophie Hood crochet pattern is everywhere right now — and once you make one, you’ll understand why. It’s warm, it fits over any hairstyle, and it looks like you spent way more time on it than you actually did.
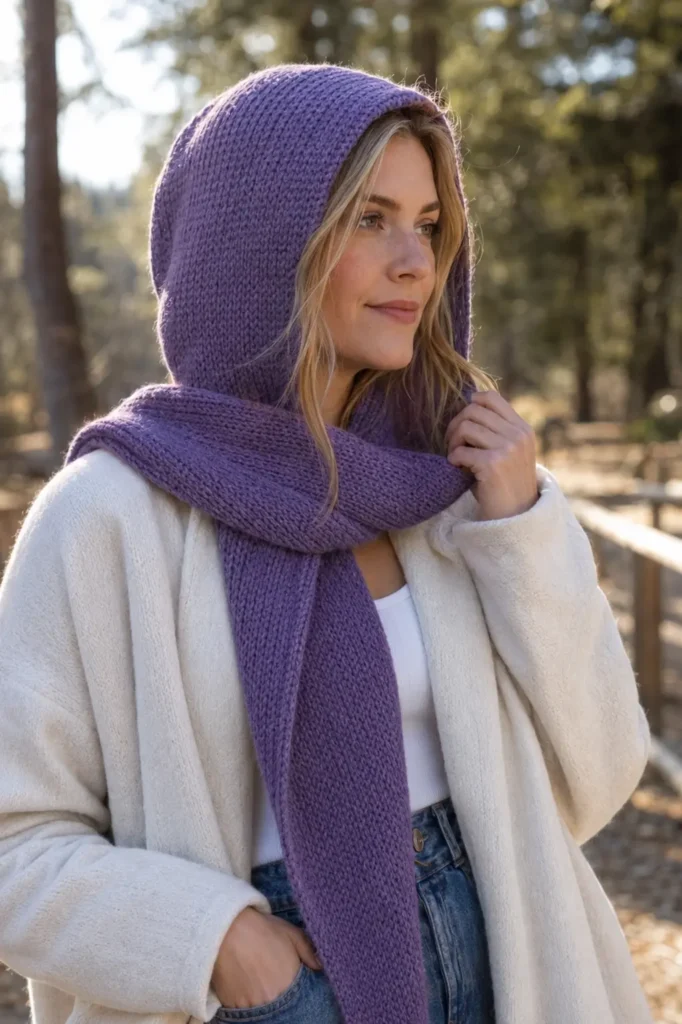
This is the free Patterns Here version, using asymmetric shaping for a natural curved fit. You’ll get the full written pattern below, step by step.
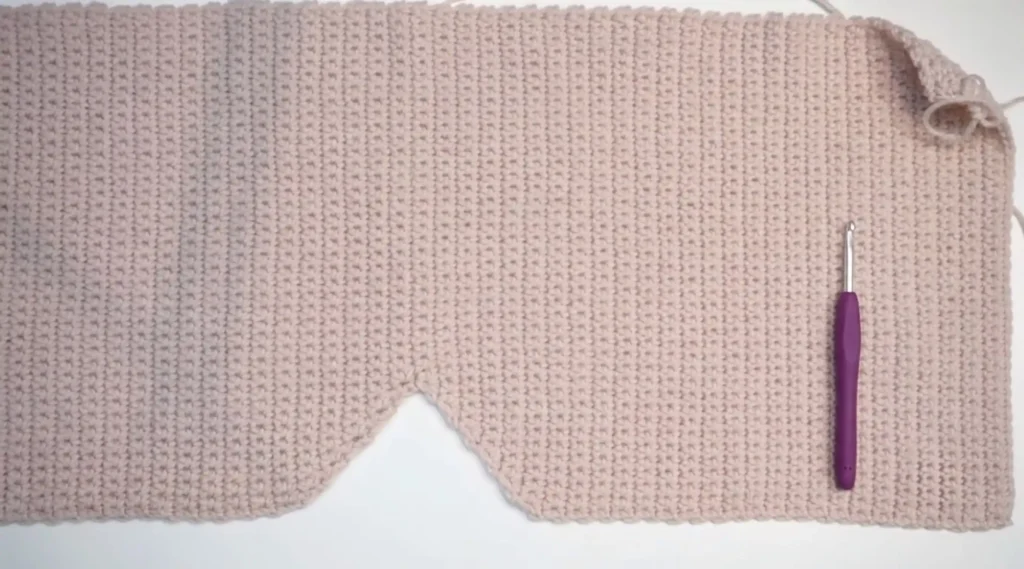
What you need to know going in: this hood is worked as a single shaped panel, not a rectangle. The shape looks strange flat. It looks exactly right once you fold and seam it. Don’t panic mid-project.
What Yarn Works Best for a Sophie Hood
Worsted weight #4 is the sweet spot for this pattern — warm enough to be practical, light enough to not feel heavy on your head. That’s what this pattern is written for.
Acrylic is the most practical choice. Machine washable, affordable, huge color range. If you’re making this as a gift or your first one, go acrylic.
Cotton gives cleaner stitch definition and works better for spring/fall wear. It has less stretch than acrylic, so go up half a hook size if your tension runs tight.
Wool or wool blends drape beautifully and block perfectly. If you want the hood to hold its shape long-term and you don’t mind hand washing, wool is worth it.
Avoid anything too bulky (#6+) — the hood will end up stiff and lose the soft drape that makes it wearable.
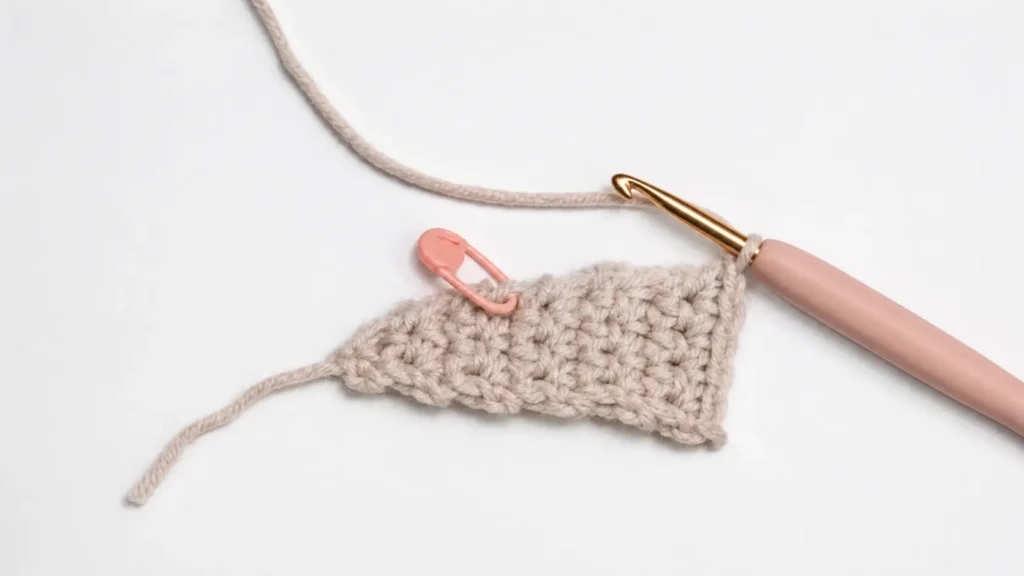
Stitches You’ll Use
- sc — single crochet (the main stitch throughout)
- inc — increase (2 sc in the same stitch)
- dec — decrease (sc2tog)
- sl st — slip stitch (for the border only)
- ch — chain (just the setup)
That’s the whole pattern. If you can sc in rows, you can make this hood.
Sophie Hood Crochet Pattern — Free (US Terms)
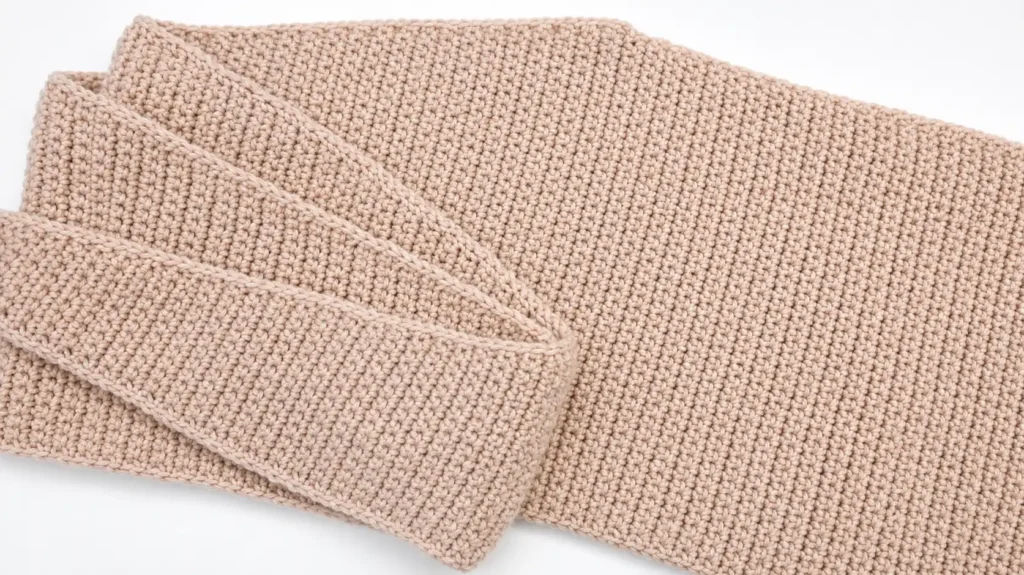
This hood is worked as one shaped panel — no seaming until the very end, no picking up stitches, no complicated construction. You build the shape as you go, row by row. When you’re done crocheting, you fold it once and seam one straight line. That’s it.
The shape looks unusual flat. That’s normal. Trust the process.
Materials
This post contains affiliate links.
| Item | Details |
|---|---|
| Yarn | Worsted weight #4 — approx. 200–250 yards |
| Hook | 4.5 mm – Check our crochet hook size guide |
| Notions | Tapestry needle, scissors, 2 stitch markers |
Finished size: One size fits most adults. Hood depth approx. 26 cm / 10 in.
Gauge
16 sc = 10 cm / 4 in
18 rows = 10 cm / 4 in
Check your gauge. This pattern works by measurement, not fixed row counts, so your tension matters more than usual. If you’re off, just adjust your hook size.
Abbreviations (US Terms)
Check our Crochet Abbreviations guide (us & uk).
- ch — chain
- sc — single crochet
- inc — 2 sc in same stitch
- dec — sc2tog (insert hook in next st, pull up loop, insert in following st, pull up loop, yo, pull through all 3 loops)
- sl st — slip stitch
- st(s) — stitch(es)
UK crocheters: US sc = UK dc.
Before You Start
Place a stitch marker on the right edge of your work after the first increase row. This is your increase edge — the only side that gets increases in Section A. Move the marker up every few rows so you always know which side you’re on.
You’ll use a second marker to track where your straight sections begin and end. Measure frequently instead of counting rows.
Section A — Building the Width
This is where the hood shape begins. You start with almost nothing and increase on one side only, every 4 rows, until the panel reaches full width.
Row 1: Make a slip knot, ch 2. Sc in 2nd ch from hook. (1 st) Ch 1, turn.
Row 2: Inc in first st. (2 sts) Ch 1, turn.
Rows 3–5: Sc in each st across. (2 sts) Ch 1, turn.
Row 6: Sc across to last st, inc in last st. (3 sts) Ch 1, turn.
That last stitch is your increase edge. Mark it.
Continue the pattern:
Work 3 rows straight, then on the 4th row: sc across, inc in the last stitch.
Keep going — 3 rows straight, increase on the 4th, 3 rows straight, increase on the 4th — until the panel measures 26 cm / 10 in wide when laid flat.
At gauge this is approximately 41 stitches. You’ll see one edge staying straight and one edge growing — that’s exactly right.
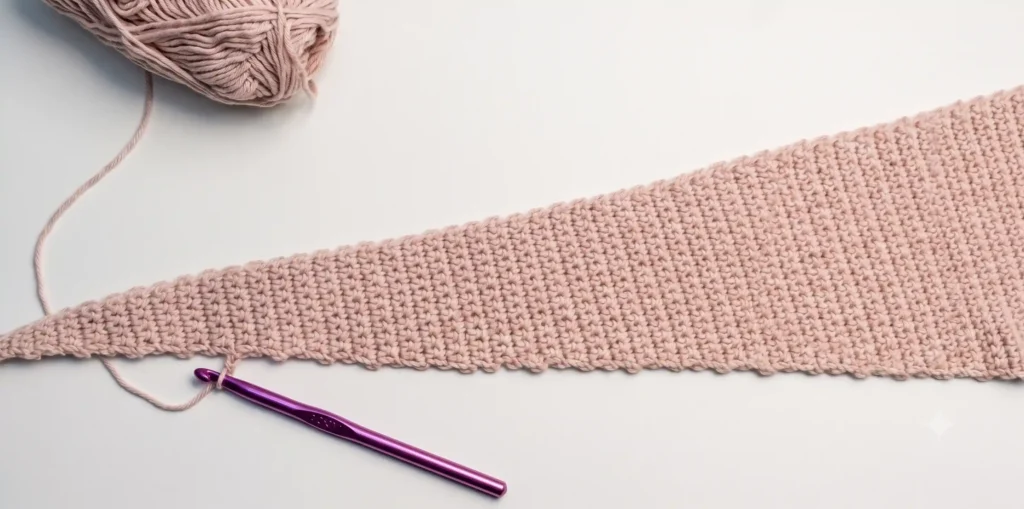
Section B — Straight Upper Section
Stop increasing. Work straight rows of sc — no increases, no decreases — until this section measures 26 cm / 10 in long.
Measure from the last increase row, not from the beginning of the piece. Place a stitch marker at the point where you stopped increasing so you know exactly where to measure from.
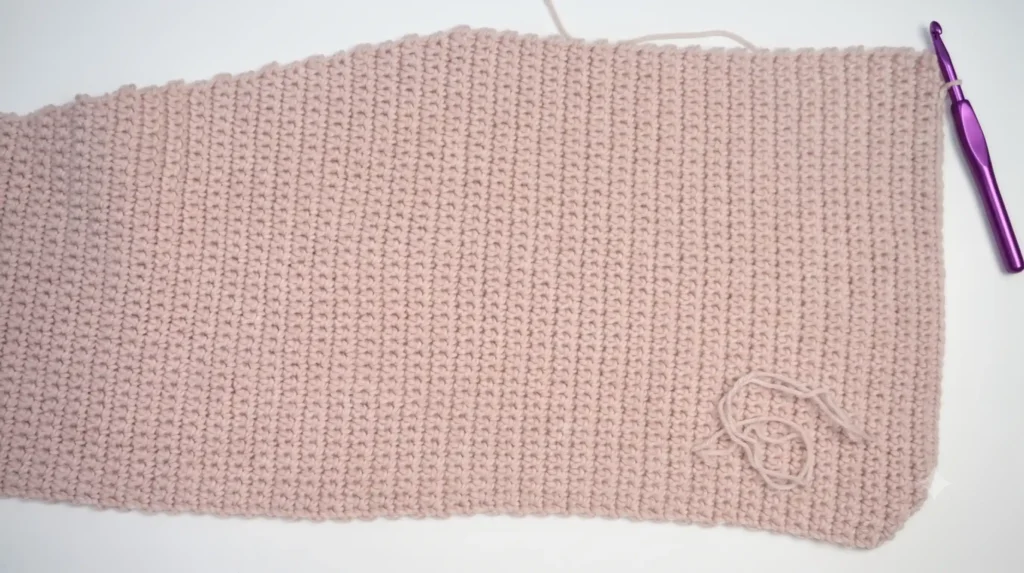
Section C — Crown Curve (Decreasing)
Here’s where the hood shape happens. You’re going to decrease on both sides until the panel narrows — this creates the curve that fits over the top of your head.
Every row: Dec in first st, sc across to last 2 sts, dec. (−2 sts per row)
Work every row as a decrease row until the panel measures 19 cm / 7.5 in wide.
It looks like you’re ruining it. You’re not.
Section D — Crown Curve (Expanding)
Now mirror what you just did. Increase on both sides every row until you’re back to full width.
Every row: Inc in first st, sc across to last st, inc. (+2 sts per row)
Work every row as an increase row until the panel is back to 26 cm / 10 in wide.
Sections C and D together form a concave notch in the top edge. When you fold the hood, this notch becomes the crown curve that sits over your head. It should look like a shallow V when laid flat.
Section E — Straight Lower Section
Same as Section B. Work straight rows of sc with no increases or decreases until this section measures 26 cm / 10 in long.
Section F — Closing the Hood
Mirror of Section A. You decrease on the right edge only, every 4 rows, until the panel closes to a point.
Every 4th row: Sc across to last 2 sts, dec. (−1 st every 4 rows)
Work 3 rows straight, decrease on the 4th. Repeat until only 1–2 stitches remain.
Fasten off, leaving a long tail. Weave in end.
Assembly
Lay the piece flat. The top edge runs the full length of the piece — Sections B, C, D, and E form this edge.
Identify what gets seamed: The straight edge of Section B meets the straight edge of Section E. Section A meets Section F at the pointed ends.
Fold the piece so Section A aligns with Section F and Section B aligns with Section E. The crown notch (Sections C+D) naturally becomes the top of the hood without any seaming.
Seam along the top using your tapestry needle and a length of matching yarn. Seam only the straight portions (B to E) — the curve (C+D) stays open and forms the crown naturally.
Turn right side out.
Border
With RS facing, attach yarn at the bottom corner of the face opening.
Work sl st evenly around the entire face opening — insert hook, yo, pull through both loops. Keep it loose. A tight border pulls the opening and makes it uncomfortable to wear.
Continue sl st along the bottom edge. Join and fasten off. Weave in all ends.
Sizing Adjustments
Larger: increase maximum width to 28–30 cm and extend straight sections to match.
Smaller / child size: reduce maximum width to 20–22 cm and shorten straight sections to 20 cm.
Shoulder coverage: after the border is complete, work additional rows of sc downward from the bottom edge to extend the panel over the shoulders.
Tips From One Crocheter to Another
Keep that stitch marker on the increase edge. After a few rows of straight sc it’s easy to forget which side gets the increase — the marker saves you from having to rip back.
Measure constantly. Every 10–12 rows at minimum. This pattern is built around measurements, not row counts, and catching a gauge problem early is much easier than catching it at the end.
The crown notch is the piece that surprises everyone. When the piece is flat it looks like you made a mistake somewhere around Section C. You didn’t. Fold it and you’ll see the hood immediately.
Block after finishing. Even a quick soak and flat dry makes a real difference — the sc fabric relaxes, the shape evens out, and the hood drapes properly over the head instead of sitting stiff.
Pause the video and follow along row by row for the best results.
⚠️ Common Mistakes When Making a Sophie Hood Crochet
The most common problem is starting too tight — if your foundation feels stiff from row one, go up half a hook size. A hood that starts tight never relaxes into shape.
The second most common: not measuring as you go. The panel will look wrong at several points during construction. Measure, don’t guess.
Skipping the border is tempting when you’re almost done. Don’t. The sl st border is what gives the face opening a clean, finished edge — without it the sc rows fray and curl.
🔧 Troubleshooting Common Sophie Hood Crochet Problems
1. The hood feels too tight
This usually happens when the stitch tension is too tight.
✔ Try going up one hook size.
✔ Add extra chains at the starting panel.
2. The hood looks flat and boxy
This can happen if the seam is too sharp.
✔ Steam block lightly.
✔ Add an extra row of increases near the top.
3. The opening feels loose
✔ Work additional rows around the face in SC.
✔ Add a drawstring for adjustable fit.
4. The shoulder pieces curl
✔ Add rows in HDC with slight increases.
✔ Alternatively, block the finished piece.
5. Yarn splits when crocheting
This is common with cotton yarns.
✔ Use metal hooks for smoother gliding.
✔ Slow down your stitching slightly.
🧼 Care Instructions for Your Sophie Hood Crochet
To help your Sophie Hood stay beautiful and comfortable for years, it’s important to care for it properly. Crochet garments are handmade and delicate, so gentle cleaning and storage will help preserve both the stitches and the yarn fibers.
Washing Your Crochet Hood
Hand washing is always the safest method for handmade crochet items.
Fill a basin with cold or lukewarm water and add a small amount of mild detergent designed for delicate fabrics. Submerge the hood and gently press the water through the fibers without twisting or scrubbing.
Let it soak for about 10–15 minutes, then rinse carefully with clean water until all soap is removed.
Machine Washing (If Yarn Allows)
If your Sophie Hood is made from acrylic yarn or other machine-washable fibers, you may use a washing machine on a delicate cycle.
For extra protection:
• place the hood inside a mesh laundry bag
• use cold water only
• choose a gentle or delicate cycle
• avoid strong spinning cycles
This helps prevent stretching or distortion of the crochet stitches.
Drying the Hood
Never hang your crochet hood to dry. The weight of the wet yarn can stretch the stitches and permanently change the shape.
Instead:
• gently press excess water out using a clean towel
• lay the hood flat on a drying rack or towel
• reshape the hood while it is still damp
• allow it to air dry naturally
Avoid tumble dryers, as heat can damage the yarn fibers.
Blocking for a Perfect Shape
If your hood loses its shape after washing, light blocking can help restore the structure.
Lay the hood flat and gently shape the edges. If needed, use light steam from a steamer or iron (without touching the yarn directly) to relax the fibers.
Blocking is especially helpful when working with cotton or wool yarns.
Storage Tips
When storing your Sophie Hood for long periods:
• keep it folded rather than hung
• store it in a breathable cotton bag or drawer
• avoid humid environments
• keep it away from Velcro, zippers, or rough surfaces that may snag the stitches
Proper storage will help maintain the softness and shape of the hood over time.
🎨 Popular Color Combinations for Sophie Hood Crochet
Color selection can completely transform the look of your Sophie Hood crochet project. While neutral tones create a timeless accessory, bold colors can turn the hood into a statement piece.
Here are some popular color combinations crocheters love to use.
Classic Winter Neutrals
Charcoal gray, cream, and soft beige create a sophisticated winter look that pairs beautifully with coats and jackets.
Autumn Inspired
Burnt orange, olive green, and mustard yellow reflect cozy fall aesthetics and work well with rustic outfits.
Soft Pastels
Lavender, blush pink, baby blue, and mint green create a gentle and dreamy hood perfect for spring and early fall.
Minimalist Monochrome
Different shades of the same color — such as light gray, medium gray, and dark gray — produce a modern minimalist design.
Many crocheters also experiment with gradient yarn cakes, which allow the hood to shift colors gradually without frequent yarn changes.
❓ Frequently Asked Questions (FAQs)
Is this beginner-friendly?
Yes, if you’re comfortable with sc rows, increases, and decreases. The construction is unusual but the stitches are basic.
How long does it take?
3–5 hours at a comfortable pace.
Can I use HDC instead of SC?
Yes — HDC gives a looser, drapier result and works up faster. The gauge changes so measure carefully. HDC is slightly taller than SC, meaning your sections will reach the target measurements in fewer rows.
What if my gauge is off?
Go up a hook size if your fabric is too stiff, down a hook size if it’s too loose. Since the pattern works by measurement, gauge affects finish time more than final size.
Can I make this in two colors?
Yes — change colors at the beginning of any row. Clean color changes happen naturally with sc. Gradient yarn cakes also work beautifully because the color shift follows the width changes.
Can I sell finished hoods made from this pattern?
Yes. Please credit Patterns Here as the pattern source when posting online.
See Also
Easy Granny Square Pattern — Free Beginner Tutorial
Crochet Hook Size Chart — US, Metric & Brand Comparison
How to Half Double Crochet (hdc) — Step-by-Step Tutorial
Crochet Abbreviations — Complete Reference Chart
📣 Follow Patterns Here
If you enjoyed this Sophie Hood Crochet guide, follow us for more free tutorials and inspiration:
- Pinterest: Follow for daily pins → Click Here to Follow Us
- Facebook: Join our cozy maker community → Click Here to Follow Us
🎉 Conclusion
The Sophie Hood Crochet is a cozy, stylish accessory that’s fast to make and incredibly satisfying. Whether you’re looking for a practical winter hood, a beautiful handmade gift, or a social-media-worthy crochet project, this pattern checks all the boxes. With the simple steps provided, paired with the full pattern you will add later, crocheters of any skill level can make a stunning hood that fits perfectly and lasts for years.