
Easy Granny Square Pattern: A Beginner-Friendly Crochet Guide to Master Your First Square
The granny square is one of the most iconic crochet motifs — and one of the easiest to learn. This free pattern teaches you the classic 3-round granny square from scratch, written in clear US crochet terms.
One square takes about 15–30 minutes. Once you know the pattern, you can make blankets, cardigans, bags, and more.
What You Need
| Material | Recommendation |
|---|---|
| Yarn | Medium weight #4 worsted — cotton or acrylic |
| Hook | 5.0 mm (H/8) – Check our Crochet Hook Size Guide |
| Scissors | Any |
| Tapestry needle | For weaving ends |
| Stitch markers | Optional — helps mark corners |
Abbreviations Used
Check the full crochet abbreviations chart.
- ch — chain
- dc — double crochet
- sl st — slip stitch
- sp — space
- rep — repeat
All terms are US. UK crocheters: US dc = UK tr.
Easy Granny Square Pattern
Round 1
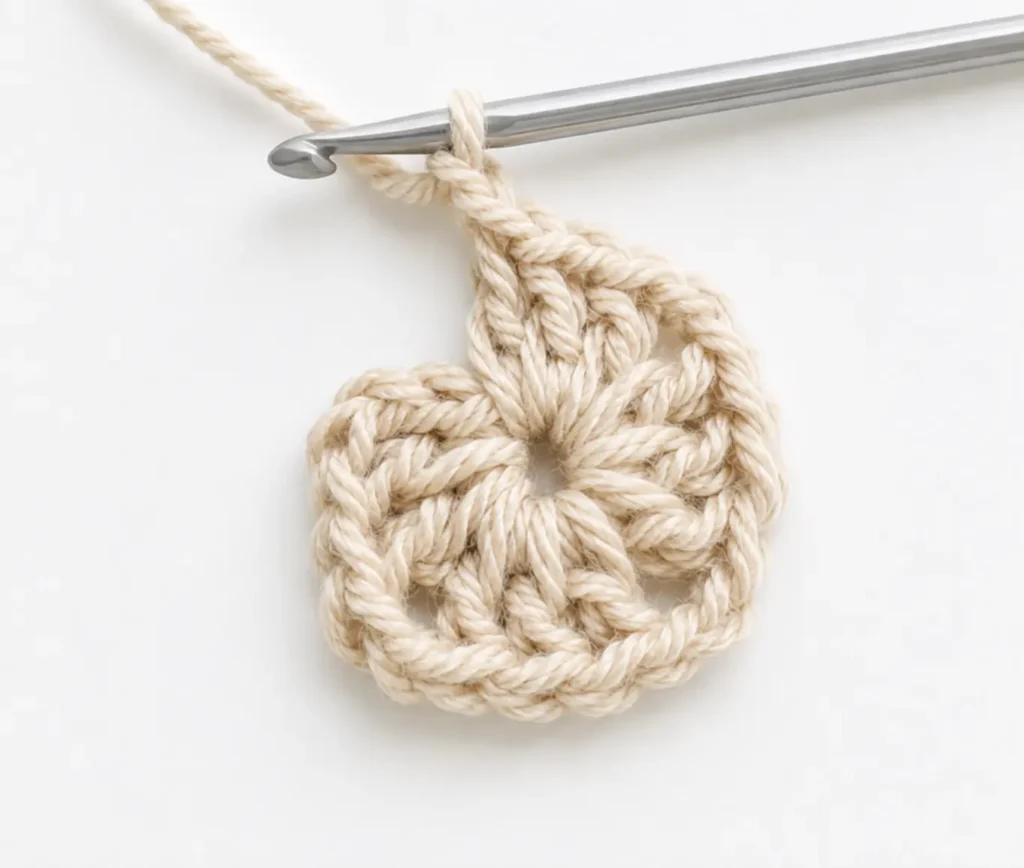
Make a magic ring – check our magic circle crochet guide.
Ch 3 (counts as first dc), 2 dc into ring, ch 2.
(3 dc into ring, ch 2) rep 3 more times.
Sl st into top of beginning ch-3 to join. — 4 clusters, 4 ch-2 corner spaces
Fasten off or continue with Round 2.
Round 2
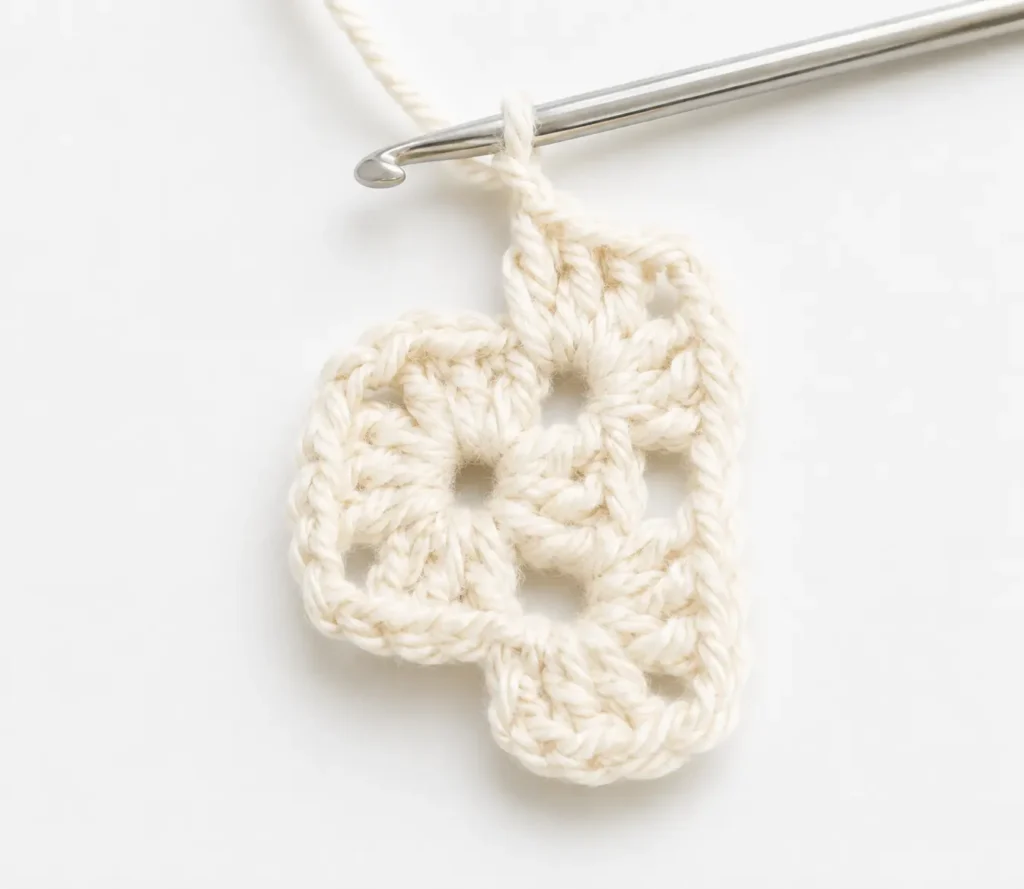
Join yarn in any ch-2 corner space.
Ch 3 (counts as first dc), 2 dc in same corner space, ch 2, 3 dc in same corner space. — first corner made
In next ch-2 corner space: (3 dc, ch 2, 3 dc) — rep around remaining 3 corners.
Sl st into top of beginning ch-3 to join. — 4 corners, no side clusters yet
Round 3
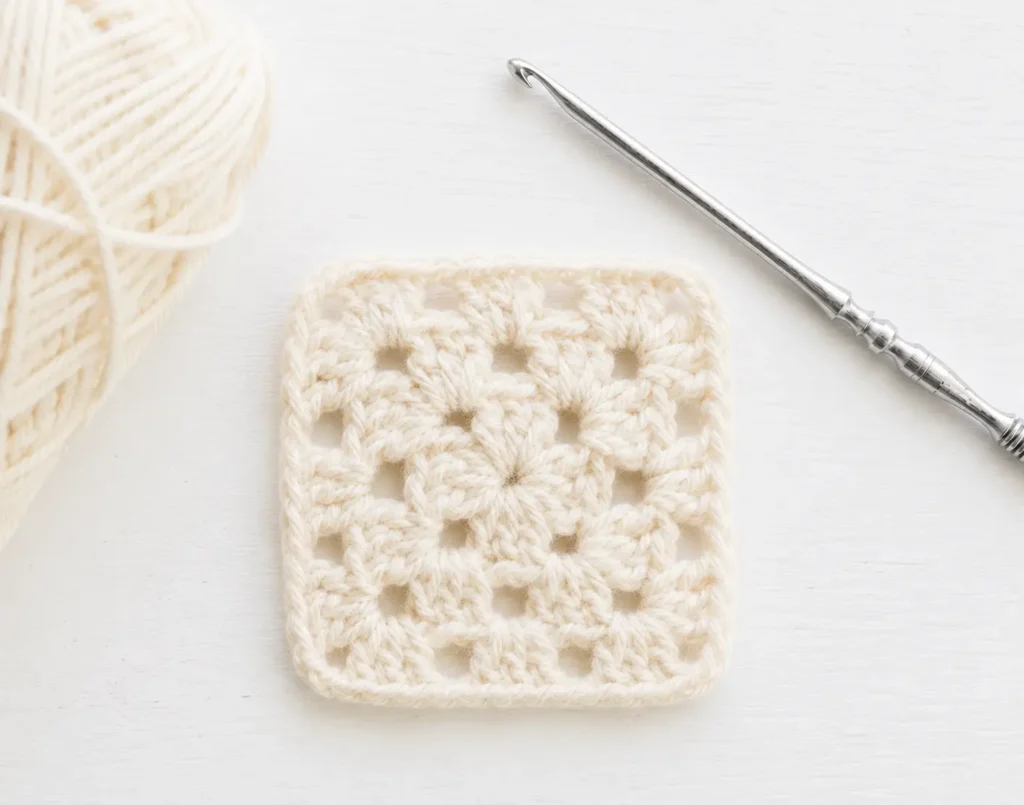
Join yarn in any ch-2 corner space.
Ch 3, 2 dc in same corner space, ch 2, 3 dc in same corner space. — corner
3 dc in the space between the two corner clusters on that side. — side cluster
(3 dc, ch 2, 3 dc) in next corner space, then 3 dc in side space — rep around.
Sl st into top of beginning ch-3 to join. — 4 corners + 1 side cluster per side
Round 4+ (Optional)
Each new round follows the same logic:
- (3 dc, ch 2, 3 dc) in every corner ch-2 space
- 3 dc in every side space between clusters
Add as many rounds as needed for your project size.
Finishing
Fasten off. Weave in all ends securely using a tapestry needle.
Block lightly by pinning to a foam board or steaming — this evens out the stitches and flattens the corners.
Video Tutorial
Stitch Count Guide
| Rounds | Clusters per side | Approx. size (worsted) |
|---|---|---|
| 3 | 1 side cluster | ~4 inches |
| 4 | 2 side clusters | ~5.5 inches |
| 5 | 3 side clusters | ~7 inches |
| 6 | 4 side clusters | ~8.5 inches |
Troubleshooting
| Problem | Cause | Fix |
|---|---|---|
| Square curls or warps | Tension too tight | Relax grip or go up one hook size |
| Corners don’t lie flat | Missing ch-2 in corners | Every corner needs exactly ch 2 between the two 3-dc groups |
| Square not square | Missing side clusters | Work 3 dc in every side space, not just corners |
| Edges uneven | Wrong join placement | Always sl st into top of ch-3, not the side of a dc |
| Stitch count growing | Treating ch-3 as a stitch AND working into it | Ch-3 counts as first dc — don’t add another dc in the same stitch |
How to Change Colors
Change colors at the beginning of any round:
- Finish the last sl st join of the current round
- Cut yarn, leaving a 6-inch tail
- Join new color with a sl st in any corner space
- Continue with ch-3 and the new round
For a classic multicolor granny square: use a different color for each of the first 3 rounds, then a solid color for the border.
Joining Granny Squares
Once you have multiple squares, join them using one of these methods:
Whip stitch — hold two squares wrong sides together, sew through the outer loops with a tapestry needle. Simple and flat.
Slip stitch join — hold squares together, sl st through both outer loops with a hook. Creates a visible ridge that can be used as a design detail.
Join-as-you-go — on the final round of each new square, join to the previous square by replacing the corner ch-2 with a sl st into the neighboring square’s corner. No sewing needed.
Project Ideas Using Granny Squares
Throw blanket — for a 40×60 inch blanket using 6-inch squares, you need approximately 70–80 squares arranged in a 7×10 grid.
Granny square cardigan — join squares across the back, front panels, and sleeves. One of the most popular wearable crochet projects right now.
Tote bag — join 8–12 squares into a rectangle, fold and seam the sides.
Pillow cover — 4 large squares joined in a 2×2 grid fit a standard 18-inch pillow.
Coaster set — a single 3-round square makes a perfect drink coaster.
Home decor — like crochet flower curtain use granny square.
FAQs
How long does one easy granny square take?
Beginners typically finish a 3-round square in 20–30 minutes. With practice it drops to 10–15 minutes.
Can I make the square larger?
Yes — just keep adding rounds following the same corner and side cluster logic. Each round adds approximately 1.5 inches per side in worsted weight.
What yarn is best for beginners?
Acrylic worsted weight is the most forgiving — it’s affordable, easy to find, and slides smoothly on the hook. Cotton gives crisper stitch definition but has less stretch.
How many squares make a blanket?
For a throw (40×60 inches) using 6-inch squares: 70–80 squares. For a full-size bed blanket (60×80 inches): 130–140 squares.
Should I block every square before joining?
Yes, especially if your tension varies between squares. Blocking evens out size and makes joining much easier.
Why does my granny square look like a circle?
You’re missing the ch-2 in the corners. Without those chain spaces, the square has no corners and curves into a circle. Make sure every corner has exactly (3 dc, ch 2, 3 dc).
Can I use different yarn weights?
You can, but all squares in one project should use the same weight and hook size to keep sizes consistent.
See Also
- Persian Tiles Crochet Pattern – A stunning crochet blanket pattern that works beautifully with worsted weight yarn and standard hook sizes.
- Crochet Abbreviations (US vs UK): Complete Beginner Guide
- Crochet Hook Size Chart (US & Metric) + Yarn Weight Guide
- Crochet Blanket Patterns – Explore a collection of blanket patterns that use various yarn weights and hook sizes.
- Sophie Hood Crochet Pattern – Free and Easy Step-by-Step Tutorial
💬 Share & Connect!
If this post helped you, please:
⭐ Save this Easy Granny Square Pattern on Pinterest
👉 Follow Patterns Here on Pinterest
💙 Join our Facebook Page:
👉 The Best Crochet – Facebook Community
💌 Want free crochet patterns straight to your inbox?
Sign up for our newsletter on PatternsHere.com and get a free beginner pattern!
🧶 Conclusion
Congratulations — you’ve completed your easy granny square and unlocked the foundation of thousands of crochet projects!
From cozy blankets to chic cardigans, these simple squares are the building blocks of creativity. Once you master this one, you’ll have endless ways to expand your skills and express your style.
So grab your hook, pick your favorite yarn, and start crocheting your next masterpiece — one easy granny square at a time. 💕