
Free Crochet Bat Pattern — Easy Beginner Amigurumi (Halloween)
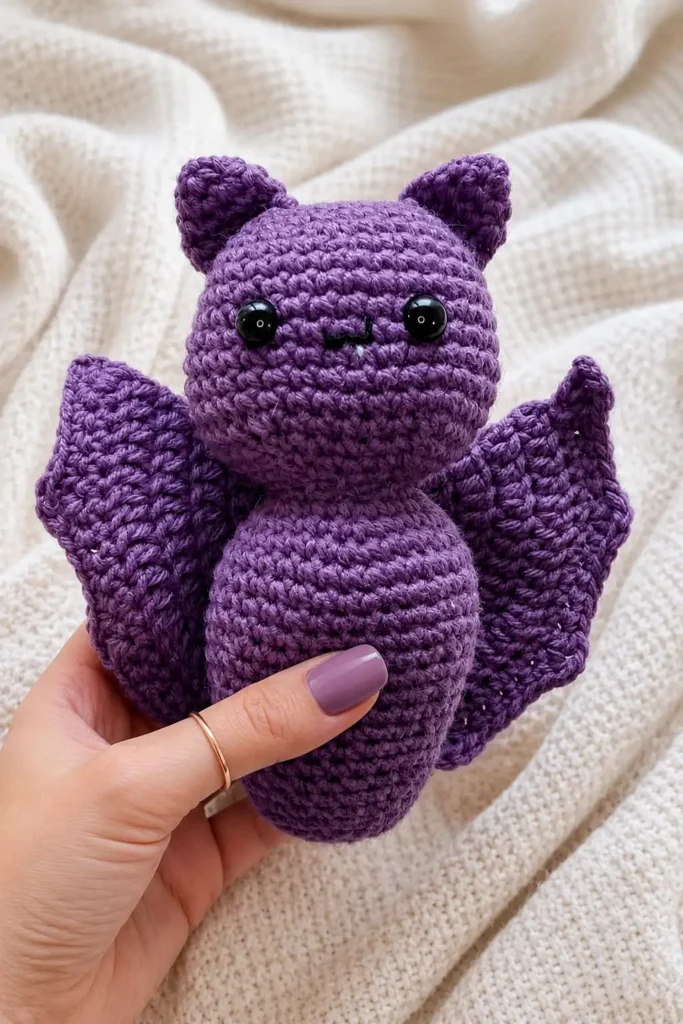
This crochet bat pattern free is the perfect companion to your ghost crew. Same easy amigurumi technique, same chenille fluffy look, and works up in about 40 minutes. No sewing required — the wings crochet right into the body.
Make a few in black, or mix in some purple and orange for a less spooky, more cute Halloween vibe.
This crochet bat pattern free uses simple shaping with no complicated techniques — just single crochet, basic increases and decreases.
Materials
Everything you need for this crochet bat pattern free is easy to find — no specialty supplies required.
This post contains affiliate links. If you purchase through these links, I may earn a small commission at no extra cost to you.
Yarn
- Bernat Blanket Yarn in Purple — matches the classic cute-bat look
- Lion Brand Velvet in Charcoal or Black — for the classic spooky version
Hook
Safety Eyes
- 12mm Safety Eyes Yellow or Black — yellow gives a classic spooky look
Stuffing
Finished size: approximately 5 inches tall with wings extended, using bulky chenille yarn.
Abbreviations (US Terms) for this Crochet Bat Pattern Free
- MR — magic ring (check our magic ring crochet)
- sc — single crochet
- inc — increase (2 sc in same stitch)
- dec — invisible decrease
- sl st — slip stitch
- ch — chain
- rnd — round
- st(s) — stitch(es)
How to Make This Crochet Bat Pattern Free — Step by Step
Work in continuous rounds. Place a stitch marker at the start of each round.
Head
Rnd 1: 6 sc in MR (6)
Rnd 2: inc in each st around (12)
Rnd 3: (sc, inc) × 6 (18)
Rnd 4: (2 sc, inc) × 6 (24)
Rnd 5–8: sc in each st around (24) — 4 rounds
Insert safety eyes between Rnd 5 and 6, approximately 7 stitches apart.
Rnd 9: (2 sc, dec) × 6 (18)
Stuff the head firmly now — it needs to hold its shape before joining to the body.
Rnd 10: (sc, dec) × 6 (12)
Rnd 11: dec × 6 (6)
Fasten off, leaving a 6-inch tail for closing and joining.
Body
Rnd 1: 6 sc in MR (6)
Rnd 2: inc in each st around (12)
Rnd 3: (sc, inc) × 6 (18)
Rnd 4–9: sc in each st around (18) — 6 rounds
Begin stuffing from Rnd 7 onward.
Rnd 10: (sc, dec) × 6 (12)
Rnd 11: dec × 6 (6)
Fasten off, leaving a 6-inch tail.
Joining Head to Body
Thread the head’s tail through a tapestry needle. Position the head on top of the body, centered. Sew around the base of the head, attaching it securely to the top of the body. Weave the end through to the inside before trimming.
Wings (make 2) — enlarged
Row 1: ch 11, sc in 2nd ch from hook, sc across (10 sts), ch 1, turn
Row 2: inc, sc across to last st, inc (12 sts), ch 1, turn
Row 3: sc across (12 sts), ch 1, turn
Row 4: inc, sc across to last st, inc (14 sts), ch 1, turn
Row 5: sc across (14 sts), ch 1, turn
Row 6: dec, sc across to last 2 sts, dec (12 sts), ch 1, turn
Row 7: dec, sc across to last 2 sts, dec (10 sts), ch 1, turn
Row 8: dec, sc across to last 2 sts, dec (8 sts)
Fasten off, leaving a long tail for sewing.
This larger wing matches the proportions in the photo — almost as long as the body itself.
Ears (make 2)
Rnd 1: 4 sc in MR (4)
Rnd 2: sc in each st around (4)
Rnd 3: sc in each st around (4)
Fasten off, leaving a tail for sewing.
Slightly taller than the original version — pinch the base flat when sewing to create that pointed triangle shape seen in the photo.
Assembly
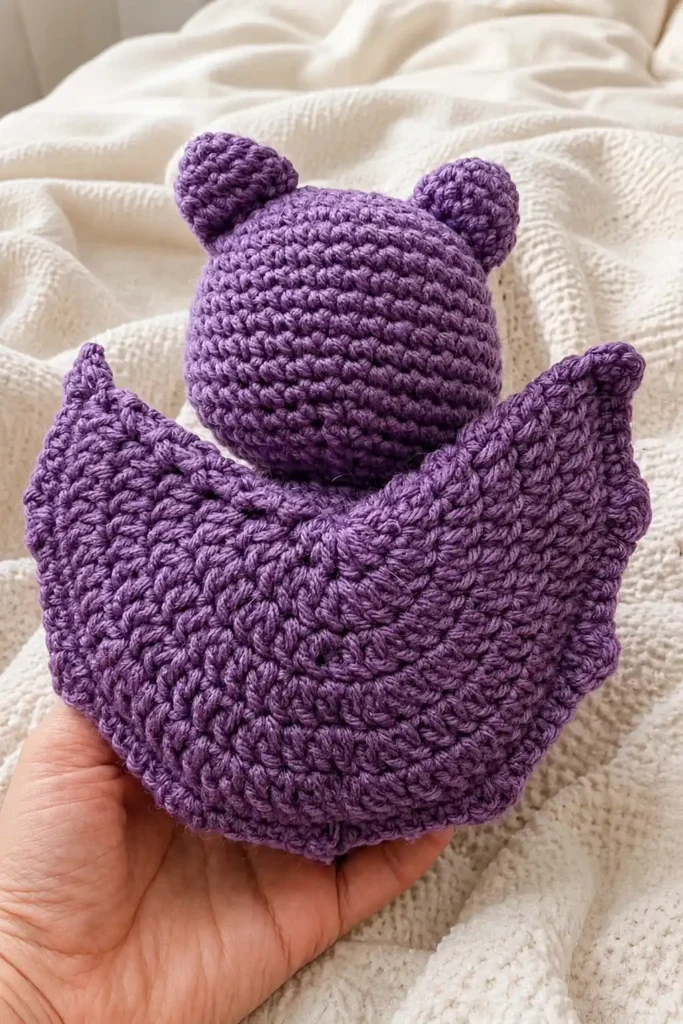
Attach the ears: position on top of the head, angled slightly outward, about 4 stitches apart at the base. Pinch each ear flat before sewing for a defined point.
Attach the wings: position at the upper sides of the body, just below where the head joins. Sew along the top 2–3 stitches only — let the rest of the wing hang free so it has natural movement and can be posed slightly outward like in the photo.
Finishing
Mouth: optional. With white or pink yarn, embroider two tiny fangs below the eyes for a playful spooky look.
Weave all ends through the inside of the body before closing.
Variations
Bat garland — make 6–8 bats, chain 100 stitches, attach each bat through the top of the head with a knotted loop. Space evenly.
Bat ornament — attach a small loop at the top of the head with embroidery thread for hanging on a Halloween tree or door.
Giant bat — use super bulky yarn and an 8.0mm hook for a 7-inch wingspan statement piece.
Two-tone bat — work the body in black and the wings in deep purple for added contrast.
Tips from one crocheter to another
The wings are the trickiest part — if your increases and decreases look uneven on the first try, that’s completely normal. Bat wings work better a little asymmetrical than perfectly matched.
Sew the wings on before you fully stuff the body. It’s much easier to position them while the body still has some give.
This crochet bat pattern free is forgiving — small variations in wing size or ear placement only add character.
If you’re using black yarn, work somewhere with good lighting. Black chenille hides stitch definition more than any other color — it’s easy to lose your place.
Project Ideas for Crochet Bat Pattern Free
Halloween garland with the ghost pattern — alternate bats and ghosts on the same chain for a mixed Halloween garland.
Trick-or-treat bag charm — attach to a keyring or zipper pull on a kid’s candy bag.
Window decoration — hang a cluster of 3–4 bats near a window using clear thread for a “flying” effect.
Halloween party favors — make mini versions (smaller hook, thinner yarn) as guest favors.
FAQs
Here’s what crocheters usually ask about this crochet bat pattern free:
Is this crochet bat pattern free suitable for complete beginners?
Yes, if you’re comfortable with single crochet, increases, and decreases. The wings involve basic flat crochet rows, which is a good first step beyond amigurumi worked in the round.
What yarn works best?
Chenille gives the soft, fluffy look shown here. If you’re new to amigurumi, practice with smooth worsted weight first — chenille hides your stitches, which makes it harder to learn on.
Can I make the wings bigger?
Yes — add 2 more chains to Row 1 and adjust the increases proportionally. Bigger wings give a more dramatic look but take a bit more sewing to attach securely.
Why does my bat look lopsided?
Usually the wings aren’t positioned symmetrically. Use a stitch marker to mark the exact center point on each side of the body before sewing, then count the same number of stitches up from the bottom on both sides.
Can I sell finished bats made from this pattern?
Yes. Please credit Patterns Here as the pattern source when posting online.
How long does one bat take?
About 40 minutes including assembly. The wings and ears go quickly once you’ve made the body.
See Also
- Free Crochet Ghost Pattern — Easy Beginner Amigurumi
- Magic Circle Crochet — Step-by-Step Guide
- Crochet Abbreviations — Complete Reference Chart
- Easy Granny Square Pattern — Free Beginner Tutorial
- Halloween Granny Square — Free Crochet Patterns (10+ Spooky Motifs)
- Crochet Pumpkin Pattern Free — Easy Beginner Amigurumi (Halloween)
- Crochet Ghost Pattern Free — Easy Beginner Amigurumi (Halloween)
- 25+ Free Halloween Crochet Patterns — Ghosts, Bats, Pumpkins & More