
Willow Granny Square Pattern — Free Crochet Tutorial (Step-by-Step)
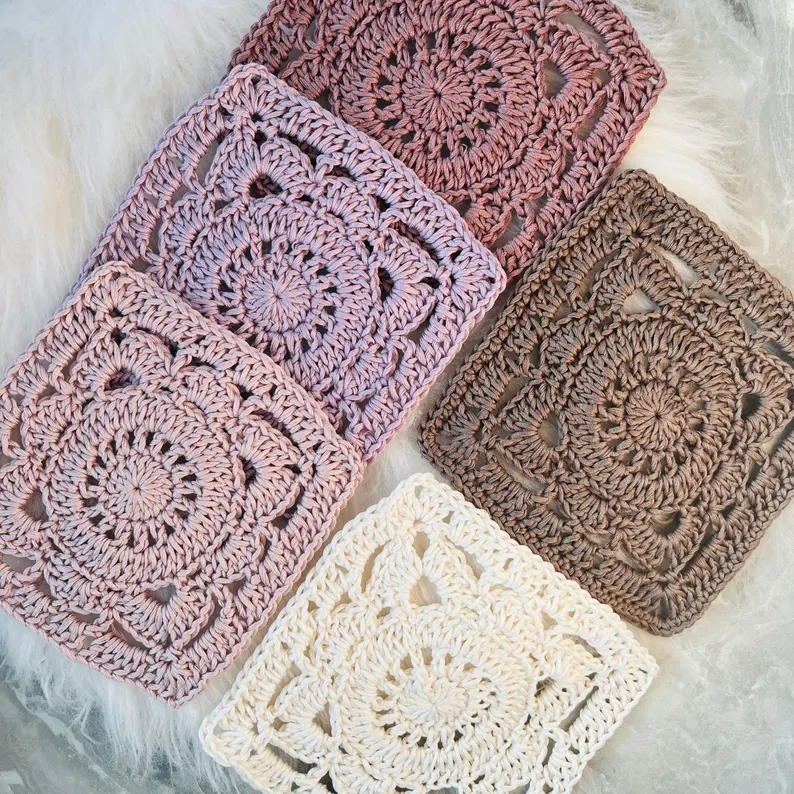
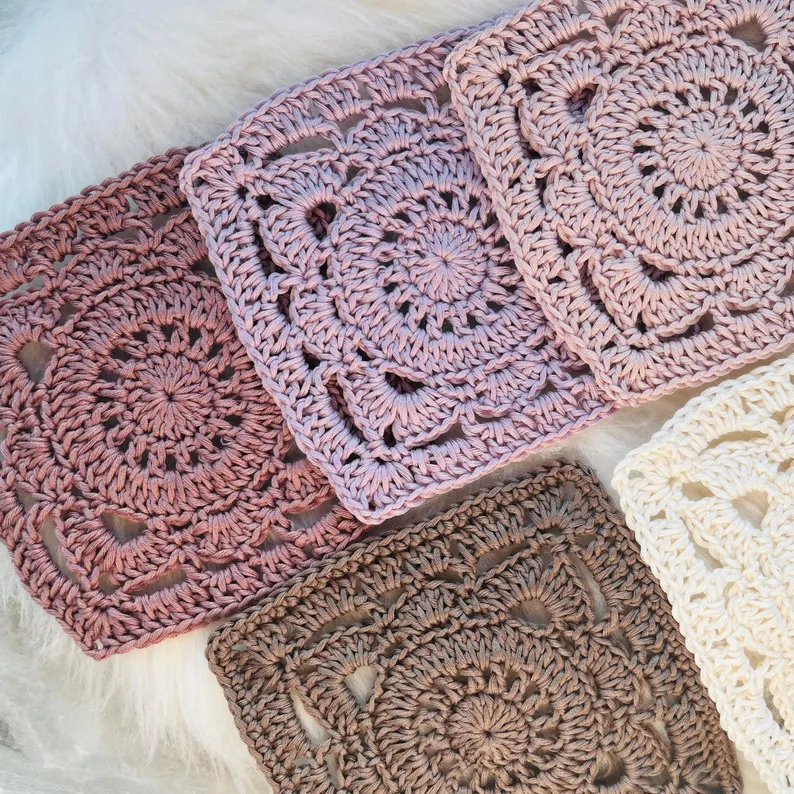
The willow granny square is one of the most beautiful and elegant crochet motifs you can learn. Known for The willow granny square is one of those patterns that looks like it took serious skill but is actually very approachable once you understand the structure. Eight rounds, a few different stitch combinations, and you have a square with that signature openwork floral design that photographs beautifully on blankets, cardigans, and bags.
This is the free Patterns Here version — full written pattern, round by round, with stitch counts verified. No PDF purchase required, no video-only instructions.
The willow granny square pattern is also called the flower granny square or floral granny square depending on where you find it. They’re all variations of the same construction: a circular center that transitions into a square through openwork chain spaces. This version uses 8 rounds and produces a finished square of approximately 6 inches / 15cm with worsted weight yarn.
Materials
This post contains Amazon affiliate links.
| Item | Details |
|---|---|
| Yarn | DK weight #3 — approx. 27 yards / 25m per square |
| Or | Worsted weight #4 — same yardage, larger finished square |
| Hook | 3.5mm for DK / 4.0–4.5mm for worsted |
| Notions | Yarn needle, stitch markers, scissors |
Finished size: approximately 5–6 inches / 12–15cm depending on yarn weight and hook size.
Yarn notes: Cotton gives cleaner stitch definition and is ideal for showing off the openwork structure. Acrylic works well for blankets — easy to wash and widely available. Avoid anything too fuzzy or textured — the chain spaces are the whole point of this pattern and they disappear in fluffy yarn.
Abbreviations (US Terms)
Check our abbreviations guide.
- MR — magic ring
- ch — chain
- sc — single crochet
- dc — double crochet
- sl st — slip stitch
- sk — skip
- sp — space
- st(s) — stitch(es)
- rep — repeat
UK crocheters: US dc = UK tr, US sc = UK dc.
How This Pattern Works
The willow granny square builds in three distinct phases:
Rounds 1–3 — circular center, working in joined rounds with turning
Round 4 — the transition round that shifts the circle into a square using chain spaces
Rounds 5–8 — building the square shape with corners, openwork arches, and a final border
The most important thing to know before starting: this pattern uses joined rounds with turning, not continuous spiral rounds. After each round you’ll slip stitch to join and then turn your work. This keeps both sides of the square looking clean — no obvious “right side” and “wrong side.”
Willow Granny Square Pattern
Round 1 — Center
Make a magic ring, or ch 4 and join with sl st to form a ring.
Ch 3 (counts as first dc throughout). Work 15 more dc into the ring. Pull ring closed. Sl st into top of starting ch 3 to join. (16 dc)
Round 2
Ch 4 (counts as dc + ch 1). Turn your work.
Dc into next dc, ch 1. Rep * to * around. Sl st into 3rd ch of starting ch 4 to join. (16 dc, 16 ch-1 spaces)
Turning the work here is what keeps both sides of the square looking equal — don’t skip this step.
Round 3
Ch 3 (counts as dc). Turn your work.
2 dc into next ch-1 space, 1 dc into next dc. Rep * to * around. Work 2 dc into the last ch-1 space. Sl st into top of starting ch 3 to join. (48 dc)
Round 4 — Transition Round
This is where the circle becomes a square. The chain spaces you create here will become the structure for all remaining rounds.
Ch 1. Turn your work.
Ch 5, sk 2 sts, sc in next st. Ch 3, sk 2 sts, sc in next st. Ch 4, sk 2 sts, sc in next st. Ch 3, sk 2 sts, sc in next st.
Rep * to * 3 more times. Ch 3, sl st into starting ch to join. (16 sc, 16 ch-spaces: 4×ch-5 corners, 8×ch-3 sides, 4×ch-4 centers)
Count your chain spaces carefully before moving on — you need exactly 16. The ch-5 spaces will become your four corners.
Round 5 — Building the Corners
Sl st twice to reach the center of the nearest ch-5 space.
Ch 3 (counts as dc). Work 4 more dc into the same ch-5 space. Ch 2. Work 5 dc into the same ch-5 space again. (First corner made.)
Sc into next ch-3 space. 7 dc into next ch-4 space. Sc into next ch-3 space. In next ch-5 space: 5 dc, ch 2, 5 dc. (Corner made.)
Rep * to * around. Sl st into top of starting ch 3 to join. (76 sts: 68 dc + 8 sc, plus 4 ch-2 corner spaces)
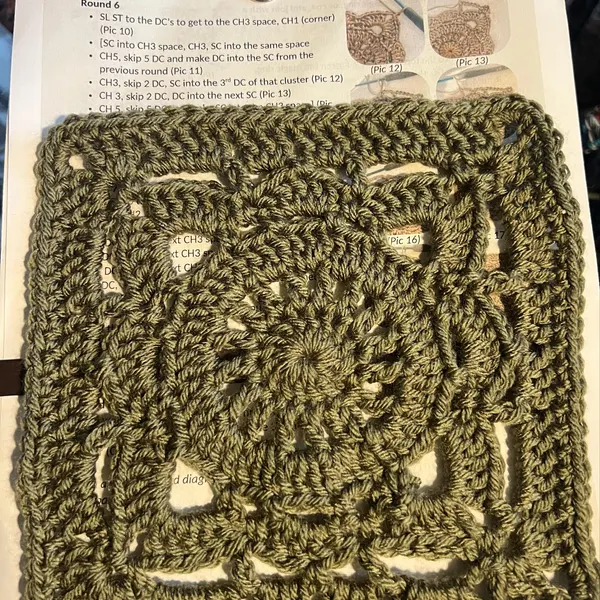
Round 6 — Openwork Arches
This is the most complex round — it creates the arching lines that give the willow square its signature look. Read through it once before starting.
Turn your work. Sl st into next st.
Ch 6 (counts as dc + ch 3). Sk 3 dc, sc in next dc. Ch 3, sk 3 dc, dc in next sc.
Ch 4, sc into corner ch-2 space, ch 2, sc into same corner space. Ch 4, sk 5 dc, dc into next sc. Ch 3, sk 3 dc, sc into next dc. Ch 3, sk 3 dc, dc into next sc.
Rep * to * 2 more times, working corners and sides.
After final side: ch 4, sl st into 3rd ch of starting ch 6 to join. (4 corners with ch-2 spaces, 4×ch-4 arches per side, ch-3 spaces between)
If this round feels confusing, slow down and identify your 4 corners first. Work one full corner-and-side repeat, check it looks right, then continue.
Round 7
Ch 3 (counts as dc). Turn your work.
Work 4 dc into first ch-4 space. In corner ch-2 space: 3 dc, ch 2, 3 dc. Work 5 dc into next ch-4 space. Work 3 dc into each of the next 2 ch-3 spaces. Work 5 dc into next ch-4 space.
Rep * to * around all 4 sides and corners. Sl st into top of starting ch 3 to join. (68 dc, 4 ch-2 corner spaces)
Round 8 — Border
Ch 1. Turn your work.
Sc in each st across all sides. In each corner ch-2 space: 2 sc, ch 2, 2 sc.
Rep * to * around. Sl st into first sc. Fasten off. (84 sc, 4 ch-2 corner spaces)
Weave in all ends.
Finishing
Block every willow granny square before joining — this is not optional for the willow granny square pattern. The openwork arches in Rounds 5 and 6 won’t lie flat without blocking. Wet blocking works best: soak the square in cool water for 10 minutes, press out excess water in a towel, pin to measurements on a blocking board, and let dry completely.
One blocked square next to one unblocked square is a dramatic difference — the stitches open up, the chain spaces breathe, and the square shape becomes crisp.
How Many Squares for a Blanket
| Blanket Size | Squares Needed | Approx. Dimensions |
|---|---|---|
| Baby | 30–42 | 30×42 in |
| Throw | 56–72 | 42×54 in |
| Twin | 110–130 | 55×78 in |
| Queen | 168–192 | 63×84 in |
Based on 6-inch squares in worsted weight. Adjust if your gauge produces a different finished size.
Color Ideas
Classic single color — works beautifully in one color. The openwork structure creates enough visual interest that you don’t need color contrast. Cream, sage, or dusty blue are popular choices.
Two-color — center rounds (1-3) in one color, outer rounds (4-8) in another. Clean and graphic.
Three-color — center, petals, and border each in a different color. Classic granny square aesthetic applied to a more sophisticated motif.
Gradient — use a gradient cake yarn and let the color shift naturally across the rounds. The result looks intentional without any planning.
Scrappy — use a different color for each square in a blanket. Works especially well because the openwork structure ties everything together visually regardless of color.
What to Make with the Willow Granny Square Pattern
Blankets — the most popular use. Join squares with a flat sl st join for a clean modern look, or a whip stitch join for a more visible seam that adds texture.
Cardigans — the openwork structure gives garments a lightweight, breathable feel. Use DK weight for drape.
Bags and totes — join a few squares and add handles. The structure is sturdy enough for everyday use with cotton yarn.
Shawls and wraps — join in a strip or triangle formation.
Pillow covers — make two squares the same size, join on three sides, insert pillow form.
Tips From One Crocheter to Another
Turn your work consistently. This pattern works in joined rounds with turning — if you forget to turn on one round, the square will show it. Make it a habit: join, turn, start next round.
Use stitch markers on your corners. After Round 4, place a marker in each of the 4 ch-5 corner spaces. This makes Round 5 much easier to navigate, especially the first time you make this square.
Round 6 is the one that trips people up. If you get confused, stop at the end of any repeat and check: you should have 4 groups of (sc, ch 2, sc) for your corners and the same ch-arch pattern repeating on each side. If that’s what you have, you’re on track.
Don’t skip blocking. Every experienced crocheter says this and every beginner ignores it. The willow granny square pattern specifically needs it because of the chain arches in Round 6 — they don’t open up without blocking and the square won’t look like the photos.
Troubleshooting
Square curling: tension too tight or hook too small. Go up half a hook size and re-check after blocking.
Openwork arches collapsing: yarn is too heavy for the hook, or tension is very tight. Use a lighter yarn or larger hook — the chain spaces need room to breathe.
Corners pulling in: add one extra chain to each corner ch-2 space in Round 7 or 8.
Square not square after Round 4: the transition round is slightly off. Recount your chain spaces — you need exactly 4 ch-5, 8 ch-3, and 4 ch-4, evenly distributed.
Squares not matching in size: tension varies between squares, which is normal. Block all squares and pin to the same measurements before joining.
Care Instructions
Cotton yarn: hand wash in cool water, lay flat to dry. Re-block if needed after washing.
Acrylic yarn: machine wash cold, gentle cycle, in a mesh bag. Lay flat to dry — heat distorts the chain spaces permanently.
Wool or wool blends: hand wash only with wool wash. Never wring. Press in a towel, re-block while damp, lay flat to dry.
Store blankets folded, not hung.
FAQs
Is the willow granny square pattern suitable for beginners?
It’s a confident beginner pattern — not the first square you make, but absolutely achievable if you know how to dc, join rounds, and work chain spaces. Make the classic granny square first if this is your first motif.
How long does one square take?
About 45–60 minutes for the first one. After a few, most crocheters get it down to 30–40 minutes.
Can I make this in one color?
Yes — single color willow granny squares look elegant and the stitch structure provides enough visual interest on its own.
What’s the best joining method for a blanket?
Flat slip stitch join gives the cleanest look. Join-as-you-go saves time on large projects. Whip stitch is softer and more flexible, good for baby blankets.
Can I sell finished items made from this pattern?
Yes. Please credit Patterns Here as the pattern source when posting online.
Do I need to block every square?
For this specific pattern, yes. The openwork arches in Round 6 don’t lie flat without blocking.
See Also
Crochet Abbreviations — Complete Reference Chart
Easy Granny Square Pattern — Free Beginner Tutorial
Retro Daisy Granny Square Pattern — Free Tutorial
Persian Tiles Crochet Pattern — Free Blanket Tutorial
Crochet Hook Size Chart — US, Metric & Brand Comparison