
Retro Daisy Granny Square Pattern — Free Crochet Tutorial
The retro daisy granny square pattern is one of those designs that looks like it took forever but actually works up faster than you’d expect. Three colors, one square at a time. The 3D petal effect comes from the way the background and petal rounds are worked alternately — you leave loops from each color and come back to them, which pushes the petals forward naturally.
This is the Patterns Here version, written from scratch with step-by-step instructions and photos of the actual process. The pattern is free, the square finishes at approximately 6 inches with worsted weight yarn, and everything you need is on this page.

Materials
This post contains Amazon affiliate links.
| Item | Details |
|---|---|
| Center color | Yellow worsted weight yarn #4 |
| Petal color | Hot pink worsted weight yarn #4 |
| Background color | Teal worsted weight yarn #4 |
| Hook | 4.0–5.0mm crochet hook |
| Notions | Yarn needle, stitch markers, scissors |
Finished size: approximately 6 inches / 15cm with worsted weight yarn and 4.5mm hook.
Color substitutions work in any combination — the construction is the same regardless of what colors you choose. Classic 70s palettes (mustard yellow, burnt orange, avocado green) look stunning. So do neutrals with a single bold petal color.
Abbreviations (US Terms)
Check our abbreviations guide.
- MR — magic ring
- ch — chain
- sc — single crochet
- hdc — half double crochet
- dc — double crochet
- sl st — slip stitch
- sk — skip stitch
- st(s) — stitch(es)
- PC — petal color (pink in photos)
- BGC — background color (teal in photos)
- rep — repeat
UK crocheters: US dc = UK tr, US sc = UK dc.
How This Pattern Works
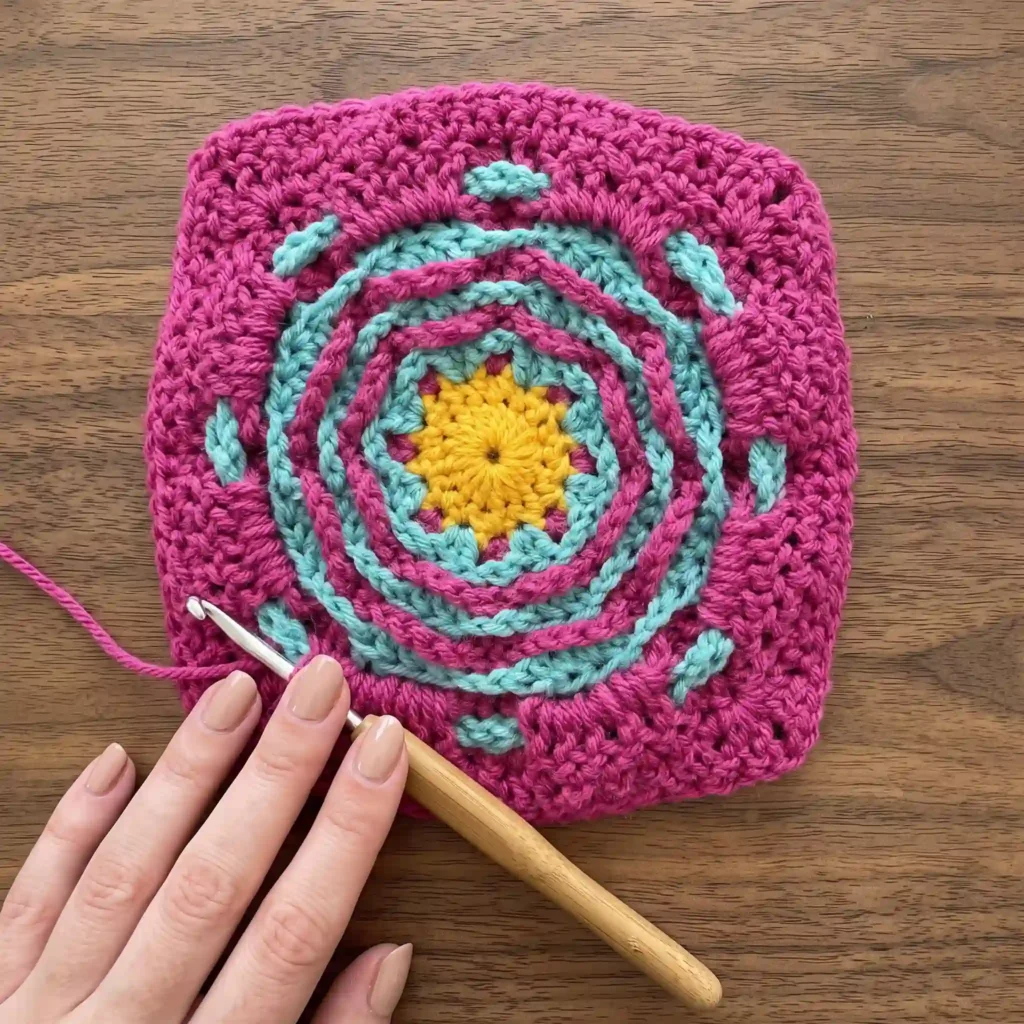
The retro daisy granny square pattern is built in alternating layers — you work the petal color and background color in the same round, leaving each color’s loop while you work the other. This is what creates the 3D effect: the petals sit on top of the background because each layer pushes the previous one forward.
Don’t cut yarn between sections unless instructed. Instead, pull up a loop and leave it — you’ll return to it in the next part of the round.
Retro Daisy Granny Square Pattern
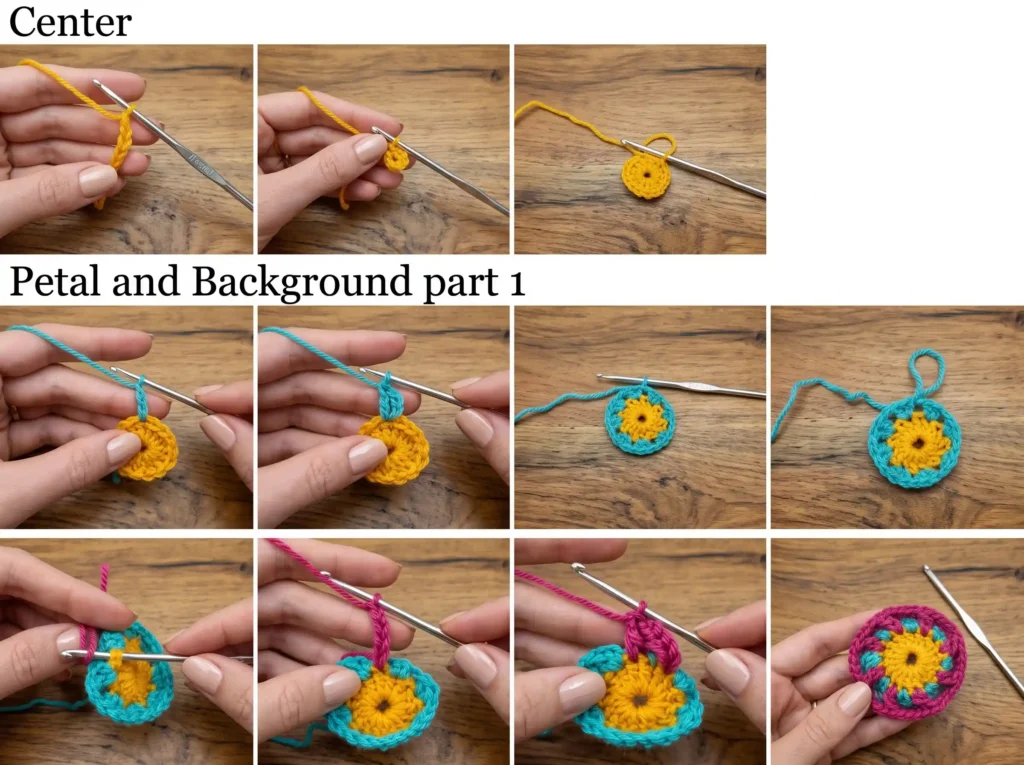
Part 1 — Center (Yellow)
Rnd 1: Make a MR, ch 1, work 8 sc into the ring. Pull ring tight, sl st to first sc to join. (8 sts)
Rnd 2: Ch 3 (counts as dc), dc in same st, ch 1, sk 1 st. 2 dc in next st, ch 1, sk 1 st. Rep * to * around. Sl st to top of ch 3 to join. (8 dc clusters, 8 ch-1 spaces)
Fasten off yellow, leaving a short tail. Weave in end.
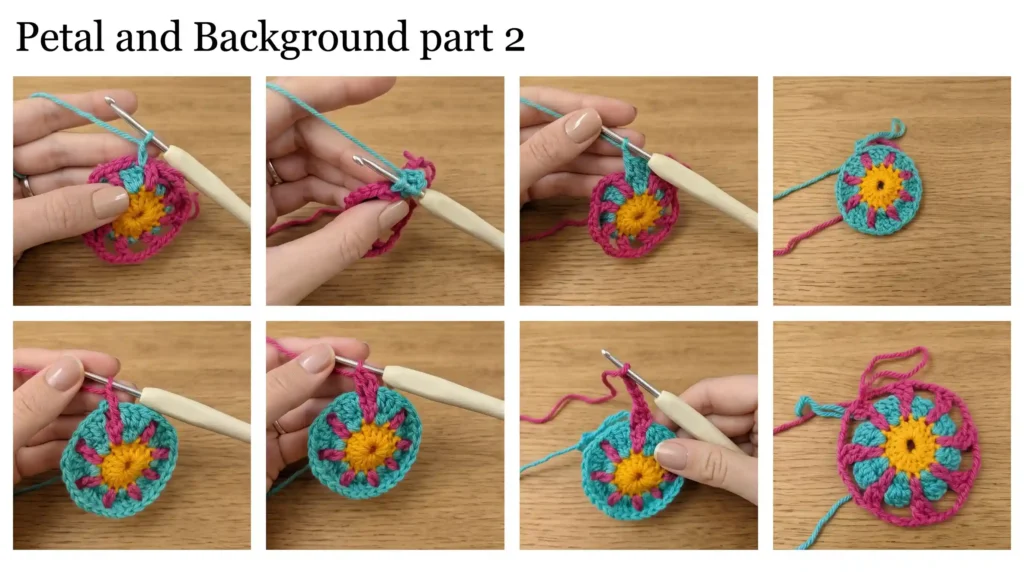
Part 2 — Petals and Background, Round 1
Petals (PC — pink):
Join PC to any dc cluster with sl st. Ch 3 (counts as dc), dc in same st, ch 1, sk next ch-1 space. 2 dc in next dc cluster, ch 1, sk ch-1 space. Rep * to * around. Sl st to top of ch 3. (8 petal clusters, 8 ch-1 spaces)
Do NOT fasten off. Pull up a loop and leave it — you’ll return to this color.
Background (BGC — teal):
Join BGC into any skipped ch-1 space from Rnd 2 of center with sl st. Ch 7 (counts as dc + ch 4). Dc into next skipped ch-1 space, ch 4. Rep * to * around. Sl st to 3rd ch of starting ch-7. (8 dc, 8 ch-4 spaces)
Do NOT fasten off. Pull up a loop and leave it.
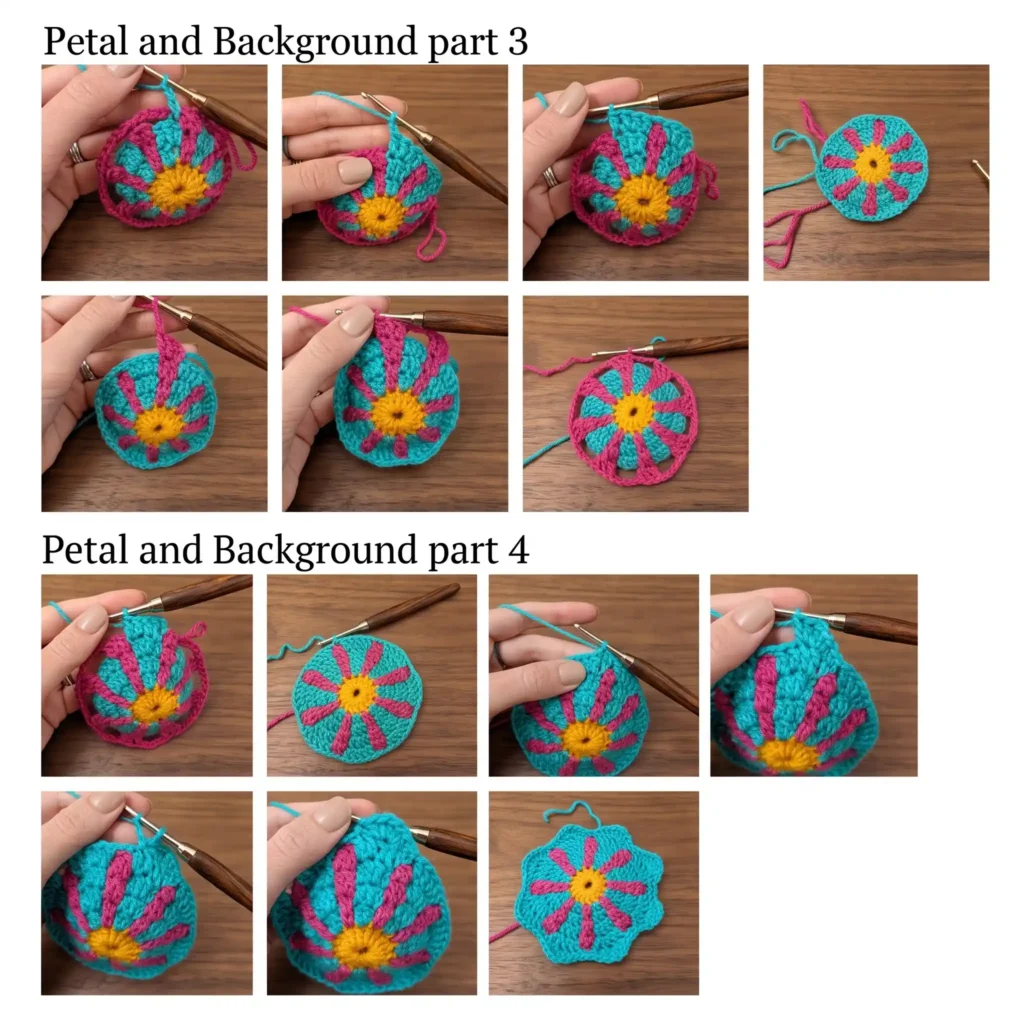
Part 3 — Petals and Background, Round 2
Petals (PC):
Push BGC ch-4 loops to the back of the work. Retake PC loop. Ch 3, dc in same st, dc in next st, ch 2. 2 dc in first dc of next cluster, dc in second dc, ch 2. Rep * to * around. Sl st to top of ch 3. (3 dc per cluster × 8, 8 ch-2 spaces)
Do NOT fasten off. Pull up loop and leave.
Background (BGC):
Push PC ch-2 loops to the back. Retake BGC loop. Ch 3, dc in same st, ch 5. 2 dc in next dc, ch 5. Rep * to * around. Sl st to top of ch 3. (2 dc per cluster × 8, 8 ch-5 spaces)
Do NOT fasten off. Pull up loop and leave.
Part 4 — Petals and Background, Round 3
Petals (PC):
Push BGC ch-5 loops to the back. Retake PC loop. Ch 3, 2 dc in next st, dc in 3rd st, ch 2. Dc, 2 dc in next st, dc, ch 2. Rep * to * around. Sl st to top of ch 3. (4 dc per cluster × 8, 8 ch-2 spaces)
Do NOT fasten off. Pull up loop and leave.
Background (BGC):
Push PC ch-2 loops to the back. Retake BGC loop. Ch 3, dc in same st, dc in next st, ch 5. 2 dc, dc in next st, ch 5. Rep * to * around. Sl st to top of ch 3. (3 dc per cluster × 8, 8 ch-5 spaces)
Do NOT fasten off. Pull up loop and leave.
Part 5 — Petals and Background, Round 4
Petals (PC) — body:
Push BGC ch-5 loops to back. Retake PC loop. Ch 3, dc in same st, dc in next 3 sts, ch 2. 2 dc, dc in next 3 sts, ch 2. Rep * to * around. Sl st to top of ch 3. (5 dc per cluster × 8, 8 ch-2 spaces)
Petals (PC) — petal edges:
Sl st into first st, sk 1 st, 5 dc in next st (petal shell), sk 1 st, sl st in next st, ch 2, sk ch-2 space. Sl st, sk 1, 5 dc in next st, sk 1, sl st, ch 2, sk ch-2 space. Rep * to * around. Sl st to join.
Fasten off PC.
Background (BGC) — final background round:
Push both PC ch-2 spaces to back. Retake BGC loop. Ch 3, dc in next 2 sts. Working behind the petal edges into the ch-5 spaces, dc 5 across the chain. Push ch-2 back, work BGC in front, dc in each st to next ch-5. Rep around, working 5 dc behind each petal edge. Sl st to top of ch 3 to join.
Do NOT fasten off BGC.
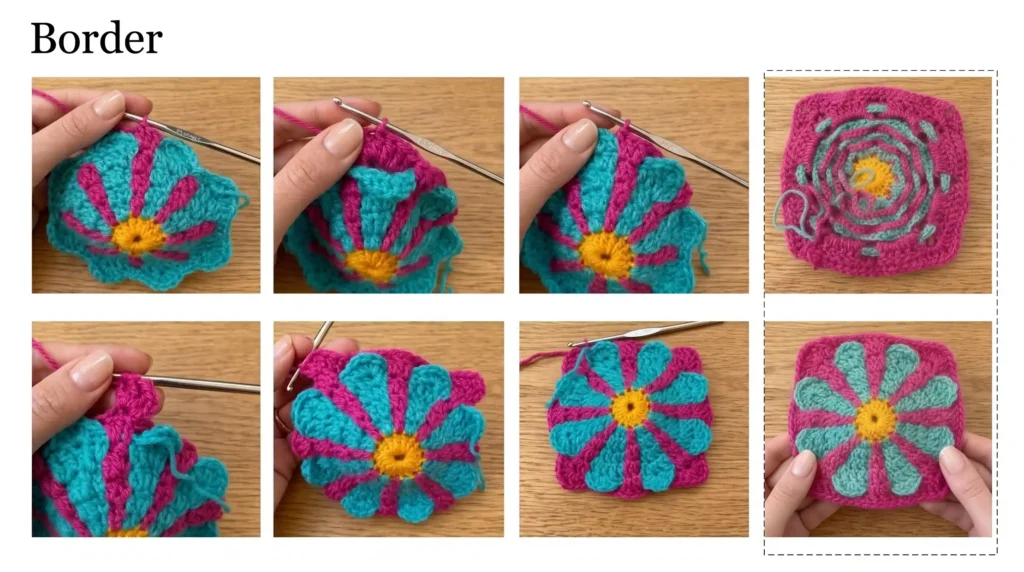
Part 6 — Border (BGC — turning circle into square)
This is what transforms the flower circle into a finished granny square. The corners are built using dc clusters with ch-2 corner spaces.
Rnd 1 (corners):
Ch 3, dc in same st, ch 2, 2 dc in same st (first corner made). Hdc in next 5 sts, sc in next 5 sts, hdc in next 5 sts. In same st: 2 dc, ch 2, 2 dc (corner). Rep * to * 2 more times. Last side: hdc 5, sc 5, hdc 5. Sl st to top of ch 3.
Rnd 2 (finish):
Ch 1, sc in each st around, working sc-sc into each ch-2 corner space. Sl st to ch 1. Fasten off, weave in all ends.
![step 6: finished square, front view showing completed daisy]](https://patternshere.com/wp-content/uploads/2025/05/retro-daisy-granny-square-finished-765x1024.webp)
🎥 Free YouTube Tutorial
Prefer a video tutorial? You can get the Retro Daisy Granny Square on YouTube here.
How Many Squares for a Blanket
| Blanket Size | Squares Needed | Approx. Dimensions |
|---|---|---|
| Baby | 36–48 | 36×45 in |
| Throw | 64–80 | 48×60 in |
| Twin | 120–140 | 60×80 in |
| Queen | 180–200 | 72×90 in |
Color Ideas for the Retro Daisy Granny Square Pattern
The three-color structure is what makes this pattern so versatile. You can completely change the look just by swapping the palette.
Classic 70s — mustard yellow center, burnt orange petals, avocado green background. The original aesthetic.
Modern minimalist — cream center, dusty rose petals, off-white background. Subtle and clean.
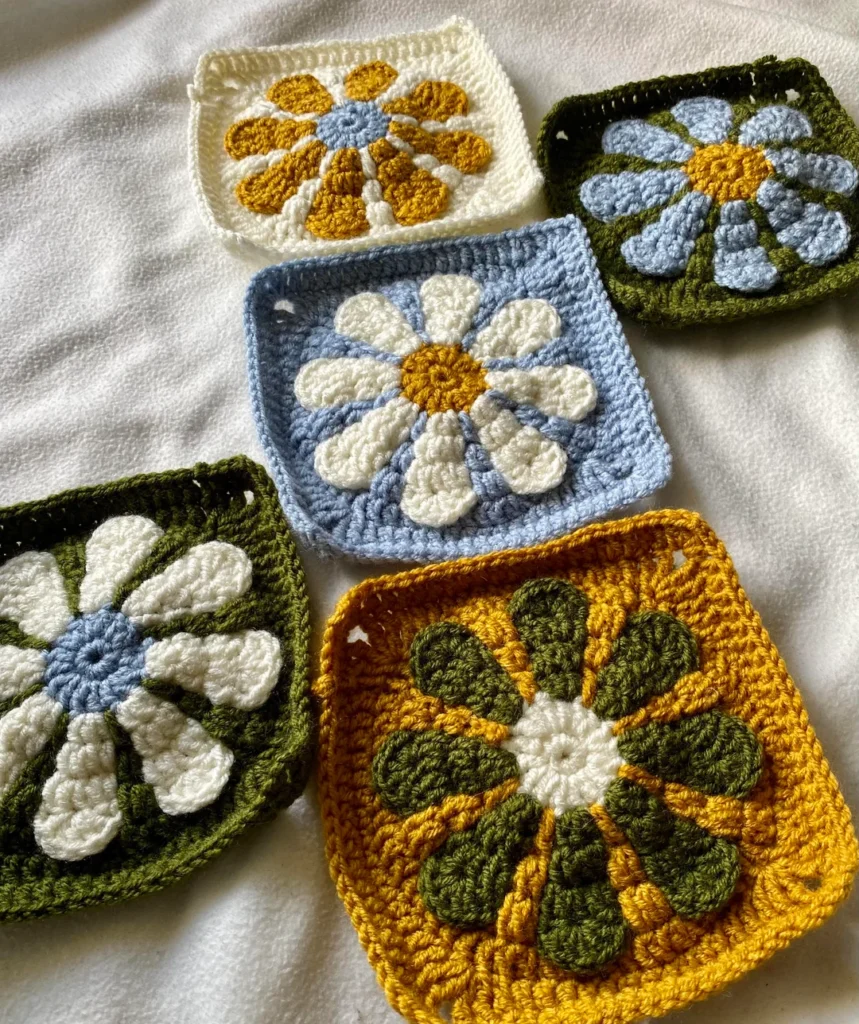
Bold graphic — white center, black petals, cobalt blue background. High contrast, very modern.
Pastel spring — pale yellow center, lilac petals, sage background. Light and airy.
Monochrome — three shades of the same color. Sophisticated and unexpected.
Tips From One Crocheter to Another
Keep the background loops out of the way. The most common mistake is accidentally crocheting into the wrong layer. When you push the BGC ch loops to the back, hold them there with your non-hook hand until you’ve completed the PC round. Same in reverse.
Don’t cut between petal and background rounds. The whole technique depends on leaving loops active. If you cut and rejoin, the joins show and the 3D effect is harder to maintain.
Color plan before you start a blanket. Lay out your colors in the actual arrangement before making more than a few squares — what looks good in theory sometimes looks muddy in a large repeat. Make 6–9 test squares first.
Block every square before joining. The petal edges can be slightly uneven straight off the hook. A light blocking evens them out and makes the squares join cleanly. Cotton yarn responds best to wet blocking; acrylic responds better to steam blocking.
The back side is your friend. The back of this retro daisy granny square pattern shows the construction clearly — if something looks wrong from the front, flip it over and you’ll usually see exactly where the issue is.
Troubleshooting
Petals not sitting on top / lying flat: The BGC loops aren’t being pushed to the back properly when you work the PC round. Hold them firmly to the back and don’t let them migrate forward.
Square curling at the corners: Tension is too tight in the border round. Go up half a hook size for the border only, or add an extra ch in each corner space.
Color changes look messy: Use the invisible join method when rejoining each color — insert hook into the first st, pull up a loop to the height of the stitch, then continue. Avoids the bump of a traditional sl st join.
Squares are different sizes: Tension variation between squares. Check gauge between the first few squares and adjust hook size if needed. Blocking helps significantly.
Care Instructions
Acrylic yarn: Machine wash cold, gentle cycle, in a mesh bag. Lay flat to dry. Do not tumble dry — heat can distort the 3D petal shape.
Cotton yarn: Hand wash cold or machine wash delicate. Lay flat to dry. Light steam blocking restores shape after washing.
Wool/wool blends: Hand wash only in cold water with wool wash. Press gently to remove water, never wring. Lay flat to dry. Re-block while damp.
Store folded, not hung. Hanging a large blanket stretches the squares over time.
FAQs
Is the retro daisy granny square pattern suitable for beginners?
If you’re comfortable with dc, sc, and joining rounds, yes. The alternating petal/background technique feels unusual at first but becomes intuitive after 2–3 squares.
How long does one square of retro daisy granny square pattern take?
About 45–60 minutes for the first one. After a few, most crocheters get it down to 30–40 minutes.
Can I use a different hook size?
Yes — the pattern is flexible. A larger hook gives more drape and a larger finished square. A smaller hook gives a tighter, firmer square. Adjust the number of squares needed for your blanket accordingly.
Can I make this in just two colors?
The center and petals can be worked in the same color, reducing it to two colors total. The 3D effect is slightly less defined but still looks beautiful.
Can I sell finished items made from this daisy granny square pattern?
Yes. The retro daisy granny square pattern is a traditional motif. Finished blankets, bags, and accessories can be sold — please credit Patterns Here as the pattern source.
What’s the best joining method for a blanket?
Flat slip stitch join gives the cleanest look and is invisible from the front. Join-as-you-go saves time if you’re making a large blanket. Whip stitch gives a softer, more flexible join good for baby blankets.
See Also
- Magic Circle Crochet — Step-by-Step Guide
- Easy Granny Square Pattern — Free Beginner Tutorial
- Persian Tiles Crochet Pattern — Free Blanket Tutorial
- Crochet Hook Size Chart — US, Metric & Brand Comparison
- Crochet Abbreviations — Complete Reference Chart
📌 Follow Patterns Here
If you love colorful crochet and vintage-inspired designs:
👉 Follow Patterns Here on Pinterest
👉 Follow Patterns Here on Facebook