
Crochet Wisteria Pattern – How to Make Stunning Hanging Flowers
Few crochet projects capture the essence of nature as beautifully as the Crochet Wisteria Pattern. Inspired by the cascading blossoms of the wisteria vine, this pattern allows crafters to create elegant hanging flowers that are versatile, romantic, and timeless.
The wisteria, with its draping clusters of purple, pink, or white flowers, symbolizes beauty, creativity, and love in many cultures. By recreating it in crochet form, you can bring this delicate flower into your home, events, or accessories—without worrying about seasonal blooms fading.
Whether you’re planning wedding decorations, enhancing your home with handmade garlands, or creating a unique gift, the Crochet Wisteria Pattern will bring a touch of magic to your project.
🌸 History & Inspiration of Wisteria Crochet
The wisteria flower has long been admired for its cascading clusters and soft elegance. In Japanese culture, it symbolizes love, humility, and longevity, while in Europe it often represents romance and creativity. Crocheters around the world were inspired by these blooms to develop the Crochet Wisteria Stitch, a floral crochet pattern that captures the natural beauty of vines and blossoms. By making your own wisteria motifs, you not only practice new crochet techniques but also recreate a piece of cultural heritage that has charmed people for centuries.
Materials Needed
To make realistic crochet wisteria, choose fine yarn and smaller hooks for detailed petals.
- Yarn: Soft cotton or cotton-blend in lilac, lavender, pink, white, or even gradient tones.
- Recommended: 100% Cotton Fingering Yarn
- Hooks: Small hooks for precision, usually between 2.0 mm and 3.0 mm.
- Suggested: 2.0 mm Crochet Hook and 3.0 mm Crochet Hook
- Scissors: Sharp thread scissors
- Yarn Needle: Tapestry needle
- Optional: Stitch markers for organizing rows
Step-by-Step Crochet Wisteria Pattern
Step 1 – Foundation Chain
Start with a chain of 25–40 stitches. The longer the chain, the longer the flower strand will be. For realistic vines, mix different lengths.
💡 Tip: If your chain twists, block it lightly before adding petals to keep strands neat.
Step 2 – First Petal Cluster
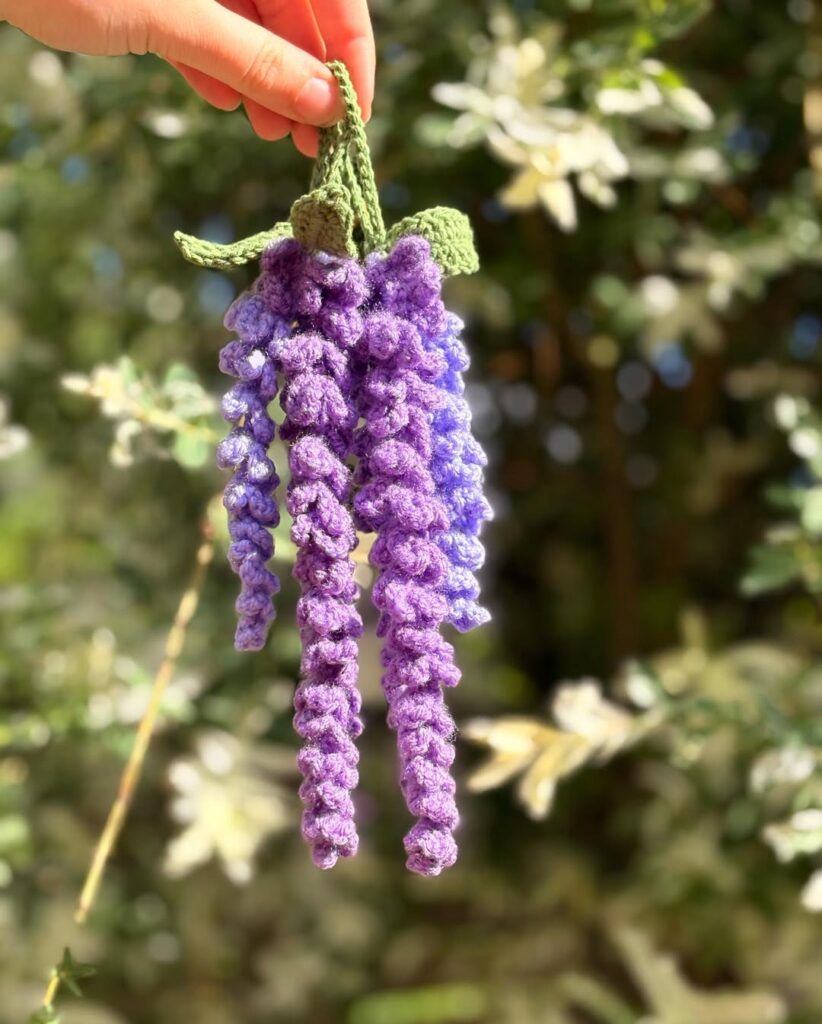
Row 1: Work puff stitches along the chain. Each puff stitch creates a petal.
To make a puff stitch: Yarn over, insert hook, pull up a loop. Repeat 3–4 times. Yarn over and pull through all loops, then chain 1 to secure.
💡 Tip: If your petals look flat, try adding one extra loop for fullness.
Step 3 – Layering the Flowers
Wisteria flowers look fuller when layered. On the top half of your strand, keep the petals smaller (2–3 loops). On the lower half, make larger petals (4–5 loops). This mimics nature’s cascade.
💡 Variation: Alternate between puff stitches and bobble stitches for more textured petals.
Step 4 – Adding More Strands
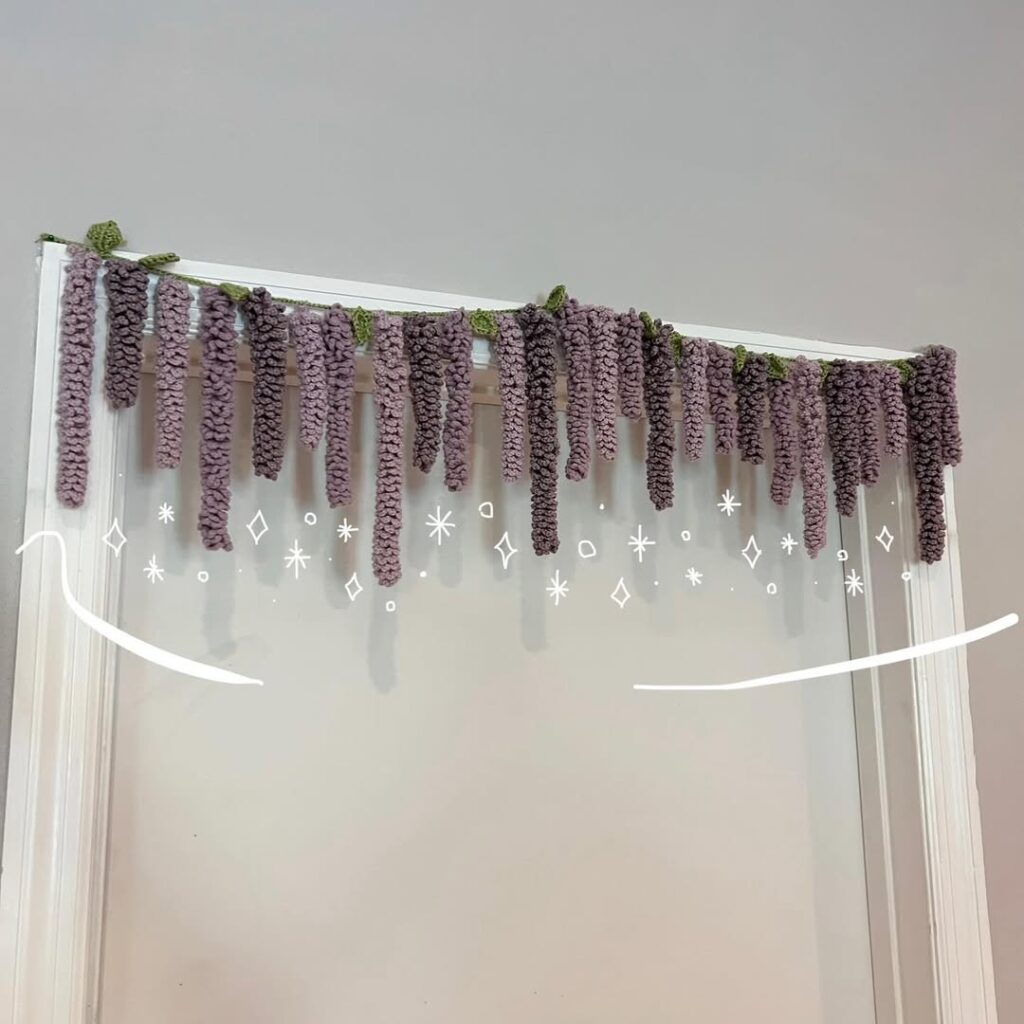
Repeat Steps 1–3 for multiple strands. Vary their lengths for a natural draping effect.
💡 Tip: For garlands, prepare at least 15–20 strands for a medium-size decoration.
Step 5 – Making the Vine
Chain 100–150 stitches, depending on how wide you want the vine. Attach flower strands by slip stitching them at intervals.
💡 Tip: Keep strands closer together at the top and spread them out toward the bottom for a cascading effect.
Step 6 – Adding Leaves
With green yarn, crochet small leaves using the following method: Chain 6. Work 1 sc, 1 hdc, 2 dc, 1 hdc, 1 sc along the chain. Attach around the vine between flower clusters.
💡 Variation: Mix small and large leaves for a more realistic look.
👉 Click Here to see the full pattern here.
Crochet Wisteria Variations
- Mini Wisteria: Perfect for hairpins, earrings, or bookmarks. Use lace yarn with a 1.5 mm hook.
- Large Wisteria Garland: Use DK yarn and a 3.5 mm hook for dramatic décor pieces.
- Wisteria Bouquets: Attach strands to floral wire and arrange in a vase for long-lasting flowers.
🧺 Care Instructions for Crochet Wisteria
To make sure your crochet wisteria flowers remain vibrant and beautiful for years, proper care is essential:
- Washing – Hand wash gently in cold water with mild soap. Avoid bleach or harsh detergents.
- Drying – Lay flat on a towel to dry. Do not wring out the flowers, as puff stitches may lose shape.
- Blocking – Lightly steam-block or pin your wisteria strands to open up the petals and enhance drape.
- Storage – Store folded in a fabric bag or box. Avoid plastic bags for long-term storage, as cotton needs to breathe.
- Handling – Keep away from sharp objects or pets that may snag the delicate stitches.
- Fringe & Leaves – If your project has leaves or tassels, gently comb them with your fingers after washing.
- Refreshing – To revive older pieces, lightly mist with water and steam-block again to restore their shape.
Tips for Realistic Results
- Use Gradient Yarn – Yarn that shifts tones gives natural shading.
- Mix Colors – Combine lilac, white, and pink strands for more depth.
- Block Your Flowers – Steam-blocking helps puff stitches stay open.
- Hang in Layers – When assembling, layer shorter strands in the front and longer ones in the back.
🎨 Color Inspiration Gallery
Choosing the right yarn colors can transform your crochet wisteria stitch from simple vines into show-stopping decorations. Here are some inspiring palettes:
- Classic Lilac & White – Perfect for realistic wisteria garlands.
- Pastel Pink & Ivory – Ideal for baby showers or romantic weddings.
- Gradient Purple Ombré – Start with deep purple at the base and fade into soft lilac at the tips.
- Rainbow Mix – Great for kids’ rooms or playful home décor.
- Green & Blue Accents – Pair wisteria flowers with teal or sage leaves for a modern, botanical vibe.
🌿 Top Crochet Wisteria Projects
Beyond garlands and simple vines, crocheters are finding new ways to use this floral pattern creatively. Here are some of the most popular projects in 2025:
- Wisteria Curtains – Crochet long strands and hang them from a rod to create romantic, boho-inspired curtains. Perfect for bedrooms or craft studios.
- Wedding Arches – Combine crochet wisteria vines with fresh greenery for unforgettable wedding backdrops. Handmade flowers won’t wilt, making them ideal for events.
- Boho Wall Hangings – Attach strands to a wooden dowel and create cascading wall art. This project has become a favorite in modern crochet home décor.
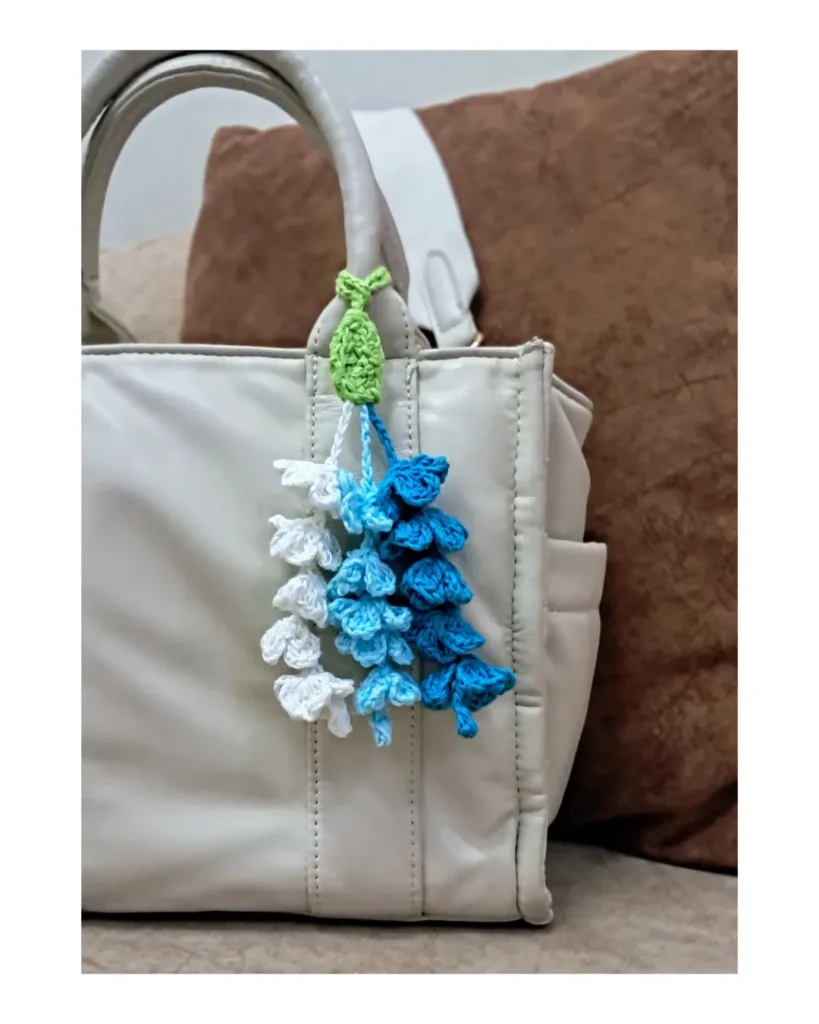
- Jewelry & Accessories – Mini crochet wisteria motifs make unique earrings, necklaces, or hair clips. Great for gifting and craft fairs.
- Gift Wrapping Accents – Use small strands to decorate gift boxes, adding a handmade touch that recipients will cherish.
🛠️ Troubleshooting Crochet Wisteria
Even simple floral crochet patterns can come with challenges. Here’s how to solve common problems:
- Petals too tight → Try using a slightly larger hook or loosen your tension.
- Petals too loose or floppy → Reduce the number of loops in your puff stitch.
- Strands curling instead of hanging straight → Block your vines gently with steam or pin them flat to dry.
- Yarn splitting while puff stitching → Use smoother cotton yarn and keep your hook tip sharp.
- Vine too stiff → Switch to a lighter yarn or reduce stitch count in the chain.
Creative Uses for Crochet Wisteria
The versatility of this pattern makes it one of the most exciting floral projects. Here are some creative applications:
1. Home Décor
- Drape garlands over curtain rods or windows
- Use as table runners for spring gatherings
- Hang on walls as nature-inspired art
2. Wedding Decorations
- Perfect as bridal bouquets, bridesmaid accessories, or ceremony arches
- Use strands as photo backdrop accents
- Create corsages or hairpieces for a romantic touch
3. Fashion & Accessories
- Mini strands for jewelry (earrings, necklaces)
- Attach to hats or handbags
- Incorporate into boho-style shawls or cardigans
4. Gifts
Handmade crochet wisteria vines make heartfelt gifts. They are ideal for housewarmings, birthdays, or as a unique handmade present for flower lovers.
Symbolism of Wisteria Flowers
Beyond its beauty, the wisteria holds deep symbolic meaning. In Japanese culture, wisteria is associated with love and longevity. In the Victorian language of flowers, it represented steadfast devotion. Including this symbolism in your crochet makes the project even more meaningful, especially for gifts or wedding décor.
🏡 Crochet Wisteria in Home Trends
Crochet floral motifs have become a rising trend on Pinterest and Instagram, especially for boho weddings and DIY home décor. The wisteria crochet motif is one of the most shared in 2025 because of its cascading beauty and romantic look. Many creators use crochet wisteria for spring garlands, nursery room accents, and wall hangings, showing how versatile this stitch can be in modern interior design.
Recommended Yarns and Hooks
- For delicate flowers: Fingering cotton yarn + 2.0 mm hook
- For durable décor: DK cotton yarn + 3.0 mm hook
- For airy texture: Mohair blend yarn + 2.5 mm hook
Affiliate suggestions:
Frequently Asked Questions (FAQ)
Q: Can beginners make the Crochet Wisteria Pattern?
A: Yes! If you know how to chain and puff stitch, you can make wisteria flowers.
Q: How many strands should I crochet for a garland?
A: For a medium garland, around 15–20 strands of varying lengths look best.
Q: Can I use thicker yarn?
A: Yes, but thicker yarn will make bulkier flowers. For realistic wisteria, lightweight yarns are recommended.
Q: How do I attach strands securely?
A: Slip stitch them to the vine or sew them with a tapestry needle.
Q: Can I wash crochet wisteria?
A: Yes, but always hand wash gently and air dry to maintain shape.
Q: What’s the best way to hang crochet wisteria?
A: Attach with small hooks, pins, or even glue if using as a permanent decoration.
Q: Can I mix crochet wisteria with real flowers?
A: Definitely! Many brides combine handmade crochet flowers with fresh arrangements for unique bouquets.
Q: Can I use the Crochet Wisteria Stitch for larger projects like blankets?
A: Yes! Many crocheters join wisteria motifs together to create stunning floral blankets or bedspreads. Use lightweight yarn to avoid bulk.
Q: Is the Wisteria pattern suitable for beginners?
A: Absolutely. While the puff stitch may take practice, once you master it, the rest of the pattern is very beginner-friendly.
Q: How long does it take to make a Crochet Wisteria Garland?
A: A medium garland with 15–20 strands usually takes about 8–12 hours, depending on your crochet speed.
Q: What colors look most realistic for crochet wisteria?
A: Traditional shades include lilac, lavender, and white, but many crafters experiment with pink, blue, or even rainbow tones.
Q: Can I mix crochet wisteria with other crochet flowers?
A: Yes! Wisteria pairs beautifully with roses, daisies, and lilies for larger arrangements like wedding arches or floral wall art.
Q: What’s the best yarn for outdoor decorations?
A: Acrylic yarn is more durable for outdoor projects since it resists fading and moisture better than cotton.
Q: Can I turn wisteria motifs into clothing embellishments?
A: Definitely. Sew them onto cardigans, shawls, or hats for a unique, bohemian touch.
🔗 Related Patterns to Try
If you enjoyed working on the Crochet Wisteria Pattern, here are other floral and geometric projects you might love:
- Persian Tiles Crochet Blanket – A timeless project with intricate details.
- African Flower Granny Square – Perfect for colorful blankets or cushions.
- Crochet Flower Bucket Hat – A fun accessory that combines style and creativity.
- Mandala Madness Crochet Pattern – A larger, meditative project with stunning symmetry.
Final Thoughts
The Crochet Wisteria Pattern is a stunning floral project that brings together creativity, tradition, and versatility. Its cascading beauty makes it perfect for weddings, home décor, accessories, and gifts. With just a few simple stitches and some patience, you can recreate one of nature’s most iconic flowers in crochet form.
So, grab your yarn and hook, and start crocheting your own handmade wisteria vines today. Whether you hang them in your living room or gift them to someone special, they are sure to leave a lasting impression. 🌸