
Crochet Tulip Blanket: A Beautiful Floral Pattern for Cozy Creations
Introduction
The crochet tulip blanket is one of those projects that instantly captures attention. With its delicate floral-inspired stitches and soft, flowing texture, this pattern brings a fresh and cheerful vibe to any space. Whether you’re making a cozy throw for your living room or a heartfelt handmade gift, a tulip crochet design offers both beauty and versatility.
What makes the crochet tulip blanket especially appealing is how it blends simplicity with elegance. Even if you’re relatively new to crochet, you can achieve a professional-looking result by mastering a few basic stitches and following a structured pattern. The repeating tulip motif creates a rhythmic, relaxing workflow that many crocheters find incredibly satisfying.
In recent years, tulip blanket designs have become increasingly popular across platforms like Pinterest and Instagram. Their floral aesthetic fits perfectly with modern home decor trends, while also maintaining a timeless charm. From soft pastel baby blankets to bold, colorful statement pieces, the possibilities are endless.
In this complete guide, you’ll learn everything you need to know about how to make a tulip crochet blanket—from materials and stitches to step-by-step instructions, tips, and creative ideas. Whether you’re crafting for yourself or someone special, this pattern is sure to become one of your favorites.
What Is This Pattern?
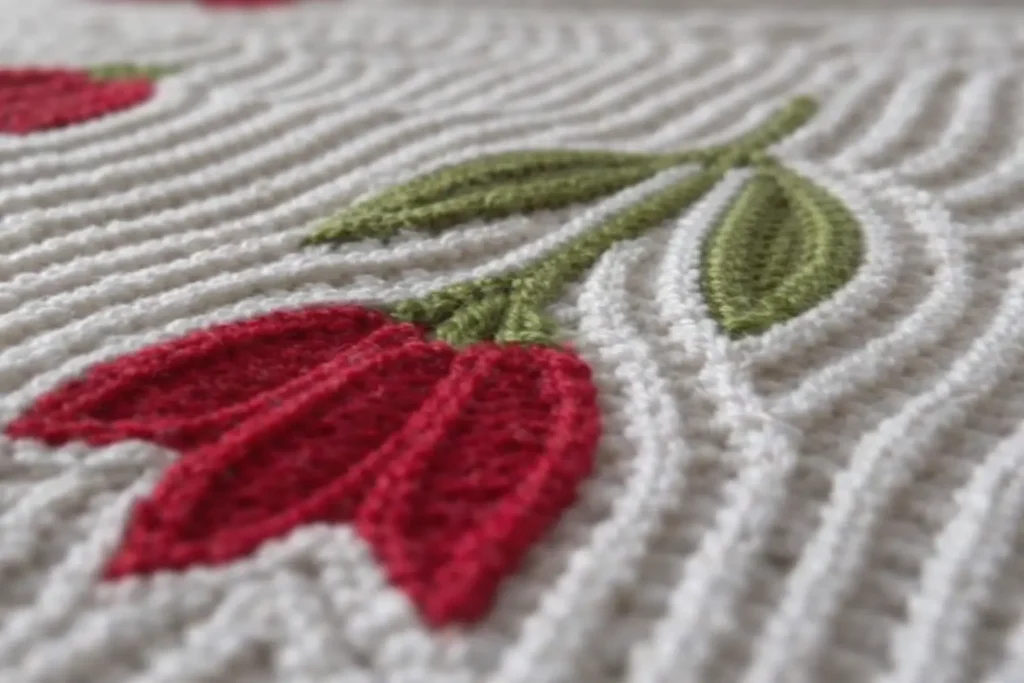
The crochet tulip blanket is a textured crochet pattern that uses stitch combinations to create small, repeating shapes resembling tulip flowers. These “tulips” are formed through strategic placement of stitches like double crochet and clusters, resulting in a raised, dimensional look that mimics blooming petals.
Unlike traditional granny square blankets or simple stripe patterns, the tulip crochet design stands out for its visual interest. Each row builds upon the previous one, forming a consistent floral pattern that feels both structured and organic. This makes it ideal for crocheters who want something more engaging than basic stitches but still manageable.
This pattern is commonly used in:
- Baby blankets
- Throw blankets
- Bedspreads
- Decorative home accents
One reason the tulip blanket is so popular is its adaptability. You can easily adjust the size by adding more stitches or rows, and you can customize colors to match any theme. Whether you prefer soft neutrals or vibrant floral tones, the pattern holds its beauty across all palettes.
Another advantage is that it works well with different yarn types. Acrylic yarn is great for durability and affordability, while cotton yarn enhances stitch definition. This flexibility makes the crochet tulip blanket accessible to a wide range of crocheters.
Overall, this pattern strikes the perfect balance between elegance and practicality. It looks intricate, but once you understand the structure, it becomes surprisingly intuitive to create.
Materials You’ll Need
Creating a beautiful crochet tulip blanket starts with choosing the right materials. The quality of your yarn and tools directly impacts the final look, texture, and durability of your project.
Yarn Selection
When making a tulip blanket, your yarn choice plays a major role in defining the stitch pattern.
- Acrylic yarn: Budget-friendly, durable, and easy to care for
- Cotton yarn: Offers crisp stitch definition and a clean finish
- Blended yarn: Combines softness and strength
For blankets, acrylic or acrylic blends are often the most practical option due to their durability and easy maintenance.
Hook Size
Hook size affects the tension and overall appearance:
- Smaller hooks → tighter stitches
- Larger hooks → softer, more open fabric
Always check your yarn label and adjust based on your tension.
Essential Tools
Make sure you have:
- Stitch markers
- Tapestry needle
- Sharp scissors
- Measuring tape
Our Recommended Tools and Yarn
To get the best results with your crochet tulip blanket, consider investing in quality tools:
- Soft acrylic yarn (medium weight #4)
- Ergonomic crochet hook (size H/5mm)
- Locking stitch markers
- Yarn needle for weaving ends
👉 Check on Amazon for beginner-friendly crochet kits and yarn bundles that include everything you need.
Using the right materials not only improves your experience but also ensures your blanket looks polished and lasts for years.
Basic Stitches You Should Know
Before starting your crochet tulip blanket, it’s important to understand a few foundational stitches. These form the backbone of the pattern and ensure your project turns out beautifully.
Chain (ch)
The chain stitch is the starting point of most crochet projects. In this pattern, it creates the base row and spacing between stitches.
Slip Stitch (sl st)
Slip stitches are used to join rows and create smooth transitions. They help maintain the structure of the blanket.
Double Crochet (dc)
This is one of the most important stitches in tulip crochet. It provides height and forms the main structure of the pattern.
Cluster Stitches
Clusters are what create the “tulip” effect. They group multiple stitches together to form petal-like shapes.
Understanding these stitches is crucial because they directly impact the appearance of your tulip blanket. Even slight variations in technique can change the texture and definition of the pattern.
Step-by-Step Tutorial
Learning how to make a crochet tulip blanket becomes much easier when you break it down into simple steps.
Step 1: Create the Foundation Chain
Start by chaining a multiple that fits your desired blanket width. This forms the base of your project.
Step 2: Work the First Row
Use double crochet stitches across the row. This creates a solid foundation for the tulip pattern.
Step 3: Begin the Tulip Pattern
Introduce cluster stitches to form the tulip shapes. These are spaced evenly across the row.
Step 4: Build the Design
Continue alternating rows of base stitches and tulip clusters. This repetition creates the floral effect.
Step 5: Maintain Consistency
Keep your tension even and count stitches regularly to avoid mistakes.
Step 6: Finish the Blanket
Once you reach your desired length, finish with a border for a clean edge.
💡 Tip: Always check your stitch count at the end of each row to ensure symmetry.
Prefer a Printable PDF Pattern?
If you enjoy having a structured and easy-to-follow format, a printable PDF version of the crochet tulip blanket pattern can make a huge difference. Many crocheters find that working from a printed pattern helps them stay organized and focused, especially during larger projects.
A PDF pattern typically includes:
- Step-by-step written instructions
- Stitch abbreviations
- Row-by-row breakdowns
- Helpful diagrams or charts
This format allows you to crochet without constantly checking your phone or scrolling through a webpage. It’s especially useful when working on long sessions or traveling with your project.
Another benefit is that you can highlight sections, take notes, and track your progress directly on the page. This makes the learning process smoother and reduces the chances of mistakes.
💡 Tip: Keep your PDF in a binder or folder with other patterns for easy access.
Prefer to Learn with a Video Tutorial?
For many crocheters, especially beginners, visual learning is the fastest way to understand a new pattern. Watching a crochet tulip blanket come together step by step can make the process feel much more approachable.
Video tutorials allow you to:
- See each stitch in real time
- Understand hand positioning
- Follow along at your own pace
- Pause and rewind as needed
This is particularly helpful for mastering cluster stitches, which are essential for the tulip effect. Seeing how the stitches are grouped visually can eliminate confusion that sometimes comes from written instructions alone.
Combining a video tutorial with a written pattern is often the best approach. You get the clarity of visuals along with the structure of step-by-step instructions.
💡 Tip: Watch the entire video once before starting. This gives you a better understanding of the pattern flow.
Color Ideas
Soft Pastel Garden
Soft pastel colors create a delicate and calming version of the crochet tulip blanket. Think blush pinks, baby blues, lavender, and mint green tones that mimic a spring garden in bloom. These colors work beautifully because they enhance the floral nature of the tulip crochet design without overwhelming the eye. The gentle contrast between shades helps define each tulip shape while maintaining a cohesive look. This palette is especially popular for baby blankets or nursery decor, where a soothing atmosphere is desired. To apply this, choose one main pastel color for the base and alternate subtle shades for the tulip rows.
Bold Floral Contrast
Using bold and contrasting colors can transform your tulip blanket into a statement piece. Combinations like deep red with cream, mustard with teal, or navy with coral create strong visual impact. This approach matters because it highlights the tulip stitch definition, making each flower pop. The contrast adds depth and makes the blanket stand out in any room. It’s ideal for modern interiors or as a standout handmade gift. To achieve balance, use a neutral base and reserve bold tones for the tulip motifs.
Neutral & Elegant
Neutral tones like beige, ivory, gray, and taupe give your crochet tulip blanket a timeless and sophisticated look. This style works well because it blends easily with any home decor while still showcasing the texture of the stitches. The subtle color variation emphasizes the pattern rather than the color itself. This creates a refined, high-end appearance that feels both cozy and elegant. It’s perfect for living room throws or minimalist spaces. To apply this, use tone-on-tone shades to add depth without strong contrast.
Size & Project Ideas
Baby Blanket
A crochet tulip baby blanket is one of the most popular project choices. Its soft texture and floral design make it perfect for nurseries and gifts. The smaller size means it works up faster, making it ideal for beginners or last-minute presents. This size matters because it allows you to practice the pattern without committing to a large project. The result is a charming, lightweight blanket that feels personal and handmade. To create this, simply reduce your starting chain and use softer yarn.
Throw Blanket
A medium-sized throw blanket is perfect for couches or reading nooks. This size balances practicality and visual impact, making it a favorite among crocheters. The tulip pattern really shines at this scale, allowing the design to repeat enough times to create a cohesive look. It’s also a great way to experiment with color combinations. The finished piece adds warmth and style to your home. To achieve this, aim for standard throw dimensions and maintain consistent tension throughout.
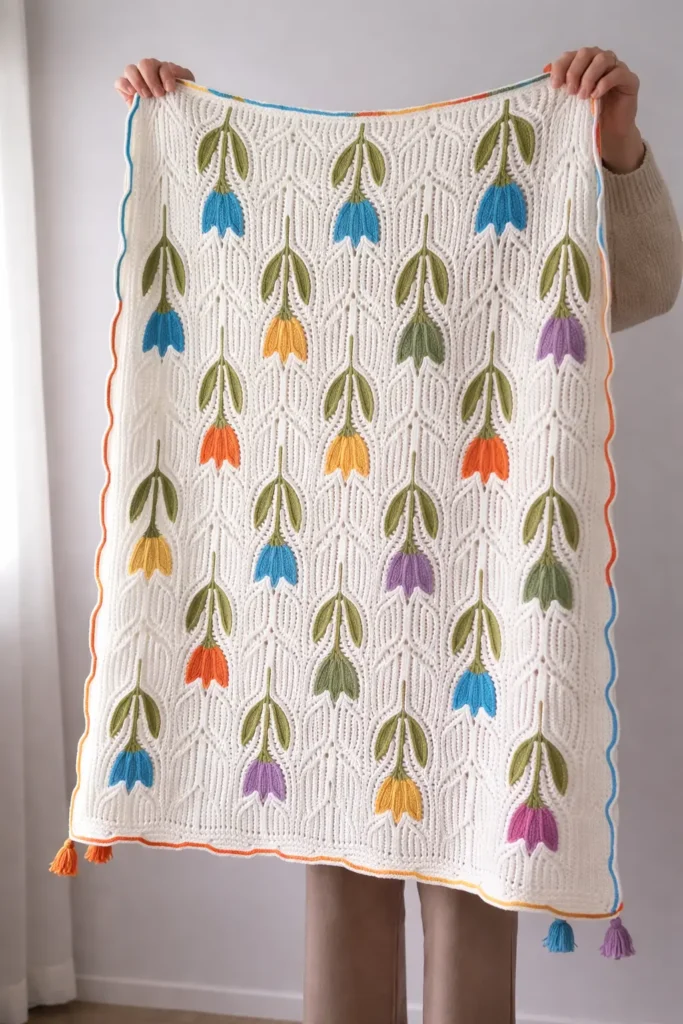
Full-Size Blanket
Creating a full-size crochet tulip blanket is a rewarding long-term project. This size is ideal for beds and provides maximum comfort and coverage. It matters because it showcases the full beauty of the tulip crochet pattern on a larger scale. While it requires more time and yarn, the result is a stunning centerpiece. This type of project is perfect for experienced crocheters or those looking for a challenge. To complete it successfully, plan your yarn quantities and color scheme in advance.
Tips for Better Results
Maintain Even Tension
Consistent tension is crucial when making a crochet tulip blanket. It ensures that your stitches are uniform and your blanket lays flat. Uneven tension can cause distortion and affect the overall look. This matters because the tulip pattern relies on symmetry for its visual appeal. Practicing steady hand movements helps improve your results. To apply this, crochet at a comfortable pace and avoid pulling the yarn too tightly.
Count Stitches Regularly
Counting your stitches at the end of each row helps prevent mistakes. Missing or adding stitches can disrupt the tulip pattern. This impacts the final result by creating uneven rows or misaligned motifs. Regular counting allows you to catch errors early. It also builds confidence in your work. Make it a habit to double-check each row before moving on.
Use Stitch Markers
Stitch markers are incredibly helpful for tracking pattern repeats. They mark key points in your work, making it easier to stay organized. This is important because the tulip crochet design involves repeating sections. Using markers reduces confusion and improves accuracy. It also speeds up your workflow. Place markers at the start of each repeat section.
Common Mistakes to Avoid
Skipping Stitches
Skipping stitches is a common mistake that can throw off the entire pattern. It often happens when you lose track of your count. This affects the alignment of the tulip shapes and creates gaps. To avoid this, always count your stitches carefully. Using markers can help prevent this issue. Taking your time also reduces errors.
Incorrect Tension
Inconsistent tension can lead to uneven fabric. This makes your blanket look less polished and can affect its size. It’s important because the tulip pattern relies on consistent spacing. Practice maintaining steady tension throughout your project. If needed, adjust your hook size.
Misreading the Pattern
Misinterpreting instructions can lead to repeated mistakes. This is especially true for beginners learning new stitches. It impacts your progress and can be frustrating. To prevent this, read through the pattern before starting. Take notes and highlight key sections.
Care Instructions
Washing Your Blanket
Proper washing helps maintain the quality of your crochet tulip blanket. Hand washing with cold water is recommended to prevent damage. This matters because delicate stitches can lose shape with harsh washing. Use mild detergent for best results. Always handle gently to preserve the texture.
Drying Properly
Drying your blanket correctly prevents stretching and distortion. Lay it flat on a clean surface and reshape while damp. This helps maintain the original dimensions. Avoid hanging, as it can pull the stitches out of shape. Proper drying ensures longevity.
Storage Tips
Storing your blanket properly keeps it in good condition. Fold it neatly and keep it in a dry place. Avoid direct sunlight to prevent fading. This protects both the yarn and color. Proper storage extends the life of your handmade piece.
What the Community Says
Ease of Learning
Many crocheters say the crochet tulip blanket is easier than it looks. The repeating pattern becomes intuitive after a few rows. This makes it accessible for beginners. It builds confidence and encourages creativity. Most users recommend it as a great learning project.
Visual Appeal
The tulip crochet design is widely praised for its beauty. The floral texture stands out in photos and real life. This makes it popular on social media platforms. Many crocheters enjoy showcasing their finished blankets. The pattern consistently receives positive feedback.
Gift Potential
Handmade tulip blankets are highly valued as gifts. They feel personal and thoughtful. This makes them perfect for special occasions. Many users create them for baby showers or holidays. The emotional value adds to their appeal.
Why You’ll Love This Pattern
Beginner-Friendly Design
The crochet tulip blanket is approachable for beginners. It uses simple stitches in a creative way. This makes learning enjoyable and rewarding. You can achieve impressive results quickly. It’s a great confidence booster.
Versatile Style
This pattern adapts to many styles and projects. You can customize colors and sizes بسهولة. This flexibility makes it suitable for any occasion. It allows for endless creativity. Each blanket becomes unique.
Beautiful Results
The final result is visually stunning. The tulip pattern adds texture and charm. This makes your blanket stand out. It’s both functional and decorative. You’ll be proud to display or gift it.
FAQs
Is the crochet tulip blanket beginner-friendly?
Yes, it is suitable for beginners who know basic stitches. The pattern becomes repetitive and easy to follow. With practice, you can master it quickly.
What yarn is best for a tulip blanket?
Acrylic yarn is the most popular choice due to durability. Cotton is great for stitch definition. Choose based on your preference and project.
How long does it take to make one?
It depends on the size and your experience level. A small blanket may take a few days, while larger ones can take weeks.
Can I customize the size?
Yes, simply adjust your starting chain and number of rows. This makes the pattern very flexible.
Do I need a pattern or can I freestyle?
While you can freestyle, following a pattern ensures consistency. It’s recommended for beginners.
Final Thoughts
The crochet tulip blanket is more than just a project—it’s a creative journey that combines relaxation, skill-building, and artistic expression. From choosing your yarn to completing the final row, every step offers a sense of accomplishment and joy.
This pattern stands out because it balances simplicity with elegance. Even if you’re just starting out, you can create something that looks intricate and professional. The repeating tulip motif makes the process enjoyable, while the finished product becomes a cherished piece.
Whether you’re making a gift or decorating your home, a tulip blanket adds warmth and personality. It’s a project that grows with your skills and allows endless customization.
Take your time, enjoy the process, and don’t be afraid to experiment with colors and textures. Crochet is as much about the experience as it is about the final result.
See Also
- 10+ Maxi Dresses Crochet Pattern: Stunning & Timeless Designs You’ll Love
- Minecraft Crochet Patterns: 13 Fun Ideas You Need to Try (Creeper, Blanket & More)
- Crochet Rose Granny Square: A Complete 3D Floral Pattern Guide for Beginners to Intermediate Makers
- Sea Life Quiet Book Crochet Pattern A Fun & Educational Project for Kids
- Crochet Hook Size Chart (US & Metric) + Yarn Weight Guide
Follow Us
Stay inspired with more crochet ideas!
Happy crocheting! 🧶✨