
Crochet Bolero Pattern: A Cozy Chunky Shrug You Can Make in a Day
There’s something satisfying about finishing a wearable crochet project without spending weeks on it. If you’ve been looking for a crochet bolero pattern that’s quick to make, easy to customize, and comfortable enough for everyday wear, this chunky shrug is a great project to keep on your hook.
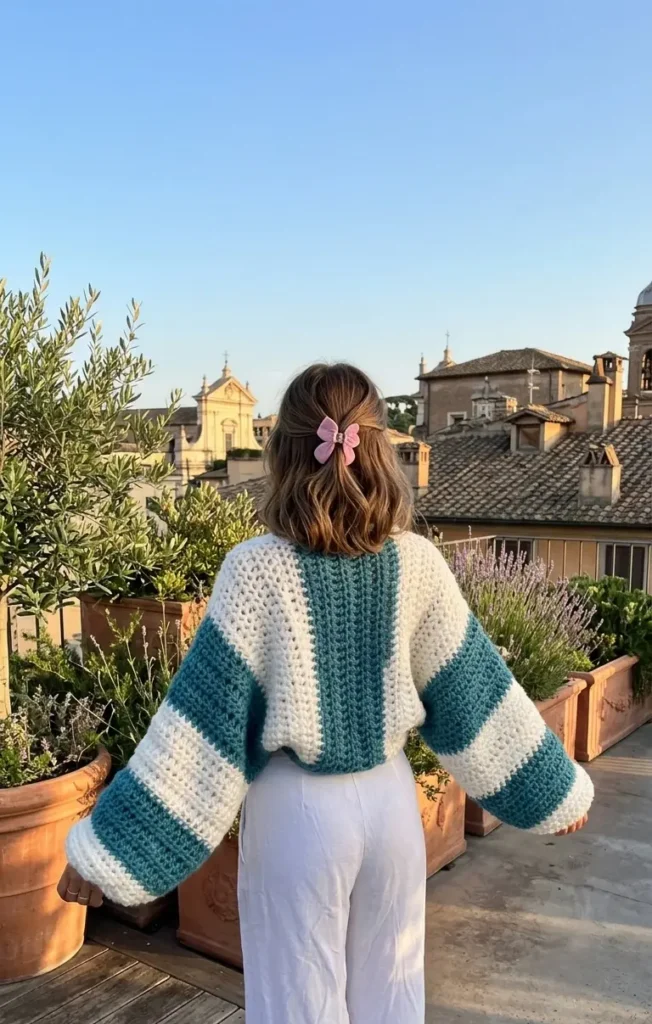
Rather than shaping the garment with complicated increases and decreases, this design starts as a simple rectangle. Once the fabric reaches the right size, you’ll fold it, seam the sleeves, and optionally finish them with stretchy ribbed cuffs. It’s a straightforward construction that lets the bulky yarn do most of the work while creating a warm, textured fabric.
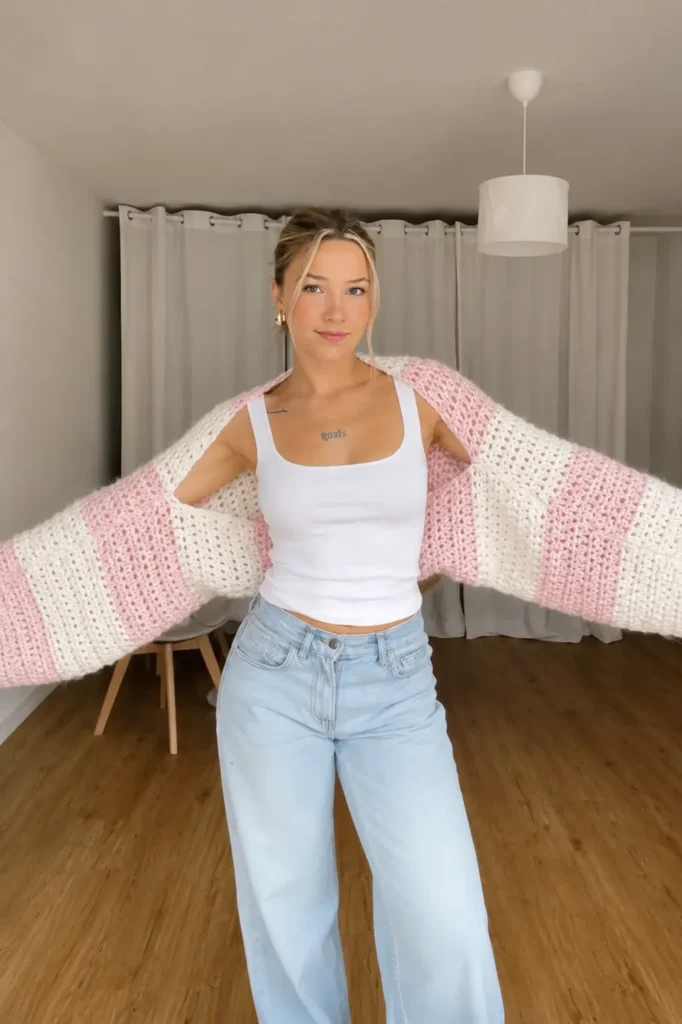
You’ll also notice that this style adapts well to different body types. Since the width and length are easy to adjust before assembly, you can make a shorter cropped shrug or extend it for extra coverage. If oversized sleeves aren’t your style, reducing the starting chain is often all it takes to create a slimmer fit.
In this guide, we’ll walk through the complete construction process of crochet bolero pattern, discuss materials, explore color ideas, share practical finishing tips, and turn the video tutorial into an easy-to-follow written pattern. Whether this is your first wearable or you’ve made sweaters before, you’ll have a clear roadmap before picking up your hook.
What Is This Pattern?
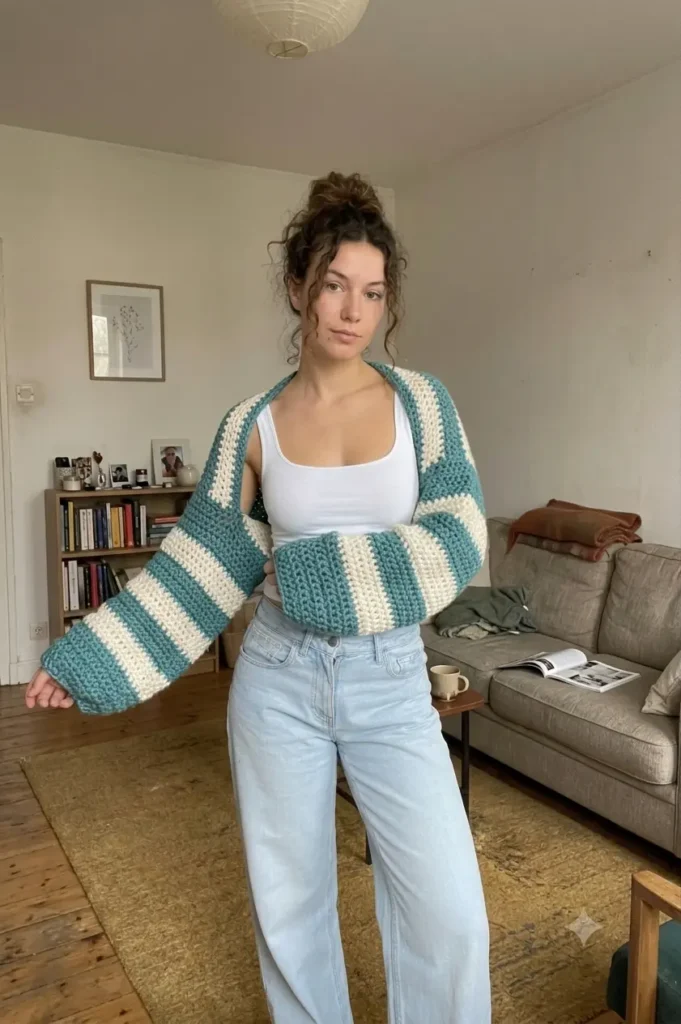
A crochet bolero pattern is designed to create a lightweight jacket or shrug that covers the shoulders, upper back, and arms while leaving the front open. Unlike a traditional cardigan, a bolero is shorter, making it easy to layer over dresses, tank tops, long-sleeve shirts, or even another sweater during colder weather.
This particular design keeps the construction intentionally simple. Instead of working individual sleeves or shaping armholes as you crochet, you’ll create one long rectangular panel using rows of double crochet stitches. After folding the rectangle, the sleeve openings are formed by seaming each side, making the project approachable even if you haven’t crocheted garments before.
Because the fabric is worked with chunky yarn and a large hook, the stitches build up quickly. The finished fabric feels soft, warm, and slightly relaxed rather than dense or stiff. If your tension stays consistent, you’ll end up with a shrug that drapes comfortably while still providing structure.
Another detail worth mentioning is that sizing isn’t locked into a fixed pattern. The original tutorial measures the rectangle against the maker’s body instead of relying solely on row counts. That means your own measurements matter more than trying to match an exact number of rows, especially if you’re using a different yarn or hook size.
Materials You’ll Need
Before you get started for crochet bolero pattern, gather all of your supplies so everything is within easy reach while you crochet.
For this crochet bolero pattern, you’ll need:
- Approximately 5 skeins of chunky yarn (or enough to reach your desired size)
- 9 mm crochet hook
- Tapestry needle
- Stitch markers
- Sharp scissors
- Measuring tape
Note: The original tutorial uses chunky yarn with a 9 mm hook. If you substitute a different yarn weight, your finished size and the amount of yarn required may vary.
Our Recommended Tools & Yarn
Above are the tools and materials we recommend for this project. These are products we personally like and believe work well for this type of chunky crochet garment.
Disclosure: Some of the links below are affiliate links. If you purchase through them, we may earn a small commission at no extra cost to you. Thank you for supporting Patterns Here!
Basic Stitches
This crochet bolero pattern relies on only a handful of stitches, making it approachable if you’re already comfortable with basic crochet techniques.
Double Crochet (dc)
The body of the shrug is worked almost entirely in double crochet rows. This stitch creates height quickly while producing a flexible fabric that doesn’t feel too heavy despite the thick yarn.
As you work, glance at the tops of your stitches every few rows. They should form neat “V” shapes across the edge, making the next row easy to identify.
Half Double Crochet (hdc)
The optional cuffs begin with rows of half double crochet. This stitch gives the cuff enough density to feel substantial without becoming stiff around the wrist.
Single Crochet (sc)
Single crochet appears during the finishing process to create a cleaner transition before attaching the cuffs. It also helps even out the sleeve edge if your last row stretches slightly.
Modified Slip Stitch
The cuff alternates a row of half double crochet with a modified slip stitch technique demonstrated in the original tutorial. This combination creates a stretchy ribbed texture that hugs the wrist more comfortably than plain rows of double crochet.
If you’ve never tried this stitch before, don’t worry if the first repeat feels unfamiliar. Most crocheters find that the rhythm becomes much more natural after a couple of rows.
Color Ideas
One of the reasons this crochet bolero pattern adapts so well to different wardrobes is that the simple stitch pattern allows color to take center stage. Whether you prefer timeless neutrals or bold statement pieces, the construction works equally well.
Soft Neutrals
Cream, oatmeal, light gray, and warm beige create a shrug that layers effortlessly over almost anything. These shades also highlight the texture of chunky double crochet without drawing attention away from the stitch definition.
If you’re making your first wearable, neutral colors are often easier to style, which means you’ll likely reach for your finished bolero more often.
Autumn Shades
Rust, cinnamon, olive, mustard, and chocolate brown give this project a cozy seasonal look.
Chunky yarn naturally emphasizes texture, and earthy tones enhance that effect even more. Pairing these shades with jeans and boots creates a relaxed outfit that’s easy to wear throughout autumn.
Bold Statement Colors
If you enjoy colorful garments, jewel tones such as emerald, sapphire, burgundy, or deep teal work beautifully.
Since the pattern itself is uncomplicated, a vibrant yarn becomes the focal point without making the project feel busy. Self-striping bulky yarns can also produce interesting results because the long rows allow gradual color changes to develop naturally.
Monochrome Black
A black crochet bolero has a polished appearance and pairs well with dresses for evening wear.
One thing to remember is that dark yarn can make stitches harder to see while crocheting. Good lighting becomes especially important during assembly and when sewing the sleeves.
Project Ideas
Although this design is introduced as a chunky shrug, it’s surprisingly versatile once you start thinking beyond the original sample.
For everyday outfits, wear it over a fitted T-shirt or tank top when temperatures start to cool. The open front keeps the garment from feeling bulky while still adding warmth across your shoulders and arms.
If you’re making a gift, consider adjusting the sleeve length rather than changing the entire body. Many crocheters find that slightly longer sleeves create a cozy oversized look without affecting the overall fit.
You can also adapt this crochet bolero pattern into a cropped jacket by shortening the rectangle before assembly. Conversely, adding extra rows creates more coverage across the back, which some people prefer when layering over dresses during cooler months.
Because the construction is straightforward, it’s also an excellent project for experimenting with luxury yarns you’ve been saving. A soft wool blend or brushed acrylic can completely change the feel of the finished shrug while following the exact same construction method.
Tips for Better Results
Before you settle into the repetitive rows, measure your starting chain against your arm rather than relying only on stitch counts. The original tutorial intentionally adjusts the chain length to create oversized sleeves, and your own measurements will produce a better fit than copying someone else’s numbers exactly.
As your rectangle grows, stop every so often and hold it across your back. It’s much easier to add a few extra rows now than after the sleeves have already been sewn.
Another small trick that makes assembly easier is placing stitch markers on both sleeve seams before threading your tapestry needle. Seeing both sides at once helps confirm they’re perfectly even, preventing one sleeve from sitting higher than the other.
Finally, don’t rush the finishing work. Weaving in ends carefully and checking the sleeve openings before tightening the seams may only take a few extra minutes, but those finishing details make the completed garment feel much more polished.
Troubleshooting
A common issue with this crochet bolero pattern is ending up with sleeves that feel tighter than expected. Before permanently closing the seams, slip your hand through each opening to make sure there’s enough room. It’s much easier to adjust the seam now than after all the yarn ends have been woven in.
If your rectangle starts leaning to one side, take a moment to count stitches along the edge. Accidentally adding or skipping a stitch during the turning rows can gradually distort the shape, making the finished shrug sit unevenly.
You may also notice the fabric stretching more than expected if your tension is loose. Rather than pulling your stitches tighter, consider trying a slightly smaller hook on your next attempt. This usually creates a more consistent fabric while preserving the soft drape that makes this chunky bolero comfortable to wear.
Step-by-Step Tutorial
This crochet bolero pattern is constructed from one oversized rectangle, which is folded and seamed to create the sleeves. Ribbed cuffs are optional and are worked separately before being attached to each sleeve.
1. Crochet the Main Panel
- Ch 32, or adjust the foundation chain to achieve your preferred sleeve width.
- Row 1: Dc in the 3rd ch from the hook and in each ch across.
- Continue working dc rows until the panel measures from one wrist, across your back, to the opposite wrist (approximately 75 rows in the original sample).
Tip: Use your own measurements rather than the row count, as your yarn, hook size, and tension may change the final dimensions.
2. Mark and Seam the Sleeves
- Fold the rectangle in half.
- Place stitch markers evenly on both sides to mark the sleeve seams.
- Seam each side from the wrist opening toward the body using a tapestry needle or sl st.
Before fastening off, try the bolero on to check that the sleeve openings are comfortable. If needed, adjust the seam depth before securing it permanently.
3. Crochet the Ribbed Cuffs (Optional)
- Ch 7.
- Row 1: Hdc across.
- Row 2: Work the modified sl st ribbing demonstrated in the original tutorial.
- Repeat Rows 1 and 2 until the cuff comfortably fits around your wrist.
- Join the short ends with sl st to form a loop.
4. Attach the Cuffs
- Align the cuff seam with the sleeve seam.
- Attach each cuff evenly around the sleeve opening.
- For a cleaner finish, work one round of sc followed by one round of hdc before fastening off.
- Weave in all yarn ends and turn the bolero right side out.
Your chunky crochet bolero pattern is now ready to wear!
Printable PDF Crochet Bolero Pattern
If you’d like a printable version of this crochet bolero pattern, the original designer also offers a PDF edition.
A PDF is especially useful if you enjoy crocheting away from your computer or prefer checking off your progress as you work. Many crocheters also find that printed patterns make it easier to compare measurements without constantly scrolling through a webpage or video.
Before purchasing, it’s worth checking exactly what the download includes. Some PDF patterns contain additional sizing information, stitch charts, or printable layouts that aren’t covered in the accompanying video.
Keep in mind that the PDF is a paid resource created by the original designer. Purchasing it is a good way to support their work while gaining a portable reference for future projects.
Video Tutorial
If you’re someone who likes seeing each stage before picking up your hook, the accompanying video is an excellent companion to this written guide to make the perfect crochet bolero pattern.
Watching the construction process makes it much easier to understand how the rectangle folds into a finished shrug, particularly when it’s time to position the sleeve seams and attach the cuffs.
One approach that works well is to read through this written tutorial first so you understand the overall construction. Then, play the video while crocheting the more technical sections, such as the modified slip stitch used for the ribbed cuffs.
Using both resources together often saves time because you’ll spend less effort figuring out the next step and more time enjoying the actual crochet.
FAQs
Is this crochet bolero pattern beginner-friendly?
Yes, provided you’re comfortable working consistent rows of double crochet. The garment construction is simple, and there isn’t any complex shaping involved. The ribbed cuffs introduce one slightly different stitch pattern, but they’re optional and become easier after a few repeats.
Can I use a lighter yarn on crochet bolero pattern?
Absolutely. Just remember that changing the yarn weight also changes the finished size and drape. If you substitute a lighter yarn, you’ll likely need more stitches and rows to achieve the same measurements.
Do I have to make the oversized sleeves?
Not at all. The oversized look comes from the width of the starting chain. Beginning with fewer chains creates slimmer sleeves while keeping the overall construction exactly the same.
Can I seam the sleeves with crochet instead of sewing?
Yes. The tutorial mentions that a slip stitch seam is a perfectly acceptable alternative. Some crocheters prefer this method because it allows the entire project to be completed with a crochet hook.
How do I know when the rectangle is long enough?
Instead of focusing on row numbers, measure the panel against your own body. Your height, yarn, hook, and tension all affect the final dimensions, so personal measurements provide a much more reliable guide than matching someone else’s row count.
See Also
Looking for your next crochet project? Here are a few more beginner-friendly guides and free patterns you may enjoy:
- 👉 Crochet Abbreviations (US vs UK): Complete Beginner Guide
- 👉 Crochet Hook Size Chart (US & Metric) + Yarn Weight Guide
- 👉 Free Crochet Cardigan Patterns You’ll Love
- 👉 Easy Crochet Shrug Pattern for Beginners
- 👉 African Flower Granny Square: A Stunning Crochet Motif for Blankets, Bags & More
- 👉 🧶 Kristee Cardigan Crochet Pattern – The Cardigan You’ll Actually Wear
- 👉 Sophie Hood Crochet Pattern – Easy & Cozy Hoodie Tutorial for All Skill Levels
Follow Us for More Crochet Inspiration
Love discovering new crochet projects? Follow Patterns Here on social media for fresh patterns, crochet tips, stitch tutorials, and seasonal inspiration.
📌 Pinterest: Save your favorite patterns and discover new project ideas every week.
If you enjoyed this crochet bolero pattern, don’t forget to save this post for later and share it with a fellow crocheter. Happy crocheting! 🧶💛
Final Thoughts
Sometimes the most enjoyable garment projects are also the simplest, and this crochet bolero pattern is a good example of that. By starting with one large rectangle and using thoughtful finishing techniques, you can create a cozy shrug without dealing with complicated shaping or advanced garment construction.
As you work through the project, don’t hesitate to pause occasionally and try the piece against your body. Those small fitting checks make a noticeable difference in the finished result and help you customize the shrug to your own style.
Whether you choose classic neutral shades, rich autumn colors, or a bold statement yarn, this design offers plenty of room for personalization while remaining approachable from the first row to the final seam.
If you enjoyed this project, explore our collection of free crochet bolero patterns, garment tutorials, and beginner-friendly wearables for more inspiration. Each new project builds confidence, and before long you’ll find yourself adapting patterns to suit your own wardrobe and crochet style.