
🌸 Lily Bag Crochet Pattern – Viral Crochet Flower Bag Tutorial
🌟 Introduction: Elevate Your Style with Handmade Elegance
Crochet is far more than a hobby—it’s an art form that blends creativity with daily utility. In the current landscape of “slow fashion,” the Lily Bag crochet pattern has emerged as a quintessential project for makers who crave a mix of vintage aesthetics and modern durability. Whether you are looking for the perfect floral accessory for a summer wedding or a chic, handmade tote for your daily essentials, this bag offers a sophisticated touch that mass-produced items simply cannot replicate.
This guide is designed to be your comprehensive roadmap. We will walk you through the structural secrets, the perfect yarn choices, and the professional finishing techniques that will turn your handmade bag into a boutique-quality piece.
Click here to grab the official PDF pattern for the Lily Bag and start your project today!
Why Is It Called a Lily Bag?
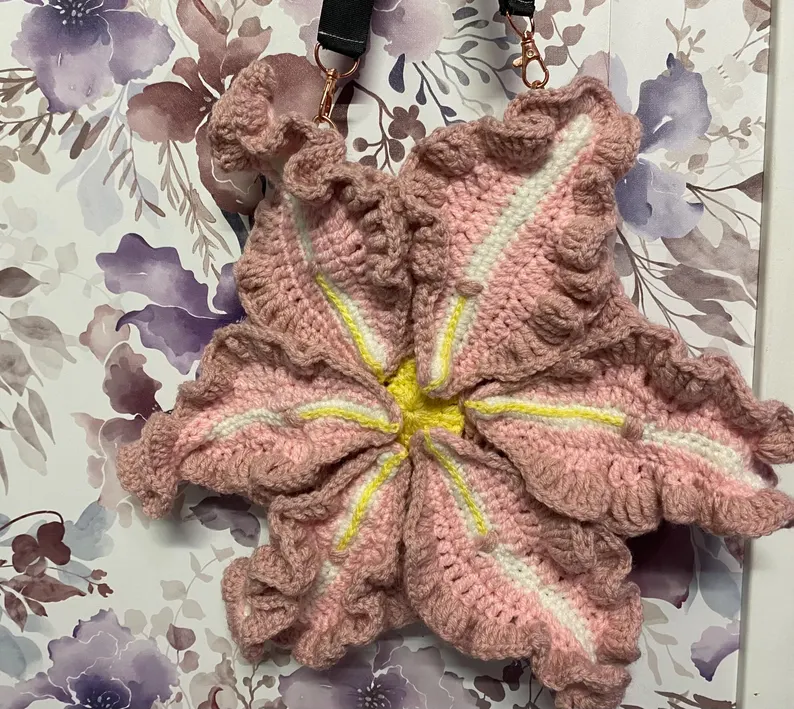
The lily bag crochet pattern gets its name from the beautiful flower-shaped motifs that resemble lily petals. The large, bold flowers used in this design create a sculptural and eye-catching look, which is why many crocheters associate this project with lily blossoms.
Because of its floral construction, the lily bag crochet pattern is often also referred to as a crochet flower bag pattern. The bag is typically built using flower motifs that are joined together to form the body of the bag, creating a unique handmade accessory that stands out from traditional crochet bags.
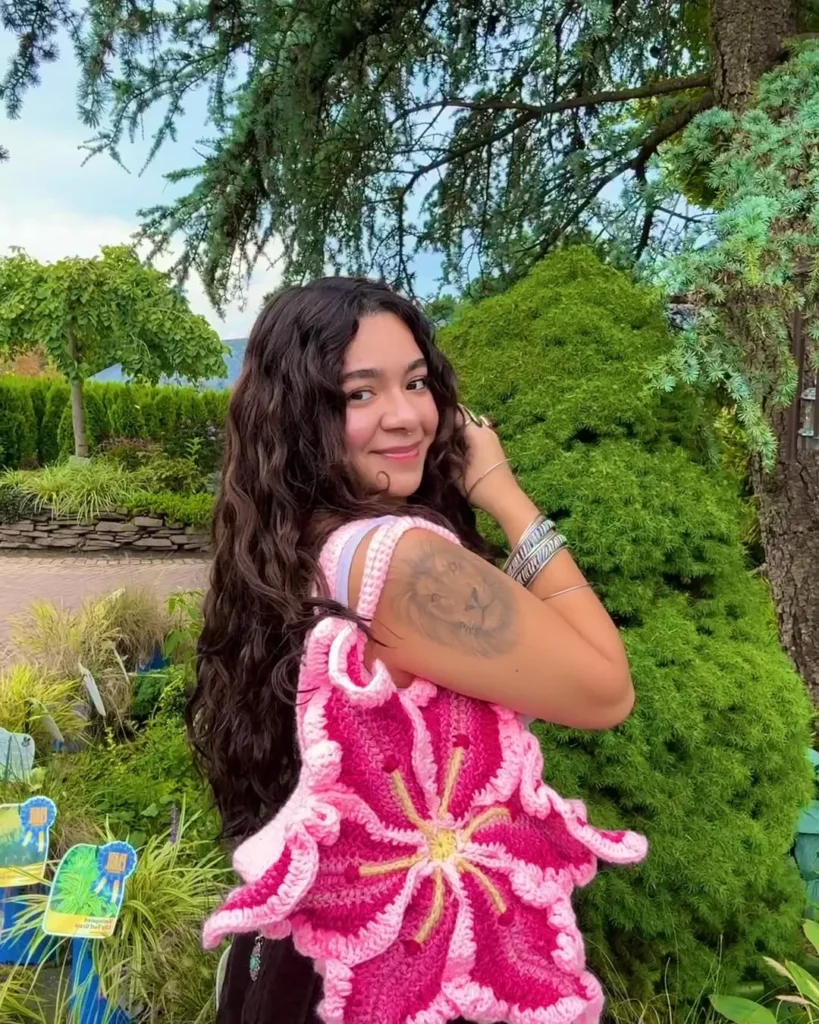
This style has become especially popular in recent years thanks to social media platforms like Pinterest, Instagram, and TikTok. Crocheters love how the crochet flower bag combines artistic design with practical use, making it perfect for everyday wear, markets, beach trips, or casual outings.
Another reason the lily bag crochet pattern is trending is the endless color combinations that can be used. Some crocheters prefer soft pastel flowers for a spring-inspired look, while others use bold, vibrant colors to create statement pieces.
Whether you call it a lily bag, a crochet flower bag, or even a floral crochet tote, the concept remains the same: a beautiful crochet bag built around striking flower motifs.
📖 The Story Behind the Lily Bag: A Return to Slow Craft
Every project in the world of fiber arts has a soul, and the Lily Bag is a testament to the “slow fashion” movement that is currently redefining our wardrobes. Long before we had mass-produced accessories at our fingertips, the most cherished items were those created slowly, with intention and care. The Lily Bag was designed to revive that feeling of connection.
It began as a concept inspired by the “Cottagecore” aesthetic—an idealized vision of rural life where handmade goods are a staple, not a novelty. The designer wanted to capture the delicate, structural beauty of a lily in bloom, translating the soft curvature of petals into the geometric precision of crochet.
But beyond the visual appeal, the story of this bag is about the therapeutic nature of the craft. When you work through the repetitive rounds of this pattern, you are doing more than just making a bag; you are engaging in a rhythmic, meditative process that quiets the mind. The Lily Bag represents the perfect harmony between nature-inspired art and everyday utility.
It is an invitation to slow down, pick up your hook, and create something that won’t just last a season, but will become a beloved staple in your collection. Carrying a bag you made yourself is a quiet but powerful statement—it shows that you value artistry, patience, and the unique beauty that can only come from human hands.
👩🎨 About the Designer: Crafting with Intention
Behind every great pattern is a mind that values clarity above all else. This Lily Bag crochet pattern was developed by a designer who spent years working in the trenches of the crafting community, listening to the frustrations of fellow makers. They noticed that many beautiful patterns were fundamentally broken: they lacked structural integrity, the instructions were overly vague, or the technical requirements were too daunting for the average crocheter.
The designer’s mission is simple: to bridge the gap between “aspirational” design and “accessible” technique. They believe that no one should be discouraged from tackling a complex-looking project. Through meticulous testing and refinement, they have transformed the Lily Bag from a complex sketch into a modular, logical, and highly achievable guide.
What sets this designer apart is their pedagogical approach to crochet. They don’t just provide rows of instructions; they explain the “why” behind the stitches. By understanding how the yarn tension affects the bag’s structure, you are learning a skill that will improve every single project you tackle in the future. When you support this designer, you aren’t just buying a PDF; you are investing in a pedagogical journey designed to build your confidence, refine your technical skills, and leave you with a finished product that stands the test of time. Their dedication to the craft has turned them into a trusted voice in the global crochet community, where quality and maker-empowerment are the top priorities.
🛠️ Essential Materials: The Professional’s Toolkit
To achieve that “store-bought” look, your materials must match your ambition. I recommend the following curated items to ensure your Lily Bag stands out:
- The Yarn (The Foundation): A high-quality mercerized cotton (DK weight) is non-negotiable. It provides the crisp definition needed for the floral petals and minimizes sagging. [Link: Shop Recommended Cotton Yarn on Amazon]
- Ergonomic Hooks: You will be performing thousands of stitches. Ergonomic hooks help prevent wrist fatigue. [Link: Shop Ergonomic Crochet Hooks on Amazon]
- Stitch Markers: Never lose your place. Use locking markers to denote increase points in your floral clusters. [Link: Shop Locking Stitch Markers on Amazon]
- Precision Finishing: Use sharp embroidery scissors for clean thread tails. [Link: Shop Precision Scissors on Amazon]
🧶 Step-by-Step Construction
Phase 1: The Magic Ring
Start with a tight magic ring. This prevents a gap from forming at the base of your bag, which is the most common sign of a “homemade” look.
Phase 2: Building the Floral Motifs
The floral clusters require consistent yarn-over tension. Ensure that each loop is the same height as the previous one to avoid a “wavy” appearance.
Phase 3: Joining and Straps
Use a flat slip-stitch join. This creates a raised, decorative ridge that mimics the natural stems of a flower, adding visual depth to your bag.
Click here to grab the official PDF pattern for the Lily Bag and start your project today!
Or watch the video bellow:
💡 Pro Tips for Professional Results
Achieving a boutique-quality finish on your Lily Bag isn’t just about following the pattern; it’s about mastering the “unwritten” rules of crochet. Here are my top expert tips to ensure your bag looks perfectly crafted:
- The Tension Hack: If your bag feels too floppy, don’t rush to sew it. Instead, try using a hook size 0.5mm smaller than the one recommended. A denser fabric provides better structural integrity, especially for bags that will carry weight.
- The Blocking Ritual: Never underestimate the power of blocking. Once your bag is finished, lightly mist it with water and pin it to a foam blocking mat, ensuring the star points are stretched and symmetrical. Let it air dry completely. This step aligns every single stitch, removing any “bumpy” texture and giving the floral motifs a professional, crisp finish.
- The Hidden Lining Technique: To prevent smaller items (like keys or coins) from slipping through the gaps between your crochet stitches, I highly recommend adding a simple fabric lining. You don’t need to be a sewing expert! A basic cotton pouch inside not only adds a premium feel but also protects your handmade fibers from the constant friction of the items inside the bag.
- Weaving Ends Like a Pro: Instead of just trimming your ends, weave them back and forth through the stitches at least three times in different directions. For extra security, use a tiny drop of fabric glue or a small knot to ensure they never unravel, no matter how much the bag is used.
🎨 Creative Color & Design Ideas
One of the most beautiful aspects of the Lily Bag crochet pattern is how the colors change the entire “vibe” of the accessory. Here are some of my favorite palettes to inspire your next make:
- The Spring Meadow Collection: Use soft shades like Sage Green, Lavender, and Buttercup Yellow. This palette is incredibly popular for summer events and brings out the organic, floral nature of the design.
- Boho-Chic Earth Tones: For a more grounded, versatile look, combine Terracotta, Mustard, and Deep Forest Green. These colors transition perfectly from summer into autumn and pair beautifully with denim or linen.
- Minimalist Monochrome: Don’t be afraid of using just one color! A Lily Bag made entirely in Cream or Crisp White looks incredibly high-end and modern. It’s the perfect accessory for a minimalist wardrobe.
- The Scrappy Masterpiece: Since this pattern is modular, it is the ultimate “stash-buster.” Use up all your leftover DK weight yarn by changing colors at the start of every floral round. The result? A one-of-a-kind rainbow bag that tells a story of your past projects.
🎁 Gift Ideas & Packaging
A handmade Lily Bag is a deeply personal and thoughtful gift. To make the presentation as special as the project itself, consider these ideas:
- The “Maker’s Tag”: Attach a small, custom-made leather or wood tag to the strap with the label “Handmade by [Your Name].” It gives the bag an immediate “designer” feel.
- Thoughtful Packaging: Instead of plastic bags, wrap your Lily Bag in acid-free tissue paper and place it in a reusable cotton drawstring bag.
- The Care Kit: Include a small “Care Card” with the bag, listing the instructions on how to wash and store it properly. Your recipient will feel like they just received a gift from a high-end artisan boutique.
💎 Advanced Troubleshooting: Expert Solutions
Crochet is an art form that thrives on nuance. Even for experienced makers, the Lily Bag crochet pattern can present minor hurdles. Don’t let these small issues derail your progress—here is how to master the technical side of your project.
- Issue: “My bag is puckering or warping.” If your floral motifs look wavy or uneven, the culprit is almost always “tension drift.” This happens when your grip on the yarn changes over the course of an hour or two.
- The Fix: Check your foundation tension. If the bag still puckers, try going up half a hook size to allow the stitches more room to breathe. Conversely, if the puckering occurs at the border, you may have added too many increases. Double-check your stitch counts against the pattern—every single round matters for symmetry!
- Issue: “The stitches look too loose or gapping.” Large gaps between stitches can ruin the bag’s structural integrity and make it look “homemade.”
- The Fix: Focus on your “yarn-over” technique. Pulling the yarn slightly tighter as you bring the loop through the stitch creates a uniform density. If that doesn’t work, size down your crochet hook by 0.5mm. A tighter hook-to-yarn ratio forces the stitches to sit closer together, creating a beautiful, dense fabric that mimics high-end woven accessories.
- Issue: “The yarn tails are showing after a few uses.” There is nothing more frustrating than seeing a yarn end pop out of your beautiful floral motif!
- The Fix: The “three-inch rule” is your best friend. Always weave your tails in at least three inches in one direction, then change direction and weave back through the base of the previous stitches. For ultimate security, use a tiny drop of clear fabric glue on the final knot before trimming. This locks the fiber into place and ensures your bag remains pristine, even with daily use.
- Issue: “The bag doesn’t hold its shape when filled.” This often happens if you use a fiber with too much “stretch,” like some acrylics.
- The Fix: If you’ve already finished the bag, don’t worry! You can “stiffen” the interior by hand-sewing a simple fabric lining or by applying a light coat of fabric stiffening spray specifically designed for crochet items.
🧼 Care Instructions & Styling: Keep Your Lily Bag Forever
A handmade piece as beautiful as the Lily Bag is an investment. Treat it with the care of an heirloom, and it will reward you with years of style.
The Art of Maintenance
Because the Lily Bag is typically crafted from cotton—a fiber known for its durability but susceptibility to stretching—you must follow these care rules:
- Hand Washing Only: Avoid the washing machine at all costs, even on a “delicate” cycle. Agitation causes cotton to fuzz and lose its structural crispness. Submerge the bag in cool water with a mild, eco-friendly liquid detergent. Gently press (don’t scrub) to release dirt.
- The Drying Technique: Never hang your bag to dry. When wet, the water weight will pull on the fibers, permanently deforming the floral motifs and stretching the straps. Instead, lay your bag flat on a clean, white towel. Roll the towel up like a sleeping bag to gently squeeze out excess water, then unroll it and lay the bag flat on a mesh surface to finish drying.
- Storage: When not in use, keep your bag stuffed with clean tissue paper to maintain its shape. Store it away from direct sunlight, which can fade the vibrant colors of your yarn over time.
Expert Styling Tips
The beauty of the Lily Bag crochet pattern lies in its versatility. It is the ultimate “transitional” accessory.
Evening Sophistication: Choose a version of the Lily Bag made in a solid, neutral color (like cream or black) and pair it with a sleek jumpsuit. The texture of the crochet elevates a simple outfit, proving that handmade bags are truly suitable for any occasion. Tip: Pair your Lily Bag with a crisp white linen dress or high-waisted denim for a timeless, effortless look.
Summer Chic: Style your bag with a crisp, white linen dress, tan leather sandals, and a wide-brimmed straw hat. The floral motifs of the bag will naturally complement the breezy, light textures of summer fabrics.
The Modern Bohemian: Pair the bag with high-waisted denim jeans, a simple ribbed tank top, and an oversized denim jacket. The contrast between the soft floral crochet and the structured denim creates a balanced, edgy, yet feminine look.
The Cottagecore Essential: If you love the vintage-inspired aesthetic, wear the bag with a flowy midi-dress in a soft pastel or a small-print floral pattern. The Lily Bag isn’t just an accessory here—it becomes the focal point of the outfit.
❓ Frequently Asked Questions (FAQ)
For a better user experience and SEO performance, ensure you use the “FAQ Block” in your Gutenberg editor for this section. This allows Google to pull these questions directly into the search results.
- Q: Is the Lily Bag pattern truly beginner-friendly?
- A: Yes! While the bag features intricate floral motifs, the construction relies on foundational stitches like the chain, single crochet, and double crochet. If you have mastered these basic techniques and are comfortable working in the round, you have every skill necessary to complete this project. We recommend it for “ambitious beginners” who want to level up their skills by working on a project that delivers a high-end, professional result.
- Q: How long does the average crafter take to finish a Lily Bag?
- A: On average, you can expect to spend between 6 to 10 hours of active crafting time. This can vary based on your personal speed, your experience with joining motifs, and how many ends you choose to weave in as you go. Many makers treat this as a relaxing “weekend project,” finishing it over two or three comfortable crafting sessions.
- Q: Can I change colors mid-round to get a custom look?
- A: Absolutely! In fact, we encourage it. Changing your yarn color between or even within the floral motifs creates a stunning “wildflower” effect that makes every bag unique. It’s the perfect way to turn the Lily Bag into a “stash-buster,” using up leftover bits of DK weight cotton to create a vibrant, one-of-a-kind accessory that perfectly matches your personal style.
- Q: Will this bag hold its shape with daily use?
- A: Yes, provided you have used the recommended mercerized cotton yarn. Because mercerized cotton has very little “stretch,” it holds its shape beautifully even when carrying a phone, a wallet, and a set of keys. For extra security and longevity, we always suggest adding a simple fabric lining, which provides internal structure and protects the crochet stitches from friction.
- Q: Can I adapt the size of the bag to make it larger?
- A: Definitely. The beauty of this modular pattern is that it is infinitely adaptable. You can increase the number of floral squares in your starting layout to transform the Lily Bag from a dainty handbag into a spacious, everyday market tote. Just remember to adjust your yardage requirements accordingly!
💬 What the Community Says: Maker Testimonials
The Lily Bag crochet pattern has become a staple in the crochet community. Don’t just take our word for it—here is what makers around the world are saying about their experience:
“I’ve made three Lily Bags already! It’s the most rewarding project I’ve tackled this year. The structure is incredible, and I get compliments every single time I wear it out to brunch. It looks so high-end that my friends refuse to believe I made it myself!” > — Sarah D., Verified Maker & Crafting Blogger
“I was honestly intimidated by the floral motifs at first, but this pattern is so clear and logically laid out that I finished my first bag in just four days. The results are professional, crisp, and so sturdy. I’m already planning my next one in a boho-terracotta shade.” > — Elena M., Crochet Enthusiast
“This is officially my new favorite ‘Cottagecore’ project! The pattern is pure perfection. I used a mix of pastel cottons I had in my stash, and it turned out like a meadow in a bag. If you’re on the fence about trying this, just go for it—the process is as fun as the final product!” > — Jessica L., Creative Crafter most rewarding project I’ve tackled this year. The structure is incredible.” – Sarah D., Verified Maker.
🔗 See Also: More Free Crochet Patterns You’ll Love
Now that you have mastered the Lily Bag, why not keep the creative momentum going? Check out these other curated projects from Patterns Here that are perfect for your next crafting session:
- 🧶 How to Turn a Photo Into a Crochet Pattern (Step-by-Step Guide)
- Crochet Easter Patterns: 20 Free Bunny, Basket & Spring Ideas for 2026 🐣 Get ahead of the season with these adorable bunny, basket, and spring-themed designs.
- 🧶 Free Granny Rectangle Pattern – Easy Crochet Tutorial for Modern Projects
- Modern Crochet Vest Patterns – 10 Stylish Free & Paid Designs for 2026
- Free Crochet Balaclava Pattern – The Ultimate Guide to Stylish, Cozy & Trendy Crochet Hoods
Popular Crochet Flower Bag Variations
The lily bag crochet pattern is just one of several beautiful floral bag styles that have become popular in the crochet community. Many of these designs share the same concept: using flower motifs as the foundation of the bag structure.
Here are some popular variations you may come across:
Crochet Lily Bag
The classic lily bag crochet pattern features bold flower motifs that resemble lily petals. This version often uses large, eye-catching flowers that create a sculptural look for the bag.
Crochet Flower Bag Pattern
A broader term used for many designs that incorporate floral crochet motifs. These bags may feature layered petals, granny-style flowers, or textured floral elements.
Daisy Crochet Bag
The crochet daisy bag is another favorite among crocheters. It typically features white petals with a bright yellow center, creating a cheerful and playful handmade accessory.
Flower Granny Square Bag
This design uses flower granny squares joined together to form the body of the bag. It’s a great project for beginners who enjoy working with classic granny square techniques.
Crochet Floral Tote Bag
A crochet floral tote bag is usually larger and designed for everyday use, perfect for shopping, beach trips, or carrying crochet projects.
All of these variations highlight the creativity of crochet flower motifs and show how versatile the crochet flower bag pattern can be.
🏁 Conclusion & Next Steps
The Lily Bag crochet pattern is the perfect way to test your skills and reward yourself with a piece of art. Don’t wait—grab the official pattern and let’s get crafting!
Click here to grab the official PDF pattern for the Lily Bag and start your project today!
Follow Patterns Here on [Pinterest] and [Facebook] for more daily inspiration, free tips, and community showcases!