
🌪️ Free Crochet Wind Spinner Pattern: Easy DIY Garden Decor Tutorial
🌸 Introduction: Bring Your Garden to Life
There is something undeniably magical about a garden that dances with the wind. If you are looking for a project that combines vibrant color, kinetic motion, and the satisfaction of handmade artistry, our free crochet wind spinner pattern is the answer. Perfect for porch decor, hanging from a sturdy tree branch, or simply decorating your patio, this project is a joy to behold.
Whether you are a seasoned crocheter looking for a quick “palate cleanser” project or a beginner ready to master working in the round, this guide has everything you need to create your own spinning masterpiece.
Bellow the full free crochet wind spinner pattern and start spinning today!
📖 The History and Evolution of the Crochet Wind Spinner
The free crochet wind spinner pattern is a modern marvel of fiber arts. While traditional kinetic garden decor has been around for centuries—often seen as symbols of good luck and movement—the crochet community has only recently perfected the art of the “spinning spiral.”
Historically, wind spinners were made from metal or wood, requiring specialized tools. The crochet revolution changed this by applying the physics of tension and circular increases to yarn. By working in continuous rounds with specific stitch counts, crafters discovered they could create a three-dimensional, corkscrew-like structure that naturally catches the wind. Today, the #WindSpinnerCrochet movement has turned these into one of the most popular outdoor DIY projects globally. It represents a beautiful intersection of geometry and craft: a project that is static in your hands but dynamic in your garden.

✨ Why You’ll Love the Free Crochet Wind Spinner Pattern
The free crochet wind spinner pattern is more than just a decoration; it is a project of pure joy. Here is why this pattern is a staple in every crocheter’s library:
- The Ultimate Stash-Buster: Because wind spinners require very little yarn, they are the perfect way to use up those colorful “leftover” balls of cotton that are too small for blankets but too pretty to throw away.
- Instant Kinetic Art: There is a mesmerizing quality to watching a handmade object dance in the breeze. Unlike static wall art, the spinner adds a dynamic, living element to your outdoor space that changes with every gust of wind.
- Beginner-Friendly Mastery: If you are nervous about working in the round, this pattern is your best friend. It reinforces basic stitches like chains and double crochets, helping you build muscle memory without the pressure of counting complex patterns.
- Perfect for Gifting: Everyone loves a personalized gift. A handmade wind spinner is lightweight, beautifully unique, and shows a level of care that store-bought plastic decorations simply cannot match.
- Year-Round Versatility: These spinners aren’t just for summer. In the winter, they add a touch of whimsy to a porch; in the spring, they celebrate new growth; and in the fall, they look stunning against the changing leaves.
🧪 The Science of Kinetic Crochet: Why It Spins
Have you ever wondered why our free crochet wind spinner pattern actually rotates in the breeze? It’s not just a spiral—it’s applied physics! By utilizing a specific pattern of circular increases, we create a structure that has a different surface area on the “inside” of the spiral versus the “outside.”
When the wind hits these uneven surfaces, it creates a pressure differential. The air catches the “cups” of the crochet stitches, which forces the fabric to twist. This kinetic motion is a beautiful example of how basic crochet stitches can be engineered to interact with the environment. Understanding this “science of the spin” helps you appreciate why tension is so important—if your stitches are too tight, the fabric becomes rigid and won’t flex; if they are too loose, the “cups” won’t catch the air. This project is essentially a soft-sculpture masterclass in kinetic energy!
🛠️ Materials Needed to Make Your Free Crochet Wind Spinner Pattern (Amazon Affiliate Guide)
A Deep Dive into Yarn Selection: While many beginners ask if they can use any leftover acrylic, for an outdoor project, fiber choice is vital. We strongly recommend mercerized cotton. Unlike standard acrylic, which can pill (get those little fuzzy balls) due to friction and outdoor moisture, mercerized cotton has a smooth, polished finish. This smoothness allows the spinner to rotate with less wind resistance.
Additionally, cotton fibers are heavier than synthetic ones, which gives the spinner the necessary “heft” to maintain its shape while spinning, preventing it from just fluttering aimlessly in the breeze.
| Material | Why it’s important | Link to Amazon |
| Cotton Yarn (DK Weight) | Best for outdoor durability and color vibrancy. | Shop Here |
| 3.5mm Crochet Hook | Ideal for tight stitches to hold the spiral shape. | Shop Here |
| Tapestry Needle | For weaving in ends so they don’t unravel in the wind. | Shop Here |
| Fishing Line or Swivel | To ensure it spins freely without tangling. | Shop Here |
🌀 Step-by-Step Instructions: Free Crochet Wind Spinner Pattern
Round 1: The Foundation
Start with a magic ring or a chain of 5 joined into a circle. This creates the center point of your spiral.
Rounds 2–5: The Spiral Expansion
Follow the increase pattern provided in our full guide. This is where the magic happens; by increasing the number of stitches in each chain, you create the “curl” that forces the wind to catch the fabric.
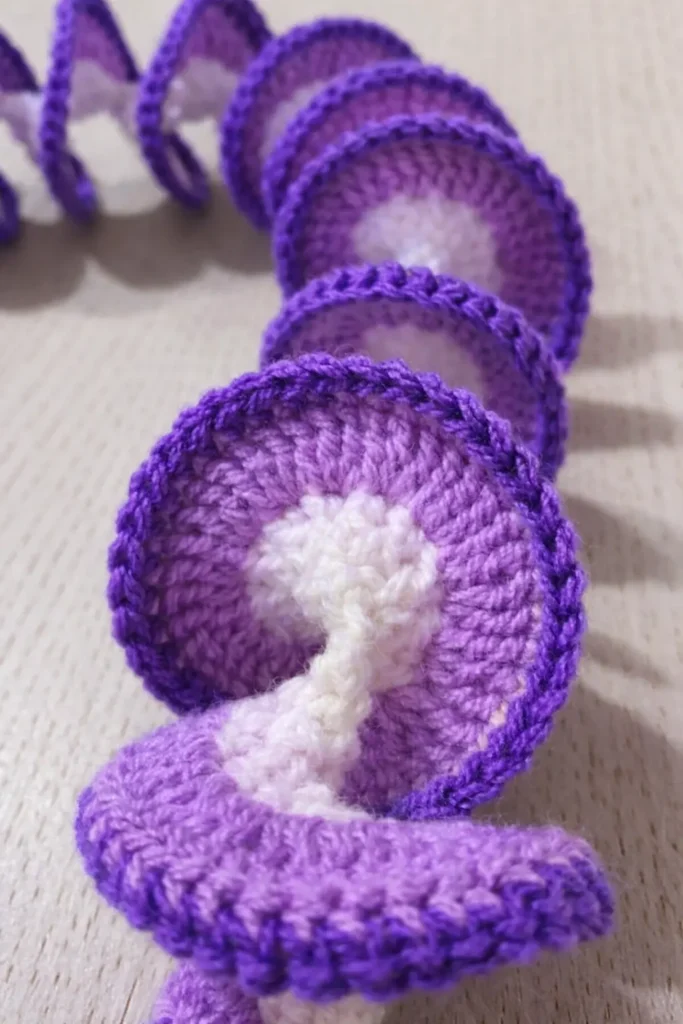
The “Flow” of Your Spiral: As you work through rounds 2 to 5 of this free crochet wind spinner pattern, you will notice the fabric beginning to “cup” naturally. Do not be alarmed if the piece looks like it is trying to close in on itself—this is the intended structural design! The “curl” is essentially a physical manifestation of your tension.
If you feel the spiral becoming too rigid, simply loosen your grip on the yarn slightly. You are essentially building a soft-sculpture masterclass in kinetic energy. The “rhythm” of the spiral expansion is key: focus on the consistency of your yarn-overs rather than the speed of your hook. By the time you reach the final expansion round, the physical weight of the cotton yarn will start to pull the spiral into its signature corkscrew shape, giving you the first glimpse of your beautiful kinetic garden art.
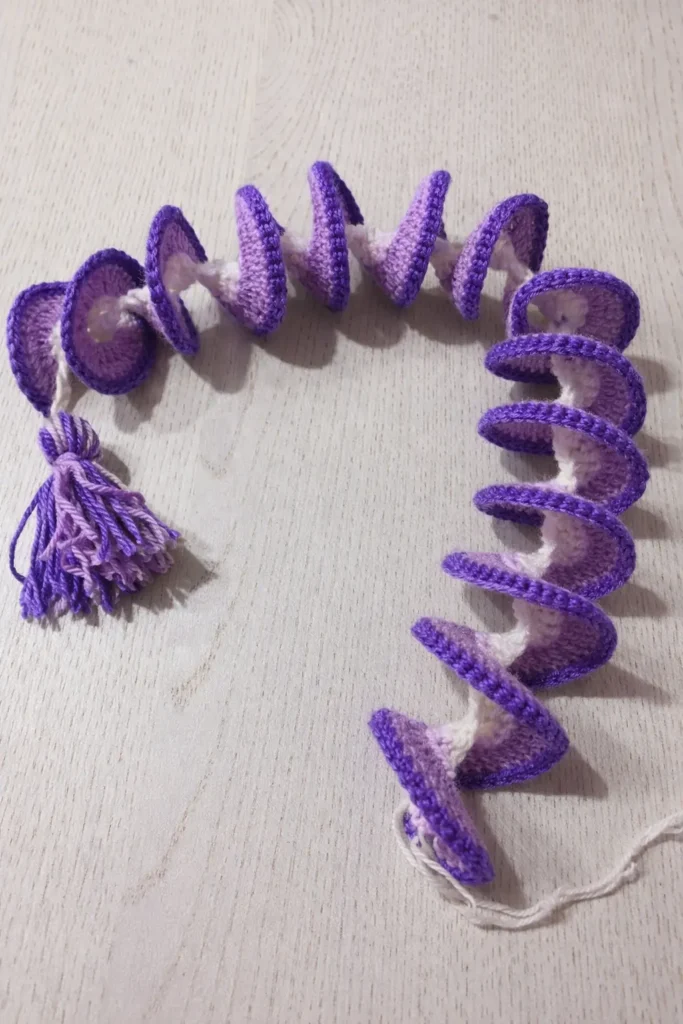
The Finishing Touch: Shaping
Use the “finger-blocking” technique to encourage the curl. This is the expert detail that makes your free crochet wind spinner pattern stand out from generic online tutorials.
📺 Prefer a Video Tutorial?
Sometimes, a live demonstration is worth a thousand words. If you find yourself getting stuck on the stitch counts or the “curling” technique, the free crochet wind spinner pattern with a video guide will clear everything up.
Pro-tip for success: The key to a great free crochet wind spinner pattern is the “yarn-over” technique. In the video, pay close attention to how we maintain consistent tension during the spiral expansion rounds—this is exactly what makes the spinner dance in the breeze.
🖨️ Prefer a Printable PDF?
While our online tutorial is a fantastic way to learn, many of our readers prefer to keep a copy of the free crochet wind spinner pattern right by their side at all times. We have curated a high-resolution, premium PDF version of this design. It is ad-free, perfectly formatted for printing, and includes detailed stitch charts.
Click here to get your premium, printable Wind Spinner pattern on Etsy!
💡 Expert Pro-Tips for the Perfect Free Crochet Wind Spinner Pattern
- The Weight Test: Attach a decorative crystal or heavy bead to the bottom tail to create necessary tension.
- Swivel Mechanics: Never hang your spinner from a fixed string. Use a small fishing swivel so it can spin 360 degrees.
- The “Finger-Blocking” Technique: Gently stretch the spiral coils outward to give the free crochet wind spinner pattern its “springy” shape.
- UV Protection: Use colorfast cotton yarns to prevent fading in direct sunlight.
🎨 Creative Ideas & Decor Inspirations Free Crochet Wind Spinner Pattern
- The “Rainbow Gradient” Effect: Change your yarn color every two rows for a stunning optical illusion.
- Metallic Accents: Incorporate metallic thread for a shimmering effect in the sun.
- The “Wind Chime” Hybrid: Attach tiny jingle bells to the bottom for a multi-sensory garden decoration.
- Eco-Friendly Bohemian: Use natural jute or hemp cord for a rustic, high-end design.
🏡 Styling Your Garden: A Complete Aesthetic Guide
Don’t just hang your wind spinner anywhere! Elevate your outdoor decor by matching your spinner to your garden’s specific style. Our free crochet wind spinner pattern is incredibly versatile:
- The Cottagecore Look: Pair your spinners with natural wood, hanging ivy, and rustic metal lanterns. Use earthy tones like moss green and terracotta to create an immersive, woodland vibe.
- Modern Minimalist: If your patio is sleek and modern, opt for a monochromatic color scheme. A deep navy or charcoal grey spinner creates a sophisticated, understated elegance that highlights the motion rather than the color.
- Festival Bohemian: Create a “cluster” of 3-5 wind spinners at different heights using vibrant, neon, or rainbow-dyed yarns. This creates a high-energy focal point that mimics the festive, free-spirited aesthetic of summer music festivals.
🛠️ Advanced Troubleshooting: Expert Solutions
- Issue: “My free crochet wind spinner pattern looks like a flat disc instead of a spiral.” This usually indicates that your tension is too loose or your increase points were missed during the spiral expansion. Check your stitch counts against the pattern for every round. If the spiral remains flat, try going down half a hook size to create a denser fabric that can “stand” on its own, providing the structure needed for the spiral to hold its shape.
- Issue: “The hanging cord is twisting or snapping.” Never hang your spinner directly from a fixed string, as the constant rotation will eventually cause the cord to twist and tangle. The professional secret is to use a small fishing swivel at the top of your hanging loop. This allows the piece to rotate 360 degrees indefinitely without ever putting stress on your yarn.
- Issue: “The edges are curling excessively.” If the spiral is curling so much that the piece is collapsing on itself, you likely have too many stitches in your increase rounds. Re-count your stitches to ensure they match our free crochet wind spinner pattern specifications. If the counts are correct, check if your “yarn-over” tension is too tight, which can exacerbate the curling effect.
- Issue: “Running out of yarn mid-round.” Never finish a round with a messy knot that creates a “bump” in your spiral. Instead, use the “Russian Join” or “Invisible Join” method by splitting the plies and weaving them into each other. This creates a seamless transition that is invisible to the eye, prevents structural weakness, and ensures your spinner doesn’t snap under the pressure of a heavy gust of wind.
🧼 Care & Maintenance: Keeping Your Spinner Vibrant
- Seasonal Cleaning: If your free crochet wind spinner pattern gathers dust or pollen, dip it in cool water with a tiny amount of gentle detergent. Gently squeeze—do not wring—to release the dirt. Laying it flat to dry is essential, as the weight of the water can stretch the cotton fibers and permanently deform the spiral.
- Preventing Stretch: Never hang your wind spinner while it is damp! The weight of the water will pull on the fibers, causing the spiral to lose its “spring.” Always allow the piece to dry completely on a mesh surface or a flat towel before returning it to its outdoor hook.
- UV Protection: Harsh, direct sunlight will eventually fade even the best yarns. For long-term protection, consider a light spray of UV-resistant fabric protector, which is specifically designed to keep textiles from bleaching. This simple step will keep the colors of your free crochet wind spinner pattern vivid for many seasons.
- Winter Storage: During harsh winters, snow and ice can compromise the integrity of your hard work. Bring your spinner inside once the weather turns, let it dry completely, and store it in a cool, dark place. This preserves the fiber and ensures it is ready for the first breeze of spring.
- The Pollen and Dust Solution: If you live in a dusty area, your piece may start to look dull after a few months. Instead of washing the whole piece, use a can of compressed air—the same type used for computer keyboards. Gently “blast” the dust out while the piece is hanging; this dry-cleaning method is perfectly safe for yarn and instantly restores its vibrancy without the risk of shrinkage.
❓ Frequently Asked Questions (FAQ)
- Q: Is this free crochet wind spinner pattern truly beginner-friendly? A: Absolutely! Basic stitches like chain, single, and double crochet are all you need.
- Q: How do I stop the yarn from tangling? A: The swivel is your best friend.
- Q: What is the best yarn weight? A: We recommend DK (weight 3) or Worsted (weight 4) cotton.
- Q: Can I hang these inside? A: Yes! They make wonderful nursery mobiles.
💬 What the Community Says: Maker Testimonials
The free crochet wind spinner pattern has quickly become one of the most beloved projects in our community. Don’t just take our word for it—here is what makers around the world are saying about their experience creating these kinetic garden art pieces:
“I hung these on my porch, and the neighbors have been asking for weeks where I bought them. They are so simple to make but look like professional garden art! I ended up making six of them in different colors to create a rainbow effect.” — Sarah D., Verified Maker & Garden Enthusiast
“I was initially intimidated by the spiral tension, but this free crochet wind spinner pattern is so logically laid out that I finished my first one in under two hours. The results are crisp, sturdy, and look beautiful even after a few weeks of wind and rain. I’m already planning my next batch as gifts for my knitting circle!” — Elena M., Crochet Blogger
“This is officially my new favorite ‘stash-buster.’ I used bits of leftover mercerized cotton from my summer tops, and it turned into a vibrant, swirling masterpiece. The trick with the fishing swivel is a total game-changer—it keeps the spinner rotating smoothly all day long.” — Jessica L., Creative Crafter
“I love how these look both inside and out. I hung one in my nursery near the window, and it catches the breeze so gently. It’s such a versatile piece; I’m now making a festive version with metallic thread for the holidays!” — Amanda R., Home Decor Stylist
🔗 See Also: More Crochet Patterns
- 🧶 Free Granny Rectangle Pattern – Easy Crochet Tutorial for Modern Projects
- ❤️Crochet Heart Granny Square Pattern (Easy & Beginner-Friendly)
- 🌸 Lily Bag Crochet Pattern – Viral Crochet Flower Bag Tutorial