
Cherry Triangle Scarf Knit: Stunning Free Pattern + Chart Guide 🍒🧣
If you love quick knits with a cute statement detail, this Cherry Triangle Scarf Knit is going to be your new favorite. It’s that trendy triangle scarf shape (easy to style, super wearable), with a sweet cherry motif that makes it feel playful without being “too much.”
This post will walk you through the full process: how to knit the cherry triangle scarf, how to follow the chart you’ll add, finishing details, plus pro tips, care instructions, FAQs, and what knitters typically say when they make this style.
About This Cherry Triangle Scarf Knit Pattern ✨
This is a free knitting pattern for a cherry triangle scarf (bandana-style scarf). You’ll knit from the top center down, increasing to form a triangle. Then you’ll add the cherry design using the chart (the grid chart you’ll attach).
Skill Level
Beginner → Easy Intermediate (because of chart reading and finishing)
Finished Look
- Cherry triangle scarf that ties at the back/side
- Cherry motif placed in the center (or slightly off-center if you prefer)
- Clean edges that look polished in photos
Materials + Amazon Affiliate Picks 🧶
Here are practical supplies that make this cherry triangle scarf cleaner, faster, and more professional.
Yarn (choose one vibe):
- Cotton yarn (best for crisp stitch definition + “bandana scarf” look)
- Mohair yarn (the most usable for that pattern)
- Cotton/bamboo blend (soft + drapey)
- Light DK / Sport (keeps the scarf lightweight and wearable)
Needles (pick based on your yarn label):
- Circular needles (even if it’s not “in the round,” they hold stitches comfortably)
- A common range is 3.5 mm to 4.5 mm, depending on yarn
Tools that help a lot:
- Stitch markers (for center stitch + edges)
- Tapestry needle (weaving ends cleanly)
- Small sharp scissors
- Blocking mats + pins (makes the triangle lay perfect)
- Measuring tape
How the Chart Works 🧩
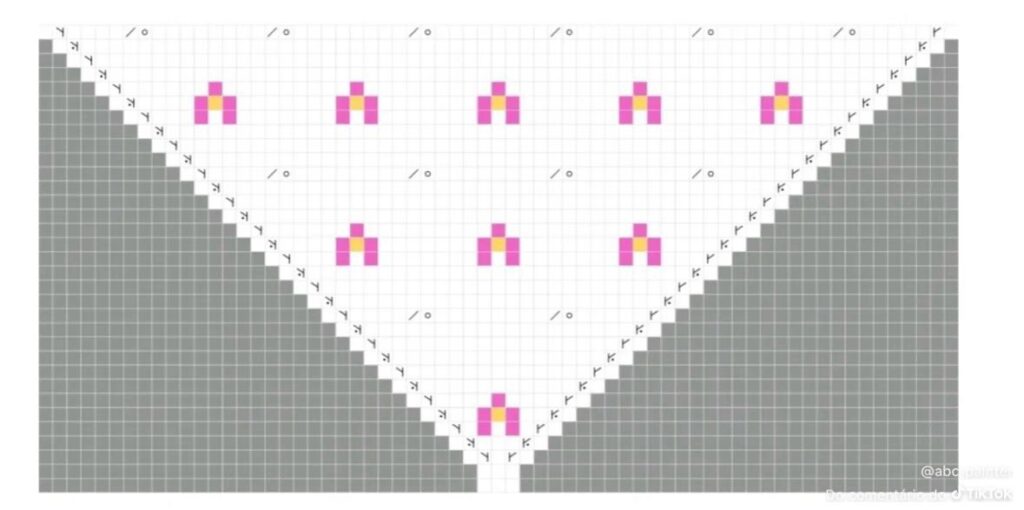
Most knit charts work like this:
- Each little square = one stitch
- You follow the chart from bottom to top
- On the right side rows, you usually read right → left
- On the wrong side rows, you usually read left → right
(unless your chart notes say “RS only,” which is common for motifs)
Common Chart Key Examples (you can adjust to match your chart legend)
- Blank square = knit (stockinette RS)
- Colored square = contrast color (cherry red)
- Green square = leaves/stem
If your chart includes a legend, keep it right under the image in your post.
Step-by-Step: Cherry Triangle Scarf Knit 🍒
1) Cast On (Top Center Start)
Cast on 3 stitches.
Row Setup (Triangle Base Formula)
You’ll increase every right-side row to build the triangle.
Row 1 (RS): Knit all stitches
Row 2 (WS): Purl all stitches (or knit all stitches if you want garter stitch)
Increase Row (Repeat)
On every RS row, do:
- Knit 1
- Increase (M1 or YO)
- Knit to last stitch
- Increase (M1 or YO)
- Knit 1
This creates a clean edge and grows the triangle evenly.
✅ Tip: Place a stitch marker near each edge stitch so you don’t forget to keep the edges consistent.
2) Choose Your Fabric Look
Pick ONE stitch style:
Option A: Moss Stitch (The chosse in the viral video)
- Knit every row
Pros: lays flat, easy, no curling
Option B: Stockinette Stitch (More “clean and modern”)
- RS: knit
- WS: purl
Pros: crisp design, chart looks very clear
Note: stockinette can curl, so blocking matters.
3) When to Start the Cherry Chart
Once your triangle has enough width to fit the motif, start the chart.
A simple rule:
- Start the cherry chart when you can center it and still keep a few stitches on each side for balance.
Centering the Motif
Count your stitches and find the center stitch.
Position the chart so the motif sits centered (or intentionally off-center for a modern look).
✅ Pro tip: Use a removable marker or safety pin at the center stitch so you can quickly align the chart.
4) Knitting the Chart (Motif Section)
There are two common ways charts are used on scarves:
Method 1: Intarsia (Best for a larger solid motif)
- You use separate yarn bobbins for red/green areas
- Twist yarns at color changes to avoid holes
Method 2: Duplicate Stitch (Easiest for beginners)
- Knit the entire scarf in one color
- Then embroider the cherry motif on top using the chart
Pros: super clean, no yarn tangles, perfect for beginners
✅ If your audience is mixed skill-level, you can mention both and say:
“If you’re new to colorwork, duplicate stitch is the simplest way to get a crisp cherry motif.”
5) Finish the Triangle (Size)
Keep increasing until you reach your preferred size.
Typical triangle scarf sizing:
- Small/Classic bandana: ~70–90 cm wingspan
- Bigger statement triangle: ~100–130 cm wingspan
Then finish with a clean edge row.
6) Bind Off (Neat + Stretchy)
Use a bind-off that won’t pull too tight:
- Standard bind-off (works fine if you bind off loosely)
- Or a stretchy bind-off if your edges tend to tighten
7) Weave In Ends + Optional Ties
- Weave in ends on the wrong side using a tapestry needle
- Optional: add i-cord ties or braided ties to secure it
Watch the Video Tutorial to Support You Make the Scarf or Access the PDF Pattern on Etsy here.
🌟 Pro Tips for a Professional Finish for your Cherry Triangle Scarf
- Block it. Always. Blocking turns “homemade” into “boutique.”
- If using stockinette, add a garter border (like 3–5 stitches at each edge) to reduce curling.
- For colorwork: keep floats neat (if stranded) or choose duplicate stitch.
- Use a lifeline before the motif section if you’re nervous—easy to undo safely.
- If your chart has lots of small color switches, duplicate stitch looks cleaner than tangled bobbins.
🧼 Care Instructions of Cherry Triangle Scarf (So It Stays Perfect)
Care depends on yarn fiber. These are safe general guidelines:
If Cotton / Cotton Blend
- Gentle machine wash cold (or hand wash)
- Lay flat to dry
- Light steam block if needed
If Wool / Wool Blend
- Hand wash cold with gentle wool wash
- Do not wring—press water out in a towel
- Lay flat to dry, reshape edges
✅ Storage tip:
- Store folded, not hanging (triangle scarves can stretch on hangers).
💬 What the Knitting Community Usually Says About This Style
Cherry Triangle scarves are popular because:
- They’re fast compared to full-size scarves
- They’re stylish and photograph well (Pinterest-friendly!)
- They work year-round depending on yarn choice
Knitters also love motifs like cherries because they:
- Add a “cute core” vibe without being childish
- Make a simple base pattern feel unique
- Are easy to personalize (different cherry colors, add leaves, add more cherries)
FAQs ❓
1) Is this Cherry Triangle scarf pattern beginner-friendly?
Yes—especially if you do the cherry motif with duplicate stitch. The triangle shape is very beginner-friendly.
2) Do I need circular needles?
Not required, but strongly recommended because the stitch count grows and circulars hold stitches comfortably.
3) My cherry triangle scarf edges look wavy—what do I do?
That’s usually uneven increases or tension. Add edge stitches (knit 1 at each side consistently) and block at the end.
4) My stockinette is curling. Is that normal?
Yes. Add a garter border, or block firmly. Garter stitch base is the easiest fix.
5) Where should I place the cherry motif?
Most people place it near the center area of the triangle so it shows when tied. You can also place it lower for a dramatic look.
6) Can I sell finished items made from this?
Usually yes for finished items, but always respect the original designer’s rules if you’re using a specific published chart.
✅ See Also (Internal Links) 🔗
📌 CTA: Follow Us for More Patterns!
If you enjoyed this Cherry Triangle Scarf Knit, you’ll love the other cozy patterns we share weekly.
👉 Follow us on Pinterest for more chart-based knits and trending accessories.
👉 Join us on Facebook for community tips, pattern drops, and new freebies.