
Crochet Flower Bracelet Pattern Free: Easy and Beautiful Handmade Accessory
A crochet flower bracelet is one of the most charming small projects you can make – delicate floral detail in a wearable, quick-to-finish design. It’s a great pick for beginners who want a fast win, and for experienced crocheters looking to use up leftover yarn.
Many people search for a crochet flower bracelet pattern free because these projects are affordable, portable, and beginner-friendly. Unlike bigger crochet projects that take weeks, this one can be finished in a single evening.
In this guide: materials, basic stitches, step-by-step instructions, sizing ideas, common mistakes, and care tips.
What Is This Pattern?
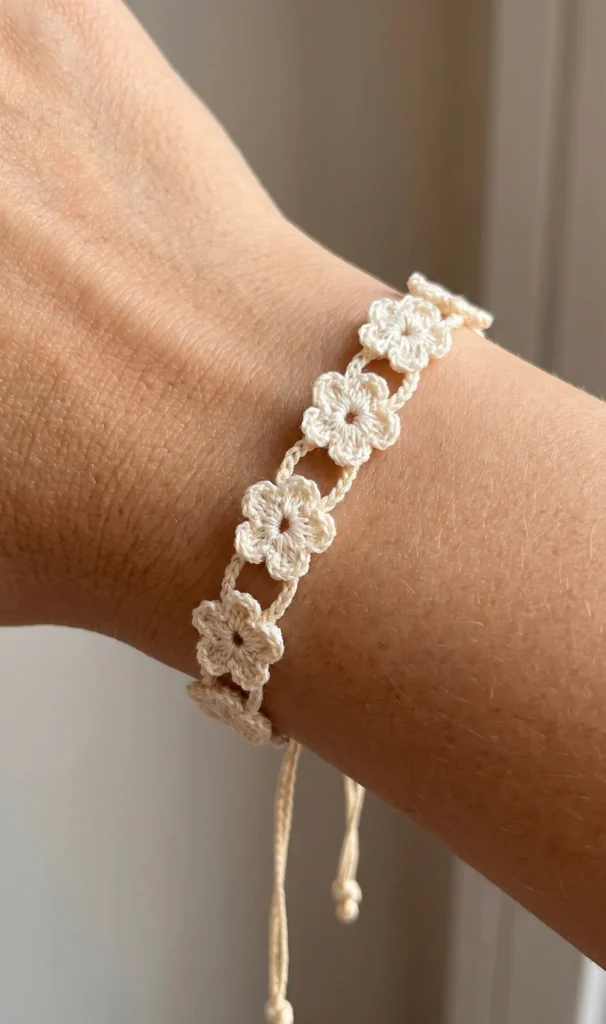
A crochet flower bracelet is a wearable accessory featuring floral motifs connected into a band. Some crocheters make a single flower centerpiece; others connect several flowers in a row like the version in this pattern. You can add beads, buttons, or decorative closures for extra personality.
Because it uses so little yarn, this crochet flower bracelet is also a great stash-buster – a nice small project to practice stitch consistency and finishing techniques before moving on to bigger floral projects.
Materials You’ll Need
Yarn
- Cotton yarn or mercerized cotton (holds shape well and stays comfortable against skin)
- Lightweight acrylic works too, if you want a more budget-friendly option
Hook
Tools
Optional embellishments
Basic Stitches You Should Know
- Chain (ch) – forms the connecting sections between flowers
- Slip stitch (sl st) – joins rounds and connects the return chain to each flower
- Single crochet (sc) – used in the petal sequence
- Half double crochet (hdc) – used in the petal sequence
- Double crochet (dc) and treble crochet (tr) – give the petals their height and rounded shape
- Magic Ring (MR) – starts each flower with a neat, gap-free center
Abbreviations (US Terms)
Check our abbreviations guide complete.
- MR – magic ring
- ch – chain
- sl st – slip stitch
- sc – single crochet
- hdc – half double crochet
- dc – double crochet
- tr – treble crochet
- rep – repeat
Crochet Flower Bracelet – Step by Step
This crochet flower bracelet pattern is worked as one continuous piece. You make all the flowers first while connecting them with the first chain, then work back along the other side to close it up. No sewing required.
Flower Motif
Repeat this for each flower until your crochet flower bracelet reaches the desired length.
Foundation: Make a Magic Ring (MR).
Round 1: Work [1 sc, 1 hdc, 1 dc, 1 tr, 1 dc, 1 hdc, 1 sc] into the MR – that’s your first petal. Repeat this sequence 4 more times for 5 petals total.
Finish the flower: Tighten the MR and join with a sl st into the first sc.
Connecting Chain
Ch 3 (test this length first – see the note below), then without fastening off, form a new Magic Ring with your working yarn and start the next flower.
Repeat the Flower Motif and Connecting Chain until your bracelet reaches the length you want.
Important sizing note: the diamond-shaped gap between each flower is formed by two chains meeting – this connecting chain on one side, and the return chain (below) joining back through the same spot on the other. The total gap is roughly double whatever chain length you pick, not just the single chain on its own. Before committing to a length for the whole bracelet, make 2 flowers connected by your chain and check the spacing. With fine thread, 3-5 chains on each side gives that tight, delicate diamond look – going much longer leaves a noticeably looser, loopier gap.
Return Chain
After your last flower, don’t fasten off. Turn your work.
Chain the same number of stitches you used for your first connecting chain (3-5, matching what you tested above).
Join the return chain to the base of the corresponding petal on each flower with a sl st, then chain again toward the next flower. Repeat this same join across every flower until you reach the first one.
Adjustable Sliding Closure
Fasten off and weave in any remaining ends before assembling the closure.
Prep the straps. Make sure both end straps are about the same length. Tie a small, tight overhand knot at the very end of each chain so the stitches don’t unravel. If using beads, slide one onto each end before knotting.
Overlap. Lay the bracelet in a circle on a flat surface. Overlap the two chain straps so they point in opposite directions.
The sliding bridge. Cut a separate 15cm (6 inch) piece of the same yarn. Position it beneath both straps and tie a simple knot around them.
Square knots. Tie 4-6 square knots around both straps – tight enough to look neat, but loose enough that the straps can still slide through when pulled. Secure the ends with a tapestry needle by weaving them into the bridge. A tiny drop of fabric glue is optional for extra hold.
Prefer a Printable PDF Pattern (Without Ads)?
A PDF version of this crochet flower bracelet pattern gives you a distraction-free copy to keep nearby while you work – no scrolling through a webpage mid-project. Ours also includes close-up step photos for the trickier parts, like joining the return chain to each flower.
-> Get the printable PDF pattern here.
Color Ideas
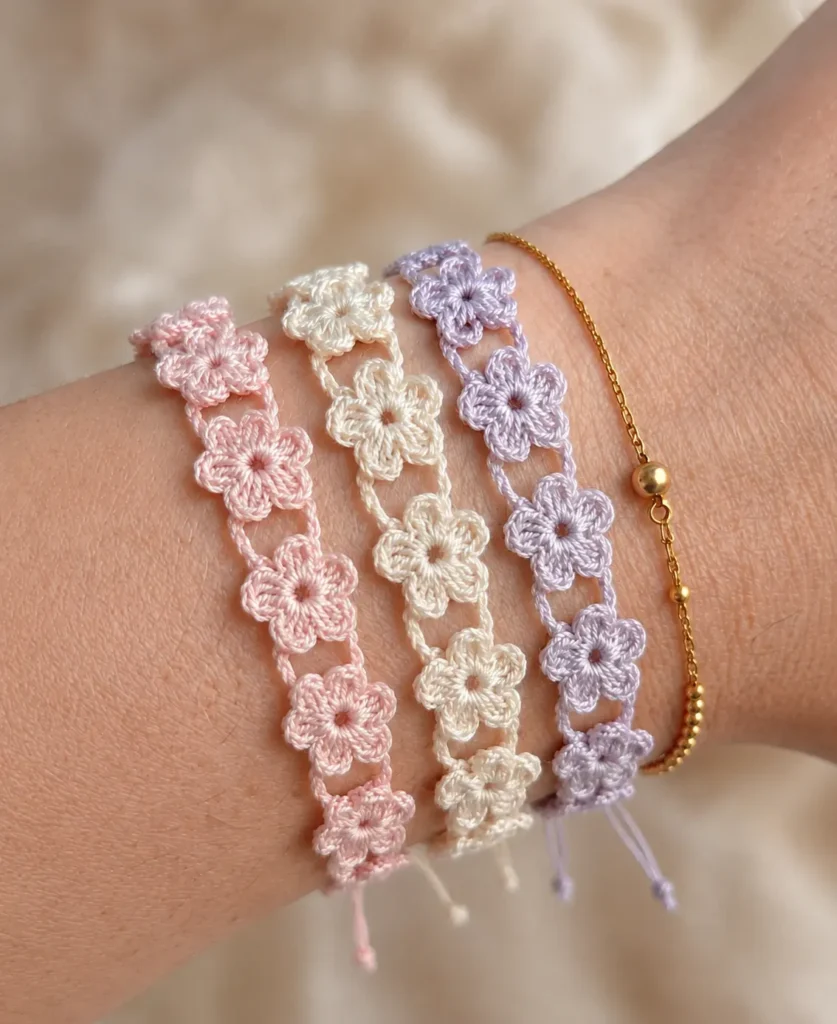
Romantic pastels – soft pink, lavender, mint, and baby blue, with a white flower center for contrast.
Summer brights – yellow, coral, turquoise, and lime green for a cheerful, vacation-ready look.
Elegant neutrals – cream, beige, taupe, and soft gray; add a pearl button to elevate it further.
Size & Project Ideas
Kids’ bracelets – smaller and quick, with an adjustable closure so it fits as they grow.
Matching friendship sets – same pattern, different flower colors, made for a group of friends.
Bridal accessories – ivory or blush yarn with a few pearls added for a jewelry-like finish.
Tips for Better Results
Keep your tension consistent – uneven tension is the most common reason flowers come out looking distorted.
Measure your wrist before finalizing the length. Too tight is uncomfortable; too loose slides off.
Weave in ends securely. Bracelets get a lot of movement, so loose ends work themselves free faster than on other projects.
Common Mistakes to Avoid
Using yarn that’s too thick – bulky yarn loses the delicate look this pattern is known for.
Skipping stitch counts – even small discrepancies show up as uneven petals.
Rushing the finishing – poorly woven ends unravel faster than you’d expect.
Wrong hook size – too large gives loose stitches, too small makes the bracelet stiff.
Care Instructions
Washing: hand wash in cool water with a mild detergent.
Drying: lay flat on a towel and reshape while damp – don’t hang it, since that can stretch the band.
Storage: keep in a small fabric pouch, away from direct sunlight, to prevent snagging.
FAQs
How long does it take to make a crochet flower bracelet? Most crocheters finish one in 1-3 hours, depending on experience and the number of flowers.
Is this project beginner-friendly? Yes – if you know basic stitches, this is a great early accessory project.
What yarn works best? Cotton, especially mercerized cotton, for durability and clean stitch definition.
Can I sell finished bracelets? In most cases yes, but always check the licensing terms of the specific pattern you’re using.
How do I make the bracelet adjustable? The sliding knot closure above handles this – no separate adjustment needed.
Can I add beads? Yes, just make sure they’re secured well and comfortable against the skin.
See Also
- Crochet Abbreviations – Complete Reference Chart
- Magic Circle Crochet – Step-by-Step Guide
- Crochet Scrunchie Pattern Free
- Persian Tiles Crochet Blanket Pattern + Yarn & Hook Tips
- African Flower Granny Square — Free Crochet Pattern (Step-by-Step)
Follow Us
Love crochet inspiration? Follow us on Pinterest and Facebook for free patterns, beginner tutorials, and seasonal project ideas.