
Crochet Wisteria Pattern — Free Garland & Flower Tutorial
Crochet wisteria pattern is one of those projects that looks wildly complicated until you understand what’s actually happening — it’s just chains of increasing size worked along a foundation chain, creating that natural cascading effect. No special stitches, no complicated construction. The spiral happens on its own.
This free crochet wisteria pattern makes the hanging flower strands and the vine leaves separately, then you tie everything together into a garland. The result looks exactly like real wisteria — dense at the top, trailing and airy at the bottom — and it photographs beautifully for home decor, wedding backdrops, and door frames.
Materials
This post contains affiliate links.
| Item | Details |
|---|---|
| Flower yarn | Worsted weight #4 acrylic in purple, lilac, pink, or ombre — approx. 380 yds per skein |
| Leaf yarn | Worsted weight #4 acrylic in green |
| Hook | 4.0mm crochet hook |
| Notions | Tapestry needle, stitch markers, scissors |
| For hanging | Command hooks, Jimmy Hooks, or a wooden dowel |
Color notes: Ombre purple yarn gives the most realistic crochet wisteria pattern effect because the color shifts naturally from deep purple at the base to soft lilac at the tips — exactly like the real flower. Solid lilac, pink, or even white all work beautifully. Check our crochet hook size chart if you’re unsure which hook to use with your yarn.
Finished size: Each crochet wisteria pattern flower strand measures approximately 25–30cm / 10–12 inches in length. Make as many strands as you need for your garland.
Abbreviations (US Terms)
Check our Abbrevations guide.
- ch — chain
- sl st — slip stitch
- sc — single crochet
- hdc — half double crochet
- dc — double crochet
- dc-inc — double crochet increase (2 dc in same stitch)
- st(s) — stitch(es)
UK crocheters: US sc = UK dc, US dc = UK tr.
How This Crochet Wisteria Pattern Works
The crochet wisteria pattern flower strand is worked along a foundation chain. As you work back along the chain, the loop sizes increase — small loops at the top (the narrower part of the flower cluster), larger loops at the bottom (the trailing, fuller part). This creates the natural tapering shape of real wisteria without any complicated shaping.
Each strand curls on itself slightly as you work — this is intentional and creates the dense, clustered look.
The vine and leaves are worked separately and tied to the garland at the end.
Crochet Wisteria Pattern
Make as many strands as desired. For a full door frame garland, plan on 15–25 strands of varying lengths.
Foundation: Ch 60–80. The longer the chain, the longer the finished strand.
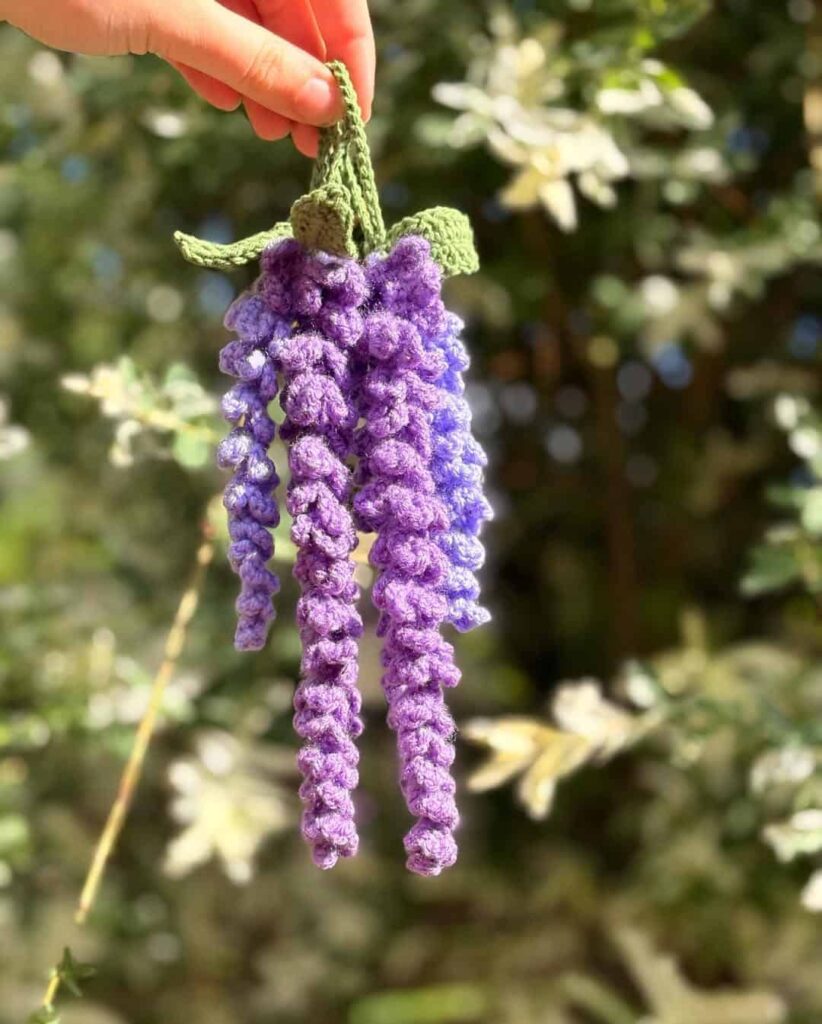
For a shorter, more compact strand (like Image 1): ch 60.
For a longer, more dramatic strand: ch 75–80.
Step 1 — Top of the strand (narrowest section)
Sl st into 4th ch from hook.
[Ch 3, sl st into next ch] — rep 3–6 times.
This creates the tight, narrow top of the flower cluster.
Step 2 — Transition
[Ch 4, sl st into next ch] — rep 5–9 times.
The loops widen slightly — you’ll see the strand starting to fill out.
Step 3 — Upper middle section
[Ch 5, sl st into next ch. Ch 5, sl st into same ch] — rep until desired length.
Now working two loops per chain — this doubles the density and creates the full, layered look.
Step 4 — Middle section
[Ch 6, sl st into next ch. Ch 6, sl st into same ch] — rep until desired length.
Step 5 — Lower middle section
[Ch 7, sl st into next ch. Ch 7, sl st into same ch] — rep 4–5 times.
Step 6 — Lower section
[Ch 7, sc into next ch. Ch 7, sc into same ch] — rep until desired length.
Switching from sl st to sc here adds more structure to the lower section and helps it hang better.
Optional: occasionally work ch 7, sc into the same chain a third time to add extra curl and fill any gaps between loops.
Step 7 — Base (optional, for maximum fullness)
[Ch 8, sc into next ch. Ch 8, sc into same ch] — rep to end of foundation chain.
Add an extra ch 8 loop into the same chain occasionally if you notice gaps.
Fasten off, leaving a 15cm tail on each end for tying to the vine. Tie a secure knot with both tails to hold the strand closed.
Crochet Leaf Pattern
Make leaves individually, then assemble onto the vine.
Ch 8.
Row 1: Sc into 2nd ch from hook, hdc, dc, dc-inc, dc, hdc, sc. (8 sts)
Row 2: Ch 1, turn. Working on the other side of the foundation chain: sc, hdc, dc, dc-inc, dc, hdc, sc. (8 sts)
Finishing: Ch 2, sl st into 2nd ch from hook (creates the leaf tip). Sl st down the center of the leaf along the foundation chain to the base.
Fasten off, leaving a tail for attaching to the vine.
The leaf is symmetrical on both sides with a pointed tip — adjust the dc-inc position if you want a wider or narrower leaf.
Crochet Vine / Foliage Pattern
Starting chain: Ch 5–10 before the first leaf position (this becomes the end of the vine that wraps around your hook or dowel).
Leaf 1: Work [Leaf Pattern]. Ch 7.
Leaf 2 and beyond: [Leaf Pattern], ch 1, [Leaf Pattern], ch 7. Rep until vine reaches desired length.
The ch 1 between pairs creates leaves on opposite sides of the vine — like real foliage.
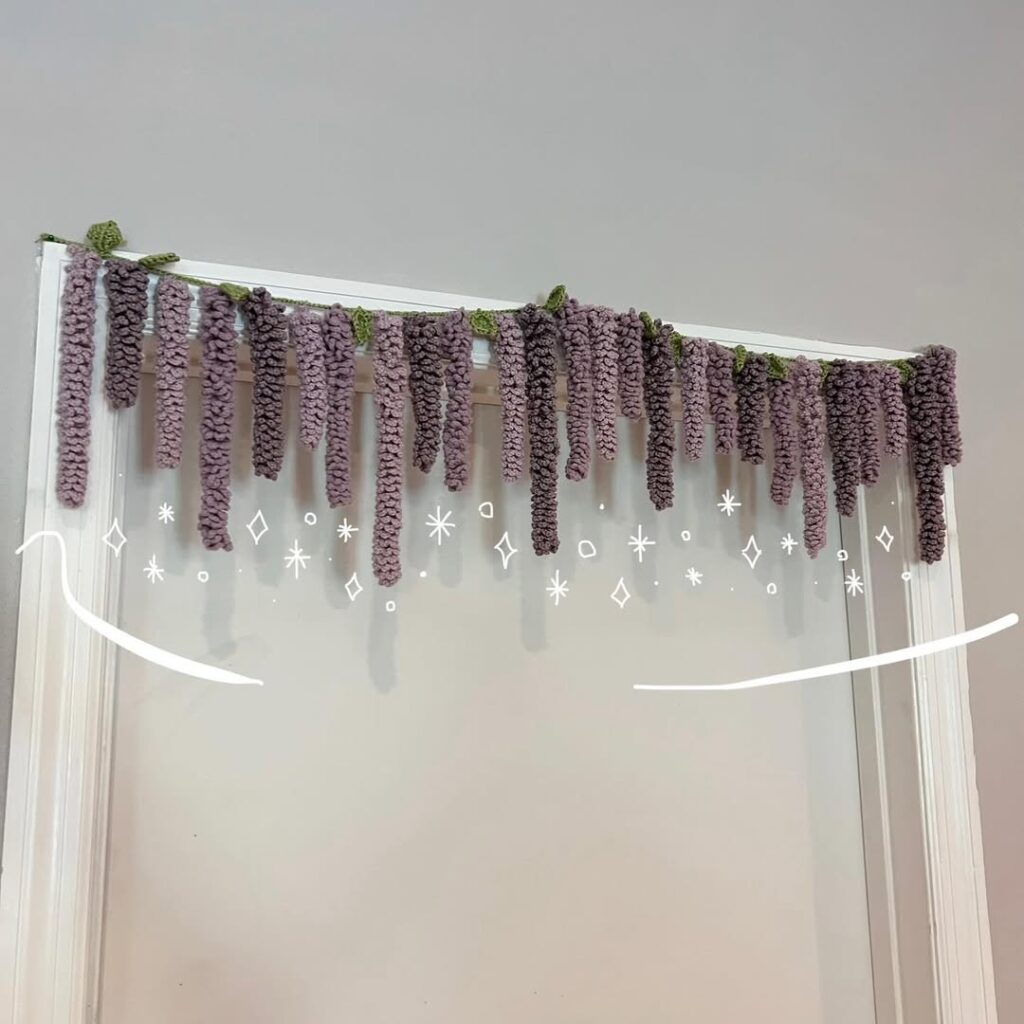
For the return: sl st back down the foundation chain, adding leaves on the opposite side wherever you want more fullness. This creates the branching effect in Image 2.
Fasten off, leaving a long tail at each end for hanging.
Assembly — Making the Garland
Step 1 — Lay out the vine
Stretch the vine to the length of your door frame or wall space. Add smaller secondary vines hanging vertically if you want the layered effect in Image 2.
Step 2 — Attach the flower strands
Choose a position on the vine for each strand. Wrap the tail ends around the vine, tie a double knot, and trim close. Space strands randomly — uneven spacing looks more natural than perfectly uniform placement.
Step 3 — Vary the lengths
Mix shorter strands (ch 60) and longer strands (ch 75–80) for the most realistic garland effect. In Image 2, the varying lengths create that natural cascade.
Step 4 — Hang the garland
Use command hooks or Jimmy Hooks on your door frame. Leave enough tail at each end of the vine to wrap around the hook securely without the garland slipping.
Tips From One Crocheter to Another
Don’t stress about the counts. This crochet wisteria pattern is intentionally flexible — the number of repetitions at each step determines the shape, and slight variations between strands make the garland look more natural, not less. Real wisteria isn’t uniform.
Ombre yarn is worth it here. A single skein of gradient purple handles all the color variation for you without any yarn changes mid-strand. The result looks like the real flower.
Make more strands than you think you need. A full door frame garland uses 20–25 strands. Start by making 5, lay them out to see the density, and adjust before committing to the full count.
The ends curl as you work — don’t fight it. The natural curl is what creates the clustered, flower-like appearance. If yours isn’t curling enough, add extra loops into the same chain in the lower sections.
Leaf placement doesn’t need to be precise. Random spacing and slightly different leaf sizes look better than perfectly even placement. Aim for natural, not perfect.
Color Ideas
Classic wisteria: deep purple at the base fading to soft lilac at the tips — use ombre yarn for this automatically.
White wisteria: cream or white for a modern, elegant look. Pairs beautifully with greenery for weddings.
Pink wisteria: blush to hot pink gradient. Very popular for baby showers and nursery decor.
Pastel mix: different strand colors mixed together in one garland — lilac, blush, and white together look soft and romantic.
Project Ideas
Door frame garland — the classic use. One long horizontal vine with vertical strands hanging down, like Image 2.
Wedding arch — combine multiple vines along an arch structure with fresh or faux greenery.
Wall hanging — attach strands to a wooden dowel for a bohemian wall art piece.
Photo backdrop — hang multiple garlands at varying heights behind a chair or table for event photos.
Gift wrapping accent — attach a single strand to a wrapped gift as a decorative element.
FAQs
How long does one crochet wisteria pattern strand take?
About 20–30 minutes each. A full door frame garland of 20 strands is a weekend project.
How many strands do I need for a garland?
For a standard door frame (approximately 80cm wide): 15–20 strands. For a wider space or denser look, 25–30.
Can I make shorter strands?
Yes — just start with a shorter foundation chain (ch 40–50) and reduce the number of repetitions at each step proportionally.
What yarn weight works best?
Worsted weight (#4) gives the fullest, most substantial look — this is what’s shown in the photos. Fingering weight (#1–2) gives a more delicate, lacy result. Both work.
How do I make it hang straight instead of curling?
Light steam blocking after assembly helps. Pin the strands out straight while damp and let dry completely before hanging.
Can I use this for outdoor decoration?
Acrylic yarn is the best choice for outdoor use — it resists moisture and fading better than cotton. Bring the garland inside during heavy rain to extend its life.
Care Instructions
Store loosely rolled or folded — never compressed, as the loops can flatten permanently. For a quick refresh, lightly mist with water and gently reshape the loops with your fingers. Acrylic yarn doesn’t need washing for decorative use.