
Sun, Moon and Star Granny Square Patterns – Free Written Patterns
Some granny squares are cute, some are classic, and some feel a little bit magical the moment you see them. This Sun, Moon and Star granny square set definitely falls into that last category.
Each square has its own personality — the Sun feels bright and playful, the Moon has that soft dreamy curve, and the Star adds the sweetest celestial touch. They look beautiful on their own, but together they feel like a tiny crochet sky you can turn into something really special.
You could use these for a celestial blanket, a tote bag, a pillow, a cardigan panel, or even just make one favorite square and frame it into a small decorative piece. If you love crochet projects that feel a little whimsical without being overly complicated, this is such a fun set to make. So, grab your free Sun, Moon and Star Granny Square pattern now.
All patterns below use US crochet terminology. If you need help with the terms, take a quick look at our crochet abbreviations guide. And if you are still getting comfortable with ring starts, our Magic Circle guide can help too.
Materials
This post contains affiliate links. As an Amazon Associate I earn from qualifying purchases.
| ITEM | DETAILS |
|---|---|
| Yarn | DK weight yarn in yellow, cream, navy, blue, white, or any colors you love |
| Hook | 3.5mm crochet hook |
| Tapestry Needle | Tapestry needle for weaving in ends and joining squares |
| Stitch Markers | Locking stitch markers for marking corners and the beginning of rounds |
| Scissors | Small yarn scissors |
| Blocking Supplies | Blocking mats and T-pins for shaping the finished squares |
These patterns are very flexible when it comes to color. You can use a classic celestial palette, soft pastels, earthy neutrals, or simply work with the yarn already in your stash. Always check your gauge if you want all three squares to finish at a similar size.
Abbreviations
- MR – Magic ring
- sl st – Slip stitch
- ch – Chain stitch
- sc – Single crochet
- hdc – Half double crochet
- dc – Double crochet
- edc – Extended double crochet
- tr – Treble crochet
- inc – Increase
- dc3tog – Double crochet three together
- tr2tog – Treble crochet two together
- sk – Skip
- BLO – Back loop only
Note: Not every abbreviation is used in every square.
Sun Granny Square Pattern
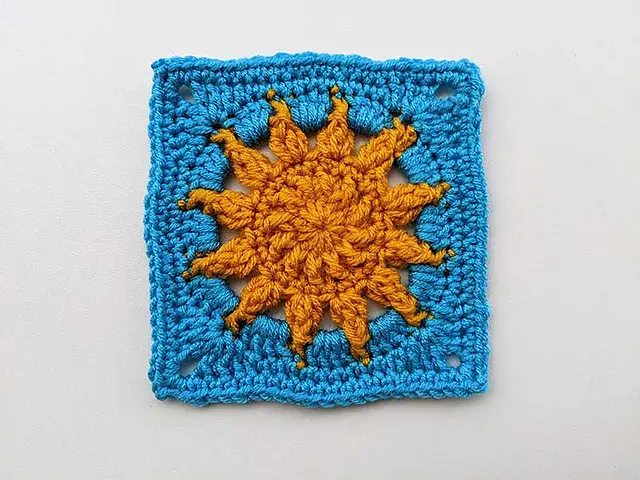
The Sun square has such a cheerful feel to it. The raised center and pointed rays give it lots of texture, and once the last round squares everything off, it starts looking like the kind of granny square you immediately want to repeat in a whole set.
Round 1: MR, ch 3, dc 11 into the ring. Join with sl st. (12 sts)
Round 2: Inc in each stitch around. Join with sl st. (24 sts)
Round 3: Ch 3, [dc3tog, ch 2] repeat 12 times around. Join with sl st. (36)
Round 4: [dc 1 (change color), dc 3 (change color)] repeat 12 times around. Join with sl st. (48 sts)
Round 5: Ch 1, [sc 1, hdc 2, dc 2, tr 1, (tr 2, ch 3, tr 2) in the next dc stitch, tr 1, dc 2, hdc 2] repeat 4 times around. Join with sl st.
Round 6: Ch 1, [sc in next 8 sts, 3 sc in the corner space, sc in next 7 sts] repeat 4 times around. Join with sl st. (72 sts)
If your points curl a little after Round 5, don’t worry — that usually settles beautifully once the square is blocked.
Moon Granny Square Pattern
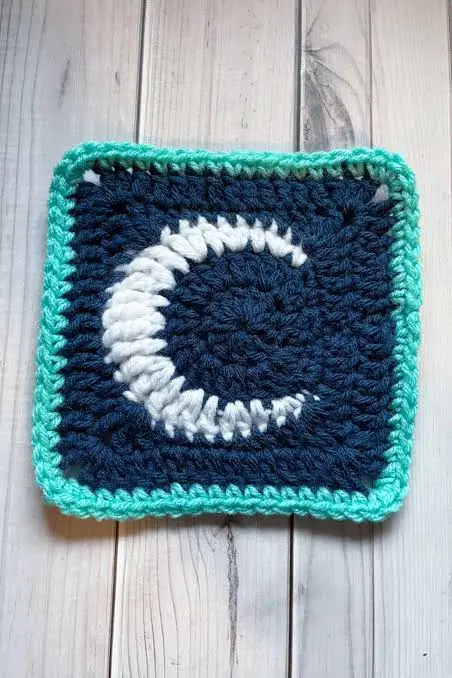
The Moon square is such a pretty one. The crescent shape forms by using different stitch heights across the round, which gives it that smooth curved silhouette. It looks especially lovely in soft yellow, cream, or pale gold against a deeper background.
Round 1: MR, ch 3, dc 17 into the ring. Join with sl st. (18 sts)
Round 2: Sl st, ch 1, sc, hdc 2, (hdc, dc 2), (dc, tr 2), tr 3, tr 3, (tr 2, dc), (dc 2, hdc), hdc 2, sc, sl st.
Round 3: (ch 4, tr, ch 3, tr 2), tr, [dc 5, tr, (tr 2, ch 3, tr 2), tr] repeat 3 times, dc 5, tr.
Round 4: (ch 3, dc, ch 3, dc 2), [dc 11, (dc 2, ch 3, dc 2)] repeat 3 times, dc 11.
Round 5: Ch 1, [3 sc in the corner space, sc in next 15 sts] repeat 4 times around. Join with sl st.
This square really comes to life once the background rounds are finished. Up close, it almost feels like the moon is floating inside the frame.
Star Granny Square Pattern
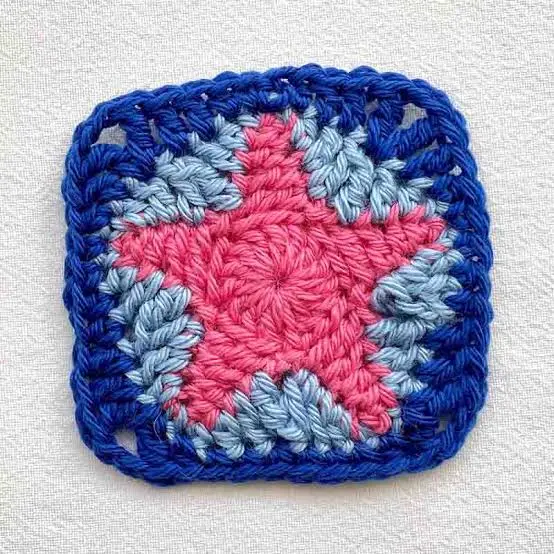
The Star square begins with a five-point star before the outer rounds fill in the spaces and turn everything into a square. It is probably the most playful of the three, and I love how much dimension it gets from the stitch changes and the BLO work.
Round 1: MR, ch 3, dc 14 into the ring. Join with sl st.
Round 2: [ch 5, sc 1, hdc 1, dc 1, tr 1, sk 2, sl st in 3rd st] repeat 5 times around. Fasten off.
Round 3: [sc 1 (change color), BLO hdc 1, BLO dc 1, BLO edc 1, tr2tog, edc 1, dc 1, hdc 1] repeat 5 times around. Join with sl st.
Round 4: Ch 1, hdc 1, sc 3, hdc 1, dc 1, edc 1, (tr 1, ch 2, tr 1) in the same stitch; [edc 1, dc 1, hdc 1, sc 3, hdc 1, dc 1, edc 1, (tr 1, ch 2, tr 1) in the same stitch] repeat 3 more times, edc 1, dc 1. Join with sl st.
Round 5: Ch 1 (change color), [sc 11, (sc, ch 2, sc) in the same stitch] repeat 4 times around. Join with sl st.
If you enjoy squares with a little extra shape and texture, this one is especially satisfying to crochet.
How to Turn These Granny Squares Into a Blanket
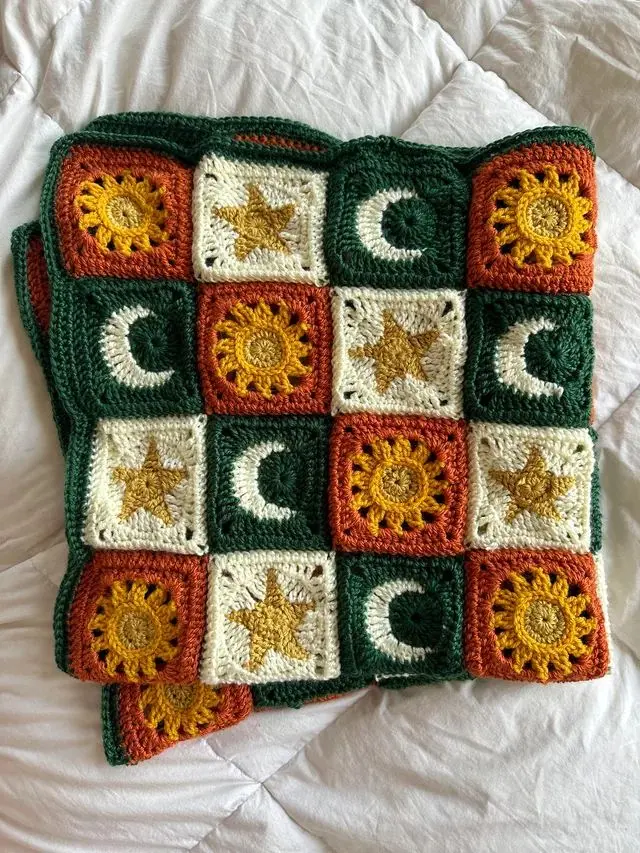
If your first thought was, “I need an entire blanket made from these,” you are definitely not alone. Repeating the Sun, Moon and Star granny squares creates a beautiful patchwork effect, especially when the motifs are surrounded by a few coordinating background colors.
The blanket pictured here can be used as layout inspiration, but it is not the exact blanket pattern for this tutorial. The number of squares, finished dimensions and joining method will depend on your yarn, hook, tension and the size you want your blanket to be.
1. Make One Sample of Each Square First
Before making a whole stack, crochet one Sun, one Moon and one Star square using the same yarn weight and hook. Weave in the ends, block all three, and let them dry completely before comparing them.
This little test saves a lot of frustration later. Even when three patterns are designed as granny squares, differences in stitch height and construction can make one motif finish slightly larger or smaller than the others.
2. Make the Squares the Same Size
Place the blocked squares on top of one another and compare both their measurements and the number of stitches along each side.
If one square is smaller, add a simple border round in your background color. Depending on how much extra size it needs, you can use sc, hdc or dc. Stop once the squares match without stretching.
For the neatest join, every square should finish with the same number of stitches along each side and the same type of corner space. If the counts are different, distribute the necessary increases evenly across the final border round rather than placing them all in one area.
Do not skip this step: the Sun, Moon and Star granny squares motifs are constructed differently, so their final stitch counts should be checked before you begin joining a full blanket.
3. Decide the Blanket Layout
Arrange the finished squares on the floor, a bed or a large table before joining anything. Move them around until the colors and motifs feel balanced.
You can repeat the three designs evenly, or use more of one motif than the others. A simple repeating layout could look like this:
Sun – Moon – Star – Sun
Star – Sun – Moon – Star
Moon – Star – Sun – Moon
There is no rule saying every row needs the same order. In fact, a slightly mixed layout often gives the blanket that collected, handmade feeling that makes granny square projects so special.
Take a quick photo of the final arrangement before moving the squares. It is much easier to check a photo than to remember where every Sun and Moon was supposed to go.
4. Work Out How Many Squares You Need
Measure one finished and blocked square. Then divide your desired blanket width and length by that measurement.
For example, if your finished squares measure 6 inches and you arrange 8 squares across, the motif section will measure approximately 48 inches wide before adding the outer border.
This is only a planning estimate. The joining seam, final blocking and outer border can change the finished measurement slightly, so it is always a good idea to allow a little flexibility.
5. Join the Squares Into Rows
A slip stitch join works well when you want a sturdy blanket with clearly defined squares.
- Place two squares with their right sides facing each other.
- Make sure the corners and corresponding stitches are aligned.
- Attach the joining yarn at the first corner.
- Insert your hook through the outer loop of the next stitch on both squares.
- Work a slip stitch through both layers.
- Continue across the entire side, matching one stitch from each square.
- Fasten off at the opposite corner.
Keep your slip stitches relaxed. Pulling the joining yarn too tightly can make the seam shorter than the squares and cause the blanket to pucker.
Continue adding squares until you have completed the first row. Repeat the same process for every remaining row.
6. Join the Completed Rows
Once each individual row is assembled, lay the rows in their correct order. Place the first two rows with right sides together and slip stitch across the entire length, matching the corners and seams as you go.
At each point where four granny squares meet, pause and check that the corners are sitting directly across from one another. This keeps the grid straight instead of letting the rows slowly shift out of alignment.
Repeat until all of the rows have been joined into one blanket.
7. Add a Simple Blanket Border
A border brings all the different motifs and colors together and gives the blanket a finished edge.
For a simple first border round, attach your yarn in any corner and work sc evenly around the entire blanket. Work 3 sc into each outer corner, then join with a sl st when you return to the beginning.
You can stop after one clean round or continue adding rounds until the border feels balanced with the size of the blanket. A background color used inside the squares is usually the easiest way to make everything feel connected.
8. Block the Finished Blanket
After weaving in the final ends, gently block the complete blanket according to the care instructions for your yarn.
Lay it flat, straighten the outer edges and gently adjust the places where four squares meet. Let it dry completely before folding or using it.
And then comes the best part: finding the Sun, Moon or Star that somehow became your favorite while you were making all of them.
Tips for Blocking and Joining
These Sun, Moon and Star granny squares look much neater once they are blocked, especially the Sun and Star. Blocking helps open the corners, smooth the edges, and make all three squares sit at a more even size if you plan to use them together in one project.
- Block each square separately before joining.
- Use the same hook and yarn weight for all three if you want them to match more closely in size.
- If one square comes out slightly larger, gentle blocking usually fixes it.
- A simple whip stitch or slip stitch join works well for this set.
- If you want a softer finish, join them with a neutral or background color.
Project Ideas for Sun, Moon and Star Granny Squares
One of the nicest things about this set is that it can go in so many different directions. You can keep it small and decorative, or turn it into a larger statement piece.
- A celestial granny square blanket
- A tote bag with one square on each side
- A pillow cover with repeated Sun, Moon and Star granny square blocks
- A cardigan back panel
- A wall hanging or mini banner
- A table runner with joined celestial squares
I also think these would be so pretty mixed with simple solid granny squares in between, especially if you want the celestial motifs to stand out a little more.
Frequently Asked Questions
Can I use worsted weight yarn instead of DK?
Yes, you can. Your finished sun, moon and star granny square will just come out a little larger, and you may want to adjust your hook size to keep the stitches neat and balanced.
Do all three patterns finish as squares?
Yes. Each motif begins as a shaped center and is then worked into a square through the outer rounds.
Can I mix all three in one blanket?
Absolutely. That is probably the prettiest way to use them, especially if you repeat the same background colors to make the set feel cohesive.
Are these beginner-friendly?
I would place them in the adventurous beginner to intermediate range. A confident beginner can definitely try them, but it helps to be comfortable with changing colors, working taller stitches, and reading slightly more decorative pattern shaping.
Do I need to follow the chart?
No — the written instructions are enough to make each square. But if you enjoy visual patterns, the chart can be a really helpful extra reference while you crochet.
Final Thoughts
There is just something so charming about a crochet set like this. The Sun feels bright, the Moon feels calm, and the Star ties everything together (Sun, Moon and Star Granny Square pattern) in the sweetest way. Whether you make just one square or decide to turn all three into a bigger celestial project, this is one of those ideas that feels genuinely fun from start to finish.
If you make them, I would honestly love to know which one becomes your favorite — the Sun, the Moon, or the Star. Mine keeps changing.