
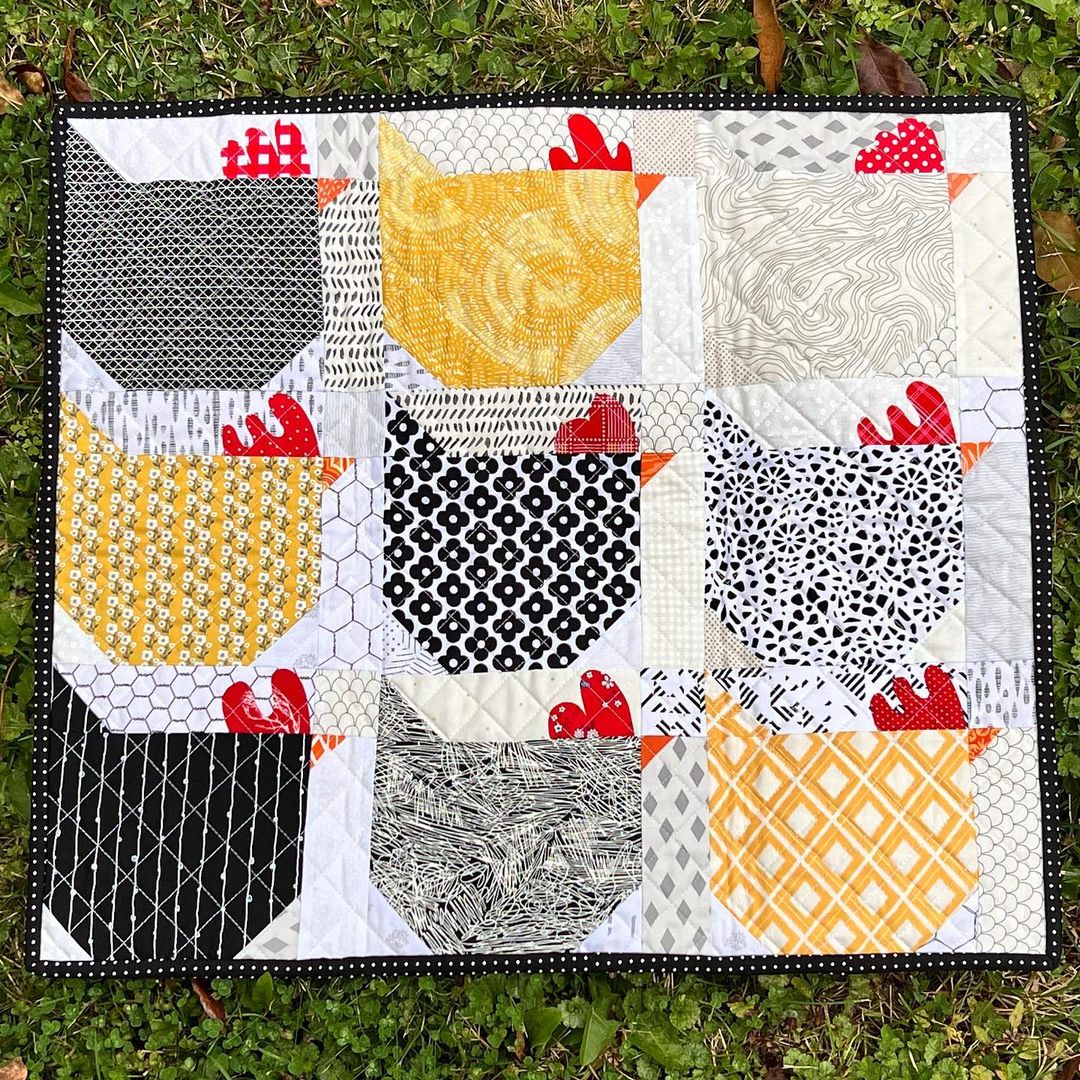
The Funky Chicken Quilt Pattern – Free Tutorial, Size Guide & Creative Ideas
If you love playful, farmhouse-inspired patchwork, The Funky Chicken Quilt Pattern is going to steal your heart. This cheerful quilt features quirky chicken blocks that are perfect for nursery décor, farmhouse kitchens, kids’ rooms, or anyone who collects chicken-themed items. In this complete guide, you’ll find an overview of the block construction, fabric recommendations, layout ideas, quilting suggestions, a printable-style size guide, a handy affiliate shopping list, FAQs, and smart tips to finish like a pro. Whether you’re a confident beginner or a seasoned quilter, The Funky Chicken Quilt Pattern offers a fun way to practice precise piecing while making something that makes everyone smile.
What makes The Funky Chicken Quilt Pattern so popular?
The Funky Chicken Quilt Pattern is block-based, so you build one chicken at a time. Each block typically uses squares, rectangles, and half-square triangles (HSTs) to form the beak, comb, body, and tail. That means it’s easy to batch-sew units and keep your project organized. Makers love it because:
- It’s scrap-friendly — you can raid your stash for colorful bodies, beaks, and combs.
- It’s beginner-friendly — once you sew one block, the rest fly by.
- It’s modular — turn a few blocks into a mini wall hanging or pillow, or make a full throw or bed quilt.
- It’s high-contrast and photogenic — perfect for sharing progress pics and finished quilts.
Pro tip: If you’re brand-new to novelty blocks, sew one “test chicken” first to dial in your cutting accuracy and seam allowance before chain-piecing the full flock.
Materials & fabric planning
Fabrics
- Chicken bodies: bright scraps or fat quarters in prints/solids
- Background: 3–4 yards (white, cream, linen, or light gray to make shapes pop)
- Beak & feet: small orange/yellow scraps
- Comb/wattle: small red scraps
- Binding: ½ yard (check Size Guide for bigger sizes)
- Backing: 3–4 yards for a throw; more for bed sizes
- Batting: throw-size cotton or 80/20 blend
Notions
- 50wt cotton thread, fresh 80/12 or 90/14 needle, pins or clips, seam ripper, fabric marker/chalk.
Color strategy
- Choose high contrast between chicken bodies and background so the silhouette reads clearly.
- Consider a cohesive palette (all blues, farm neutrals, or rainbow flock).
- Low-volume backgrounds (tiny prints on white/cream) add texture without stealing focus.
Tools we recommend (Affiliate picks)
These tools make crisp chickens and a smoother quilting experience:
| Tool / Material | Why it helps | Our pick (affiliate) |
|---|---|---|
| Rotary cutter + self-healing mat | Accurate, fast cutting for small units | Olfa 45mm + Mat |
| 6.5″ square ruler | Trimming HSTs perfectly to size | Creative Grids 6.5” Ruler |
| 24″ x 6″ ruler | Long straight cuts for sashing & borders | Creative Grids 24×6 |
| Wonder Clips | Keep rows aligned while joining | Clover Wonder Clips |
| Cotton batting | Soft drape and easy quilting | Warm & Natural Batting |
Disclosure: As an Amazon Associate, Patterns Here may earn from qualifying purchases at no cost to you.
Cutting & assembly workflow (step-by-step)
- Cut in batches: Pre-cut all squares, rectangles, and HST pairs for your target number of chickens. Label zip bags “Body,” “Beak,” “Comb,” “Tail,” and “Background.”
- Make HSTs first: Use the two-at-a-time method (draw diagonal on the back, sew ¼” on both sides, cut, press, trim). Accurate HSTs = crisp chicken shapes.
- Piece sub-units: Assemble beak + head section; body + wing section; tail units; feet if your block includes them.
- Join sub-units into a block: Square up each finished block. Most layouts are rectangle-oriented blocks; check your chosen block dimensions.
- Add sashing (optional): 1.5″–2.5″ sashing strips between blocks give the flock breathing room and help small inaccuracies disappear.
- Join rows, then add borders: A narrow inner border in red or yellow can echo the comb/beak and tie the palette together.
This flow is repeatable and fast — ideal for chain piecing several chickens in an afternoon.
Access the Complete PDF Pattern here!
Layout ideas for The Funky Chicken Quilt Pattern
- Rainbow Flock: Each chicken in a different color; arrange in ROYGBIV order across rows.
- Farmhouse Neutrals: Bodies in cream/tan/gray with a textured linen background.
- Spotlight Chickens: Use sashing plus cornerstone squares (tiny red/yellow squares) to echo combs and beaks.
- Kitchen set: Make 3–4 blocks for a wall hanging, plus matching pillow covers and table runner using leftover units.
- Story quilt: Alternate chicken blocks with simple patch blocks (e.g., nine-patch or churn dash) for a playful mix.
Quilting ideas (make the flock strut!)
- Crosshatch quilting (1″–1.5″ spacing) creates a sturdy, classic farmhouse texture.
- Echo quilting around chicken silhouettes makes each bird “pop.”
- Diagonal straight lines keep it modern and quick on a domestic machine.
- Free-motion “chicken tracks” (little V-shaped footsteps) add whimsy to borders or sashing.
Size guide (blocks, yardage & binding estimates)
Use this table as a starting point; adjust to your chosen block size and whether you include sashing/borders.
| Quilt Size | Approx. Finished Size | Chicken Blocks | Background Yardage | Binding |
|---|---|---|---|---|
| Wall Hanging | ~24″ x 36″ | 4–6 | ~1.5 yds | ¼ yd |
| Baby | ~40″ x 50″ | 9–12 | ~2.5 yds | ⅓ yd |
| Throw | ~60″ x 70″ | 16–20 | ~3.5–4 yds | ½ yd |
| Twin | ~70″ x 90″ | 25–30 | ~5 yds | ⅝ yd |
| Queen | ~80″ x 90″ | 30–36 | ~6 yds | ¾ yd |
Tip: If you’re short on background yardage, add scrappy sashing or a piano-key border from leftover chicken fabrics.
Pressing, accuracy & finishing tips
- Press seams consistently (to the dark or open). Open seams often help small pieces lay flatter.
- Trim blocks after assembly so every chicken measures identically.
- Starch lightly before piecing for sharper points and stable bias edges.
- Use a design wall (or a sheet on the wall) to preview color placement across the flock.
- Baste well (pins or spray) so quilting lines stay straight across sashing seams.
These small details turn The Funky Chicken Quilt Pattern into a crisp, professional finish.
Care & washing
- Pre-wash dark reds used for comb/wattle if you’re pairing with white backgrounds.
- Wash finished quilt cold, gentle; add color catchers the first 1–2 washes.
- Tumble low or air dry flat; press lightly after drying to reset seams.
Another Ideas
- Try bold geometrics after this: Colorbrick Quilt Pattern
- Love star blocks? Starburst Quilt Pattern
- Practice skills with building blocks: Quilt Patterns – Free Ideas, Tutorials & Modern Designs
- Prefer another models? 15 Jelly Roll Quilt Patterns You Can Sew This Weekend (Free & Modern Ideas)
Interlinking spreads topical authority and helps Google understand how The Funky Chicken Quilt Pattern connects to your broader quilting content.
Trusted external resources (learn & explore)
- AllPeopleQuilt – Free Quilt Patterns: great for block inspiration and seasonal ideas.
https://www.allpeoplequilt.com/quilt-patterns - QuiltersCache – Quilt Block Library: lookup alternative block math and HST techniques.
https://www.quilterscache.com/ - Riley Blake Designs – Free Projects: colorful inspiration and precut-friendly projects.
https://www.rileyblakedesigns.com/free-projects/ - Robert Kaufman – Fabric Calculators & Patterns: yardage planners and downloadable patterns.
https://www.robertkaufman.com/quilting/quilts_patterns/
Adding a few authoritative external links signals quality and helps readers go even deeper.
FAQs – Everything about The Funky Chicken Quilt Pattern
1) Is The Funky Chicken Quilt Pattern beginner-friendly?
Yes. If you can sew an accurate ¼” seam and make simple HSTs, you can complete this quilt. Start with a small wall hanging to practice, then move to a throw.
2) What block size should I use?
Common chicken blocks range from 8″ to 12″ finished. Larger blocks are more forgiving and faster; smaller blocks look extra cute but require more precision.
3) Do I need sashing?
No, but sashing gives each chicken space and keeps the top visually tidy. If your blocks vary slightly in size, sashing helps mask small differences.
4) Can I make The Funky Chicken Quilt Pattern with precuts?
Absolutely. Fat quarters and charm packs are perfect for bodies, beaks, and combs. Add background yardage and you’re set.
5) What quilting design is fastest for a throw?
Straight-line or crosshatch quilting is quick, sturdy, and farmhouse-friendly. Echo quilting around chicken shapes is a fun extra if you have time.
6) How many times should the keyword appear for SEO?
Use The Funky Chicken Quilt Pattern naturally throughout your post — in the H1, intro, a few headings, and several paragraphs. Avoid stuffing; keep it reader-first.
Join the Patterns Here community
If this guide to The Funky Chicken Quilt Pattern inspired you, don’t miss future tutorials and free patterns:
- Follow us on Facebook: https://facebook.com/patternshere
- Pin this quilt on Pinterest so you can find it later and share with quilting friends.
- Subscribe to our newsletter: get weekly free quilt patterns, fabric tips, and seasonal projects.
We’d love to feature your makes! Post your finish and tag @patternshere so we can cheer you on.